
Create custom flow and trigger point in Salesforce [Landing Page & Dataroom]
Sandbox setup
1. Object and Apex creation
After installing the Salesforce (Invite to Landing Page and Dataroom) integration, the following objects are automatically created in your Salesforce sandbox:
- Named Credential:
- Label:
[DataroomName](the name of the Data Room instance selected during configuration) - URL: The URL of the "Invite Contact to Dataroom" flow, found in the Trigger details of the integration instance
- Authentication:
- External Credential:
Credential: [DataroomName](as described below)
- External Credential:
- Label:
- External Credential:
- Label:
Credential: [DataroomName] - Name:
AnduinSFDCCredential_[InstanceId] - Authentication Protocol:
Custom - Related Named Credentials: includes the Named Credential created above
- Custom Header:
- Name:
Api-Key - Value: The API key of the "Invite Contact to Dataroom" flow
- Name:
- Label:
- Apex Class:
AnduinLPDRInvitationV2- Shared across all instances of this integration (not per-instance) — every deploy first deletes any existing
AnduinLPDRInvitation/AnduinLPDRInvitationV2/...Testclasses, then recreates them, so the class is always running fresh source rather than silently skipping on a stale version. - Invocable method
invite:- Takes a
recordId, anamedCredentialName, and a list of selected LP-DR-Group rows (selections) - Securely POSTs
{recordId, selections: [{lpId, drId, groupId}, ...]}to the endpoint configured in the pre-populated Named Credential / External Credential above
- Takes a
- Shared across all instances of this integration (not per-instance) — every deploy first deletes any existing
- Apex Test Class:
AnduinLPDRInvitationV2Test— unit tests for the Apex Class, so it's ready to deploy to Production.
2. Configure Permissions
To grant your Salesforce users permission to create invitations on Anduin, follow these steps. Permissions can be granted through Salesforce Profiles or Permission Sets.
Grant Permission via Profile:
- Navigate to Profiles:
- In Salesforce, go to Setup > Administration > Users > Profiles
- Select Profile:
- Choose the profile (e.g., "Standard User") to which you intend to grant permission.
- Edit Permissions:
- Under the Apps section, select External Credential Principal Access
- Click Edit next to it.
- Assign External Credential:
- In the External Credential Principal Access table, select the External Credential of the integration flow
- Click Save
- Verify Assigned Users:
- To see the users granted this permission, click the Assigned Users button on the Profile overview page.
3. Create a Screen Flow to Trigger the Invitation on Anduin
This section walks through the actual Screen Flow built for this integration — a 3-stage cascading picker (Landing Page → Data Room → Group), each stage narrowed by the previous selection, before sending one combined invitation request to Anduin.
Although you may have multiple Data Rooms on Anduin (and thus multiple instances of this integration), you build this Screen Flow only once — it works with all integration instances automatically.
Steps to Create the Screen Flow
-
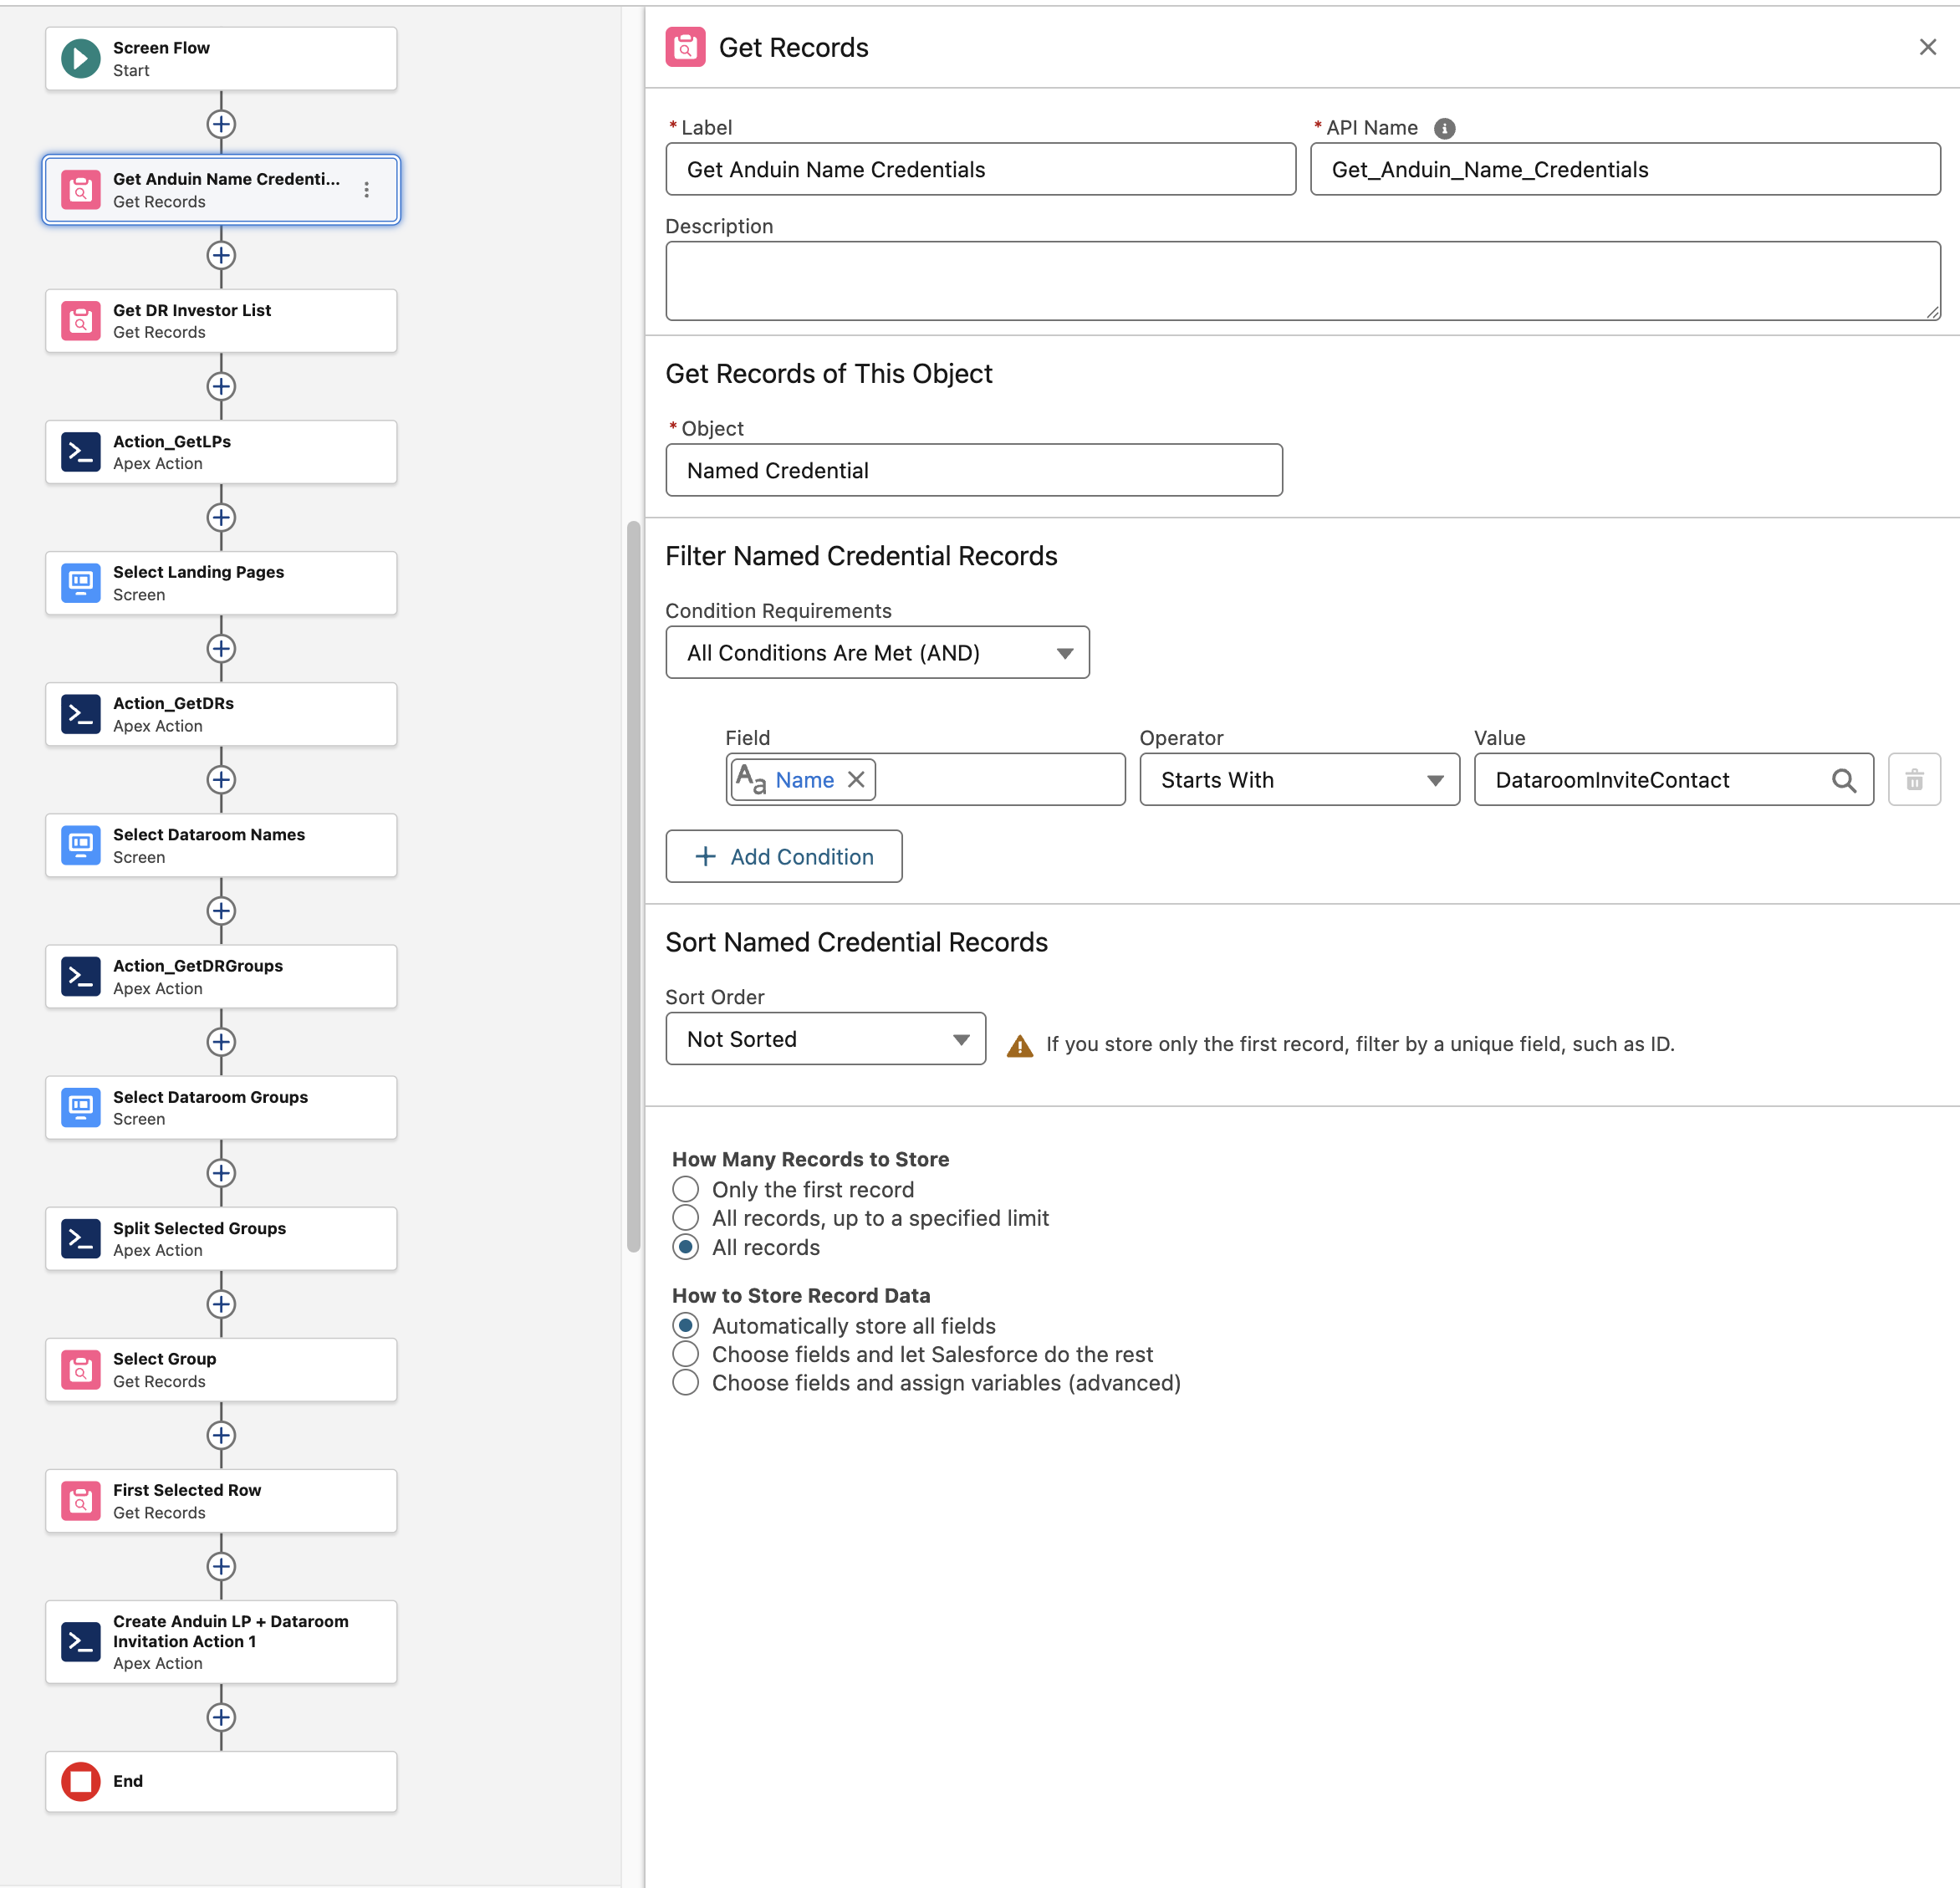
Get Anduin Name Credentials (Get Records)
This element retrieves all Named Credentials created by the integration for this flow, filtered to those beginning with
DataroomInviteContact. Unlike the original Dataroom-only flow, this output is not turned into a user-facing picklist here — the correct Named Credential to invoke is instead resolved automatically later, from the Anduin alias carried on the investor's selected Group record (see step 14). Its output does not currently appear to feed any other element in this flow — worth confirming with the Anduin team whether it's still needed.- Object:
Named Credential - Filter:
NameStarts WithDataroomInviteContact - Store: All records
- Object:
-
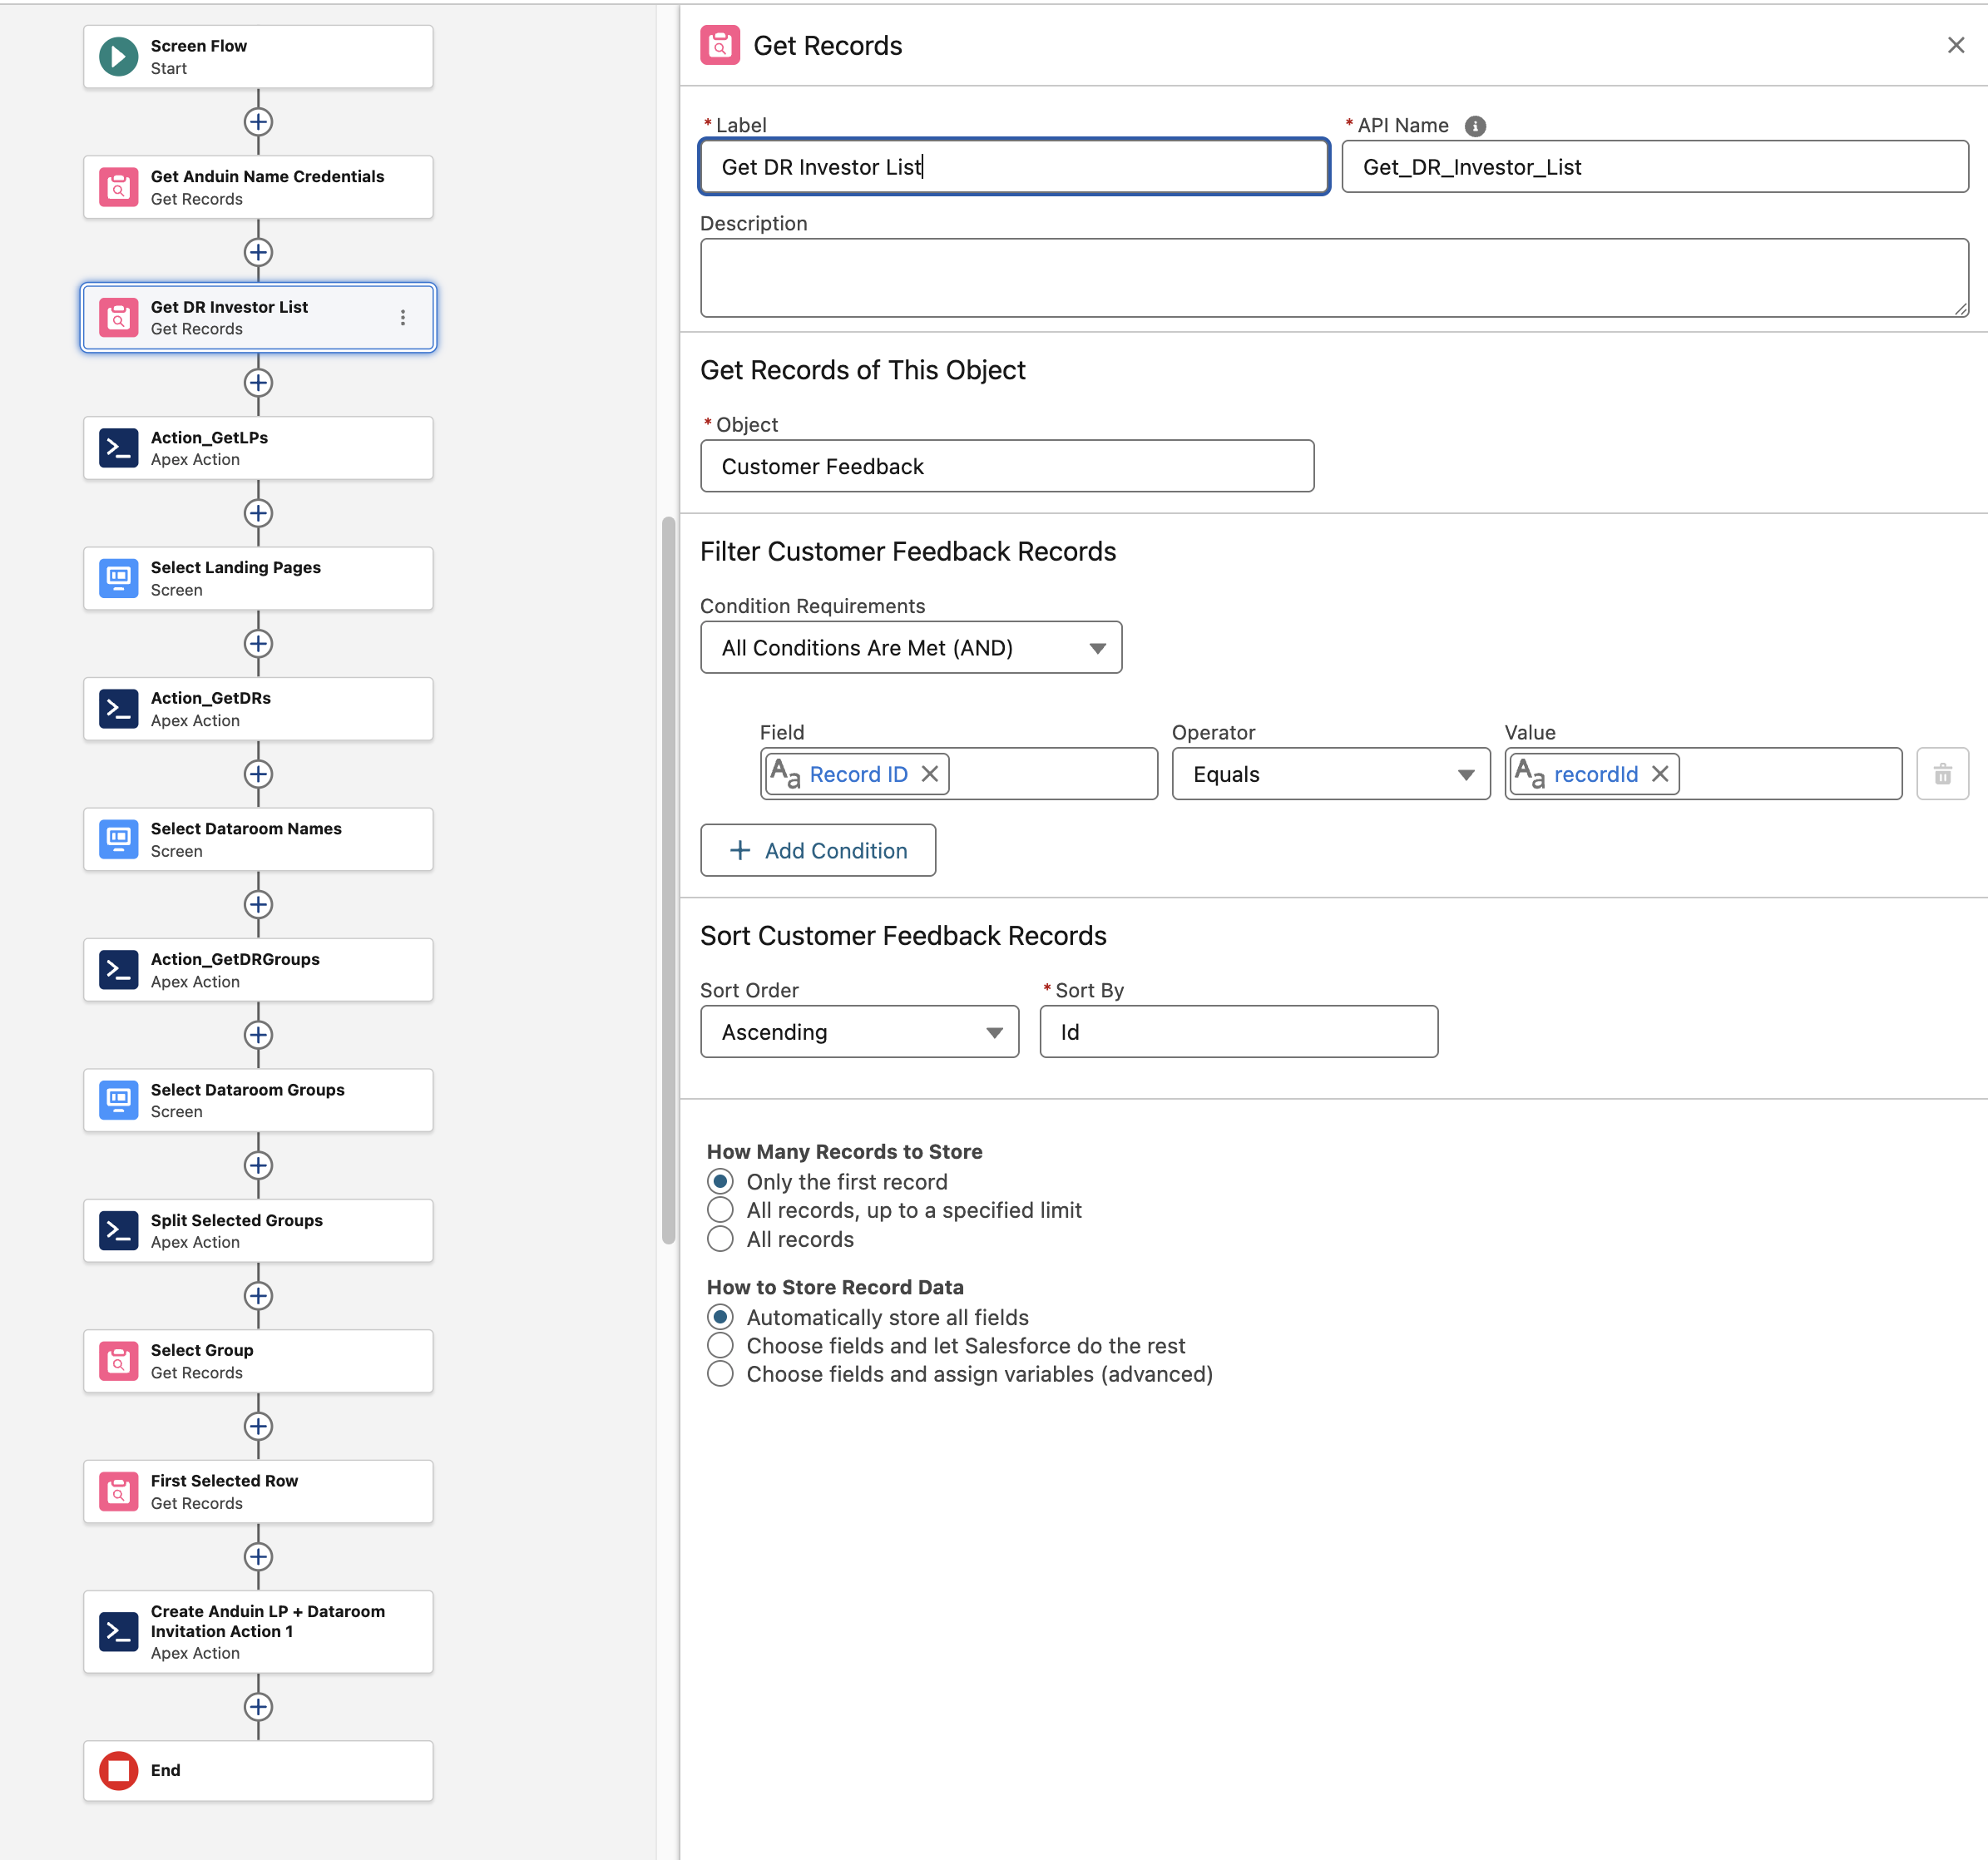
Get DR Investor List (Get Records)
This element retrieves the investor record that triggered this flow, using the
recordIdpassed in. We'll use its fields later to extract the investor's email, first name, and last name when creating or matching their contact in Anduin.- Object: the Salesforce object you prepared to hold investor data (e.g. a custom object, or standard object like Contact) — filtered where
Record IDEquals therecordIdvariable passed into the flow - Store: only the first record
- Object: the Salesforce object you prepared to hold investor data (e.g. a custom object, or standard object like Contact) — filtered where
-
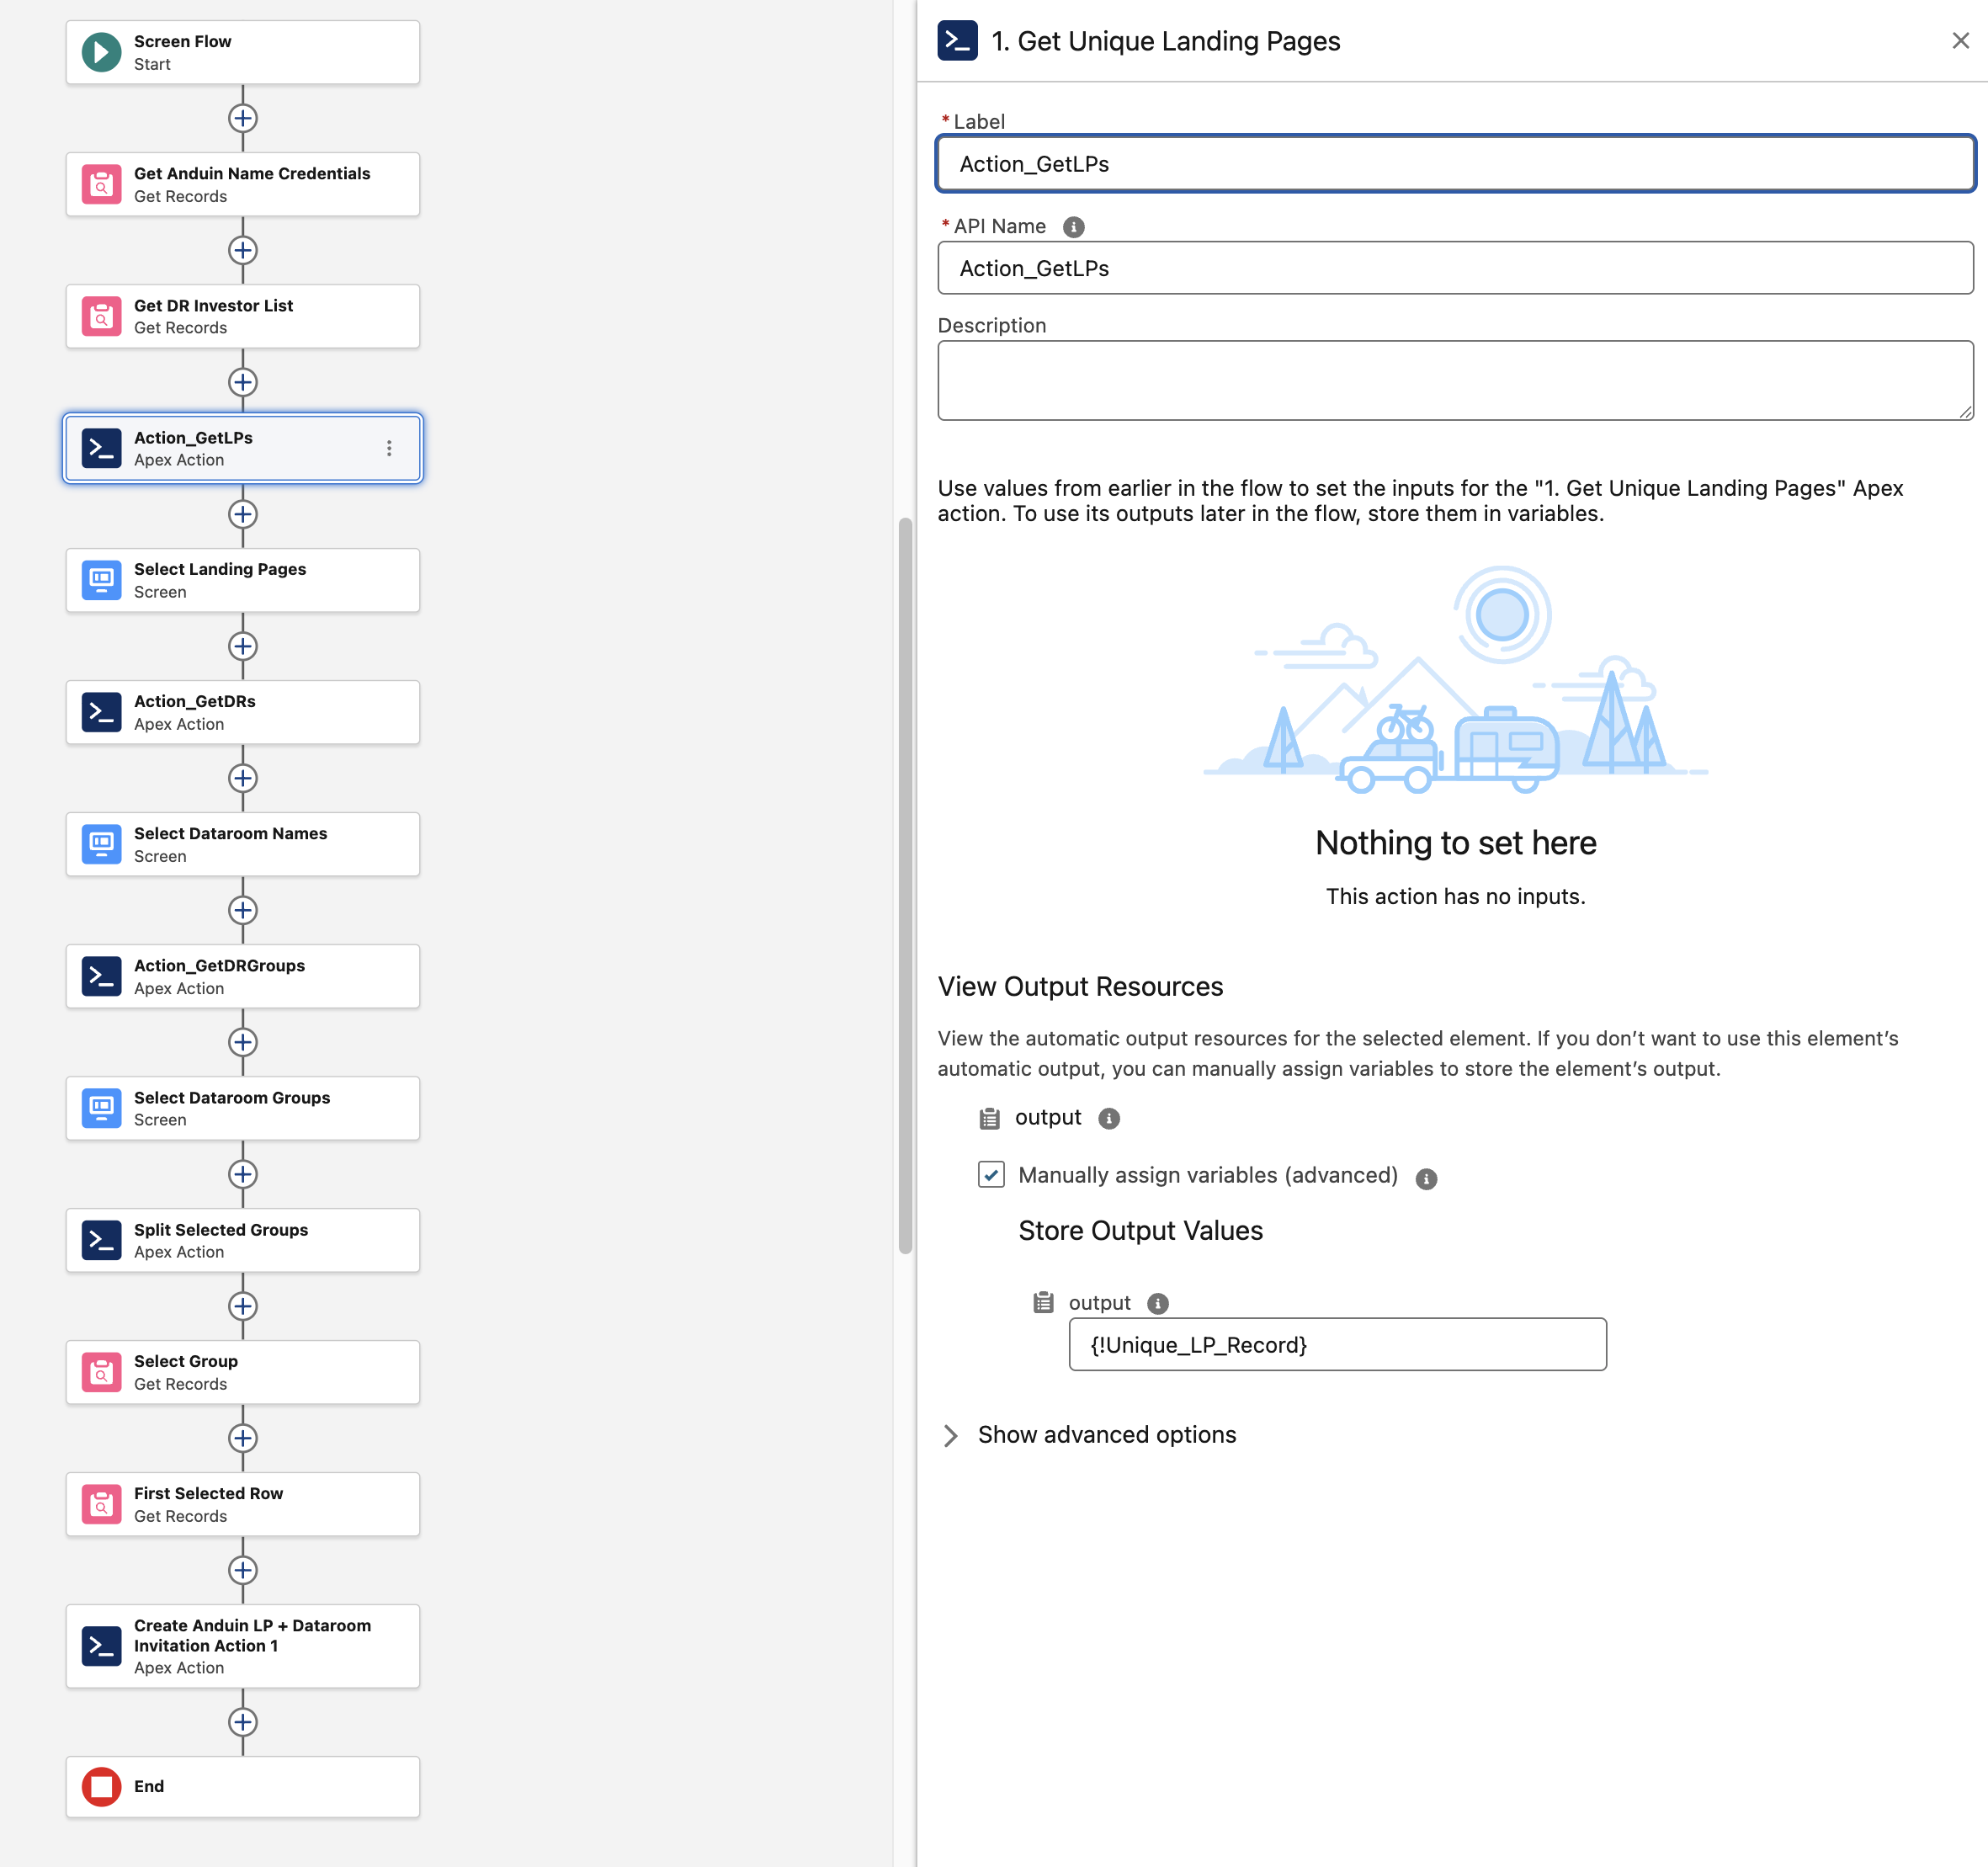
Get Unique Landing Pages (Apex Action, labeled
Action_GetLPs)This Apex action retrieves every unique Landing Page linked to the Data Rooms this integration can access. The output of this component is a collection of Landing Page records, which we'll use to create the picklist on the next screen so users can select which Landing Page(s) they wish to invite their investor to.
- No inputs — this action has none to set
- Output stored in
{!Unique_LP_Record}
-
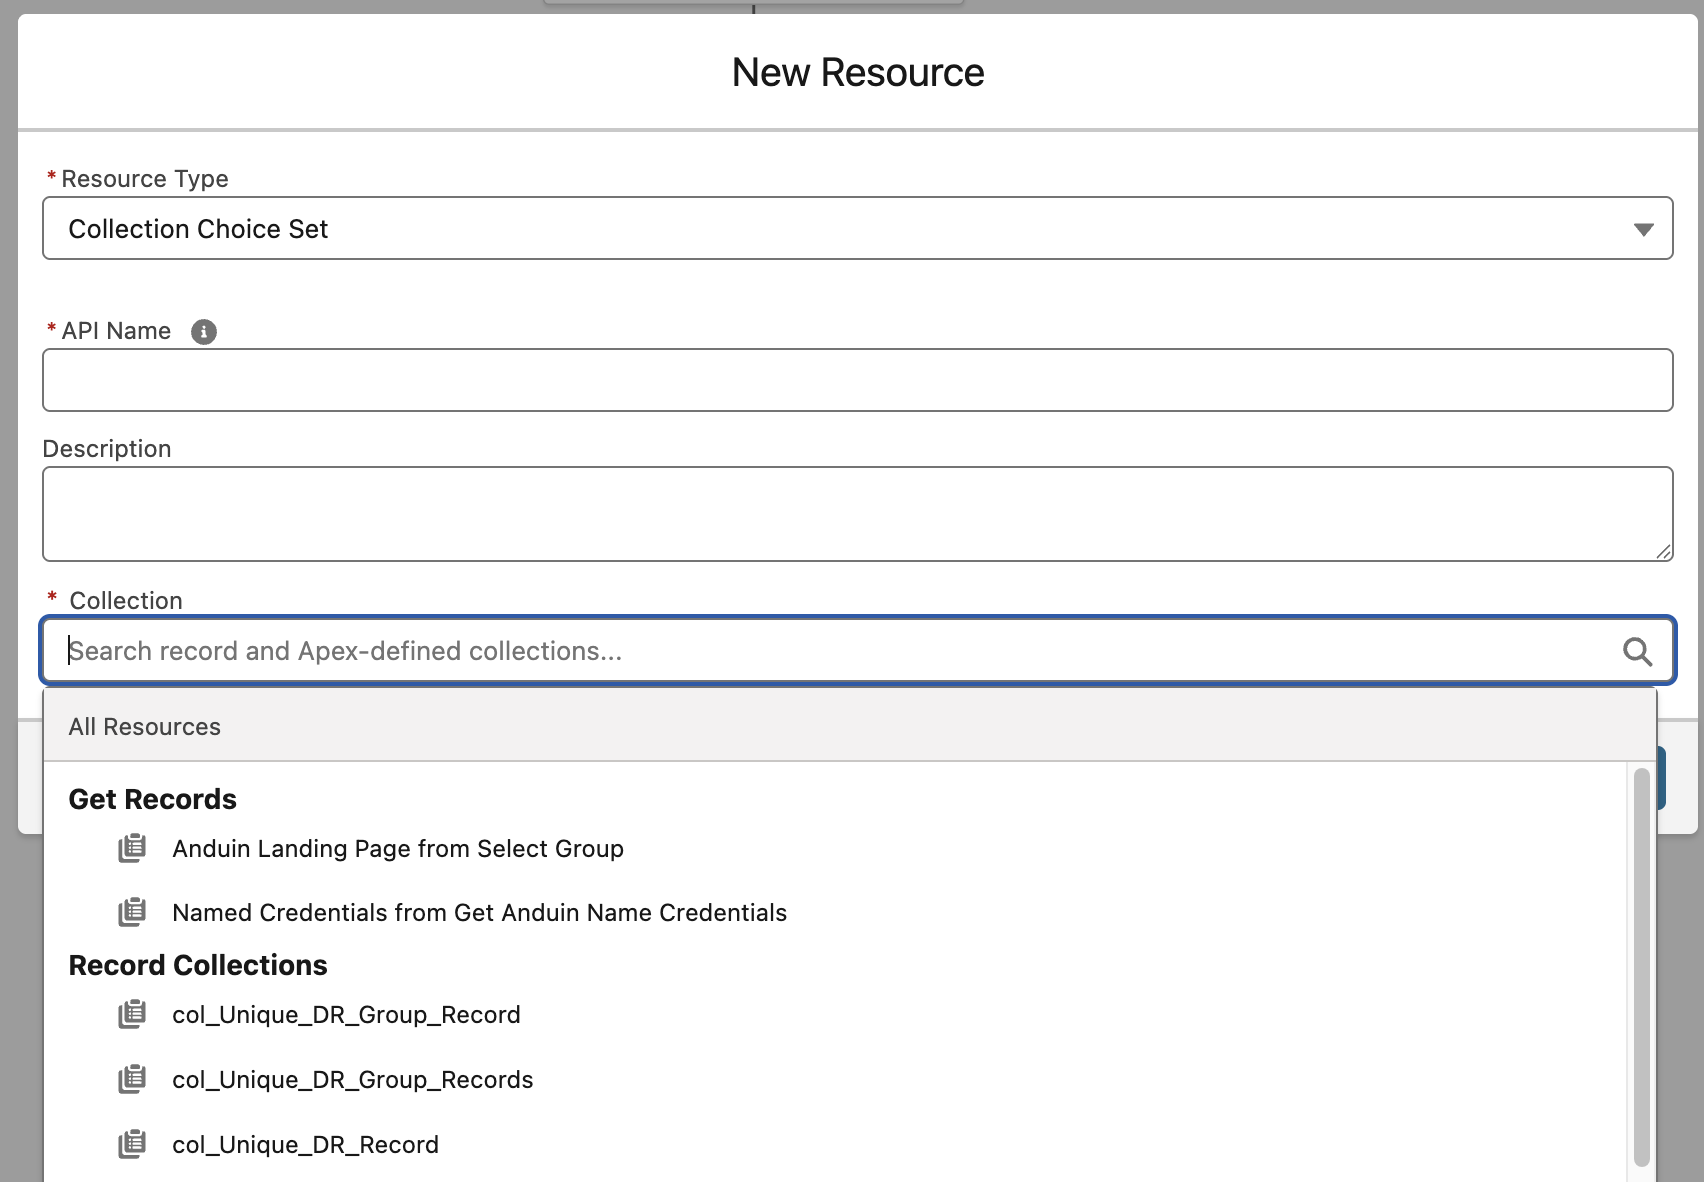
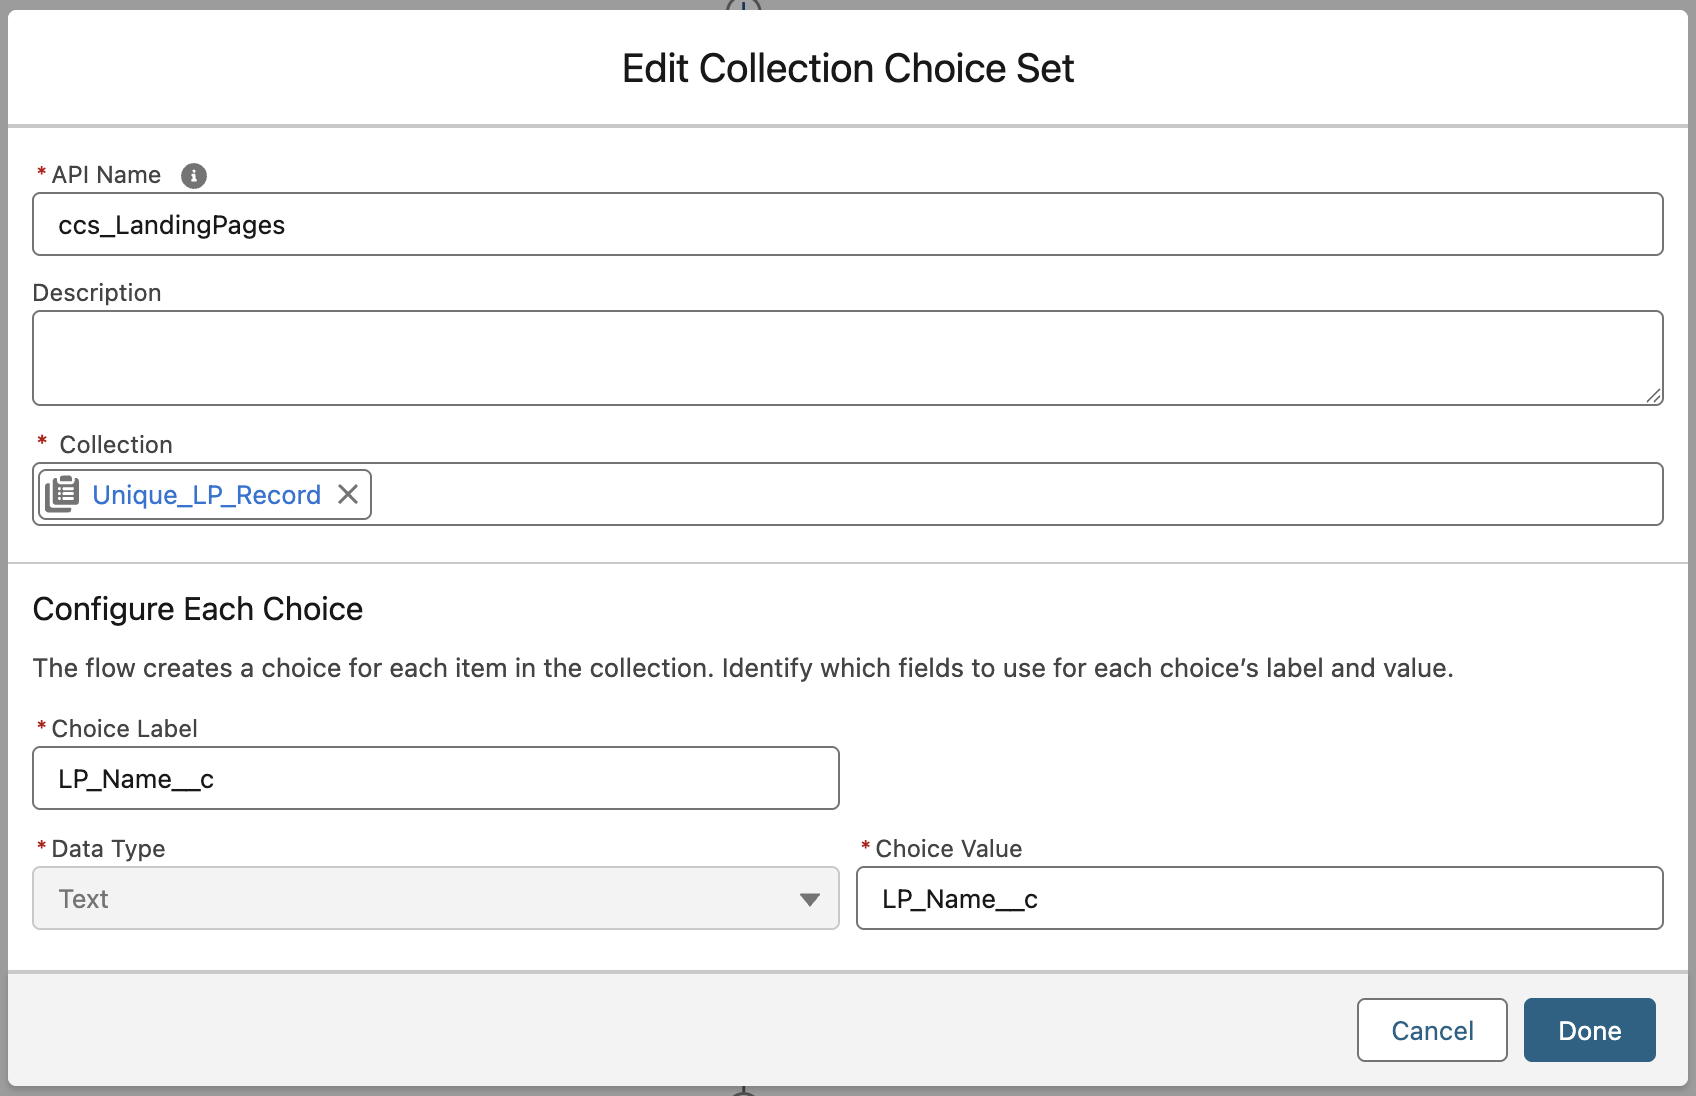
Create a Collection Choice Set Resource (
ccs_LandingPages)Create a new Collection Choice Set resource to allow selection from the output of the retrieved Landing Pages.
- Open the left panel and select New Resource.
- Resource Type:
Collection Choice Set - API Name:
ccs_LandingPages - Collection:
Unique_LP_Record - Choice Label:
LP_Name__c - Data Type:
Text - Choice Value:
LP_Name__c - Click Done.
-
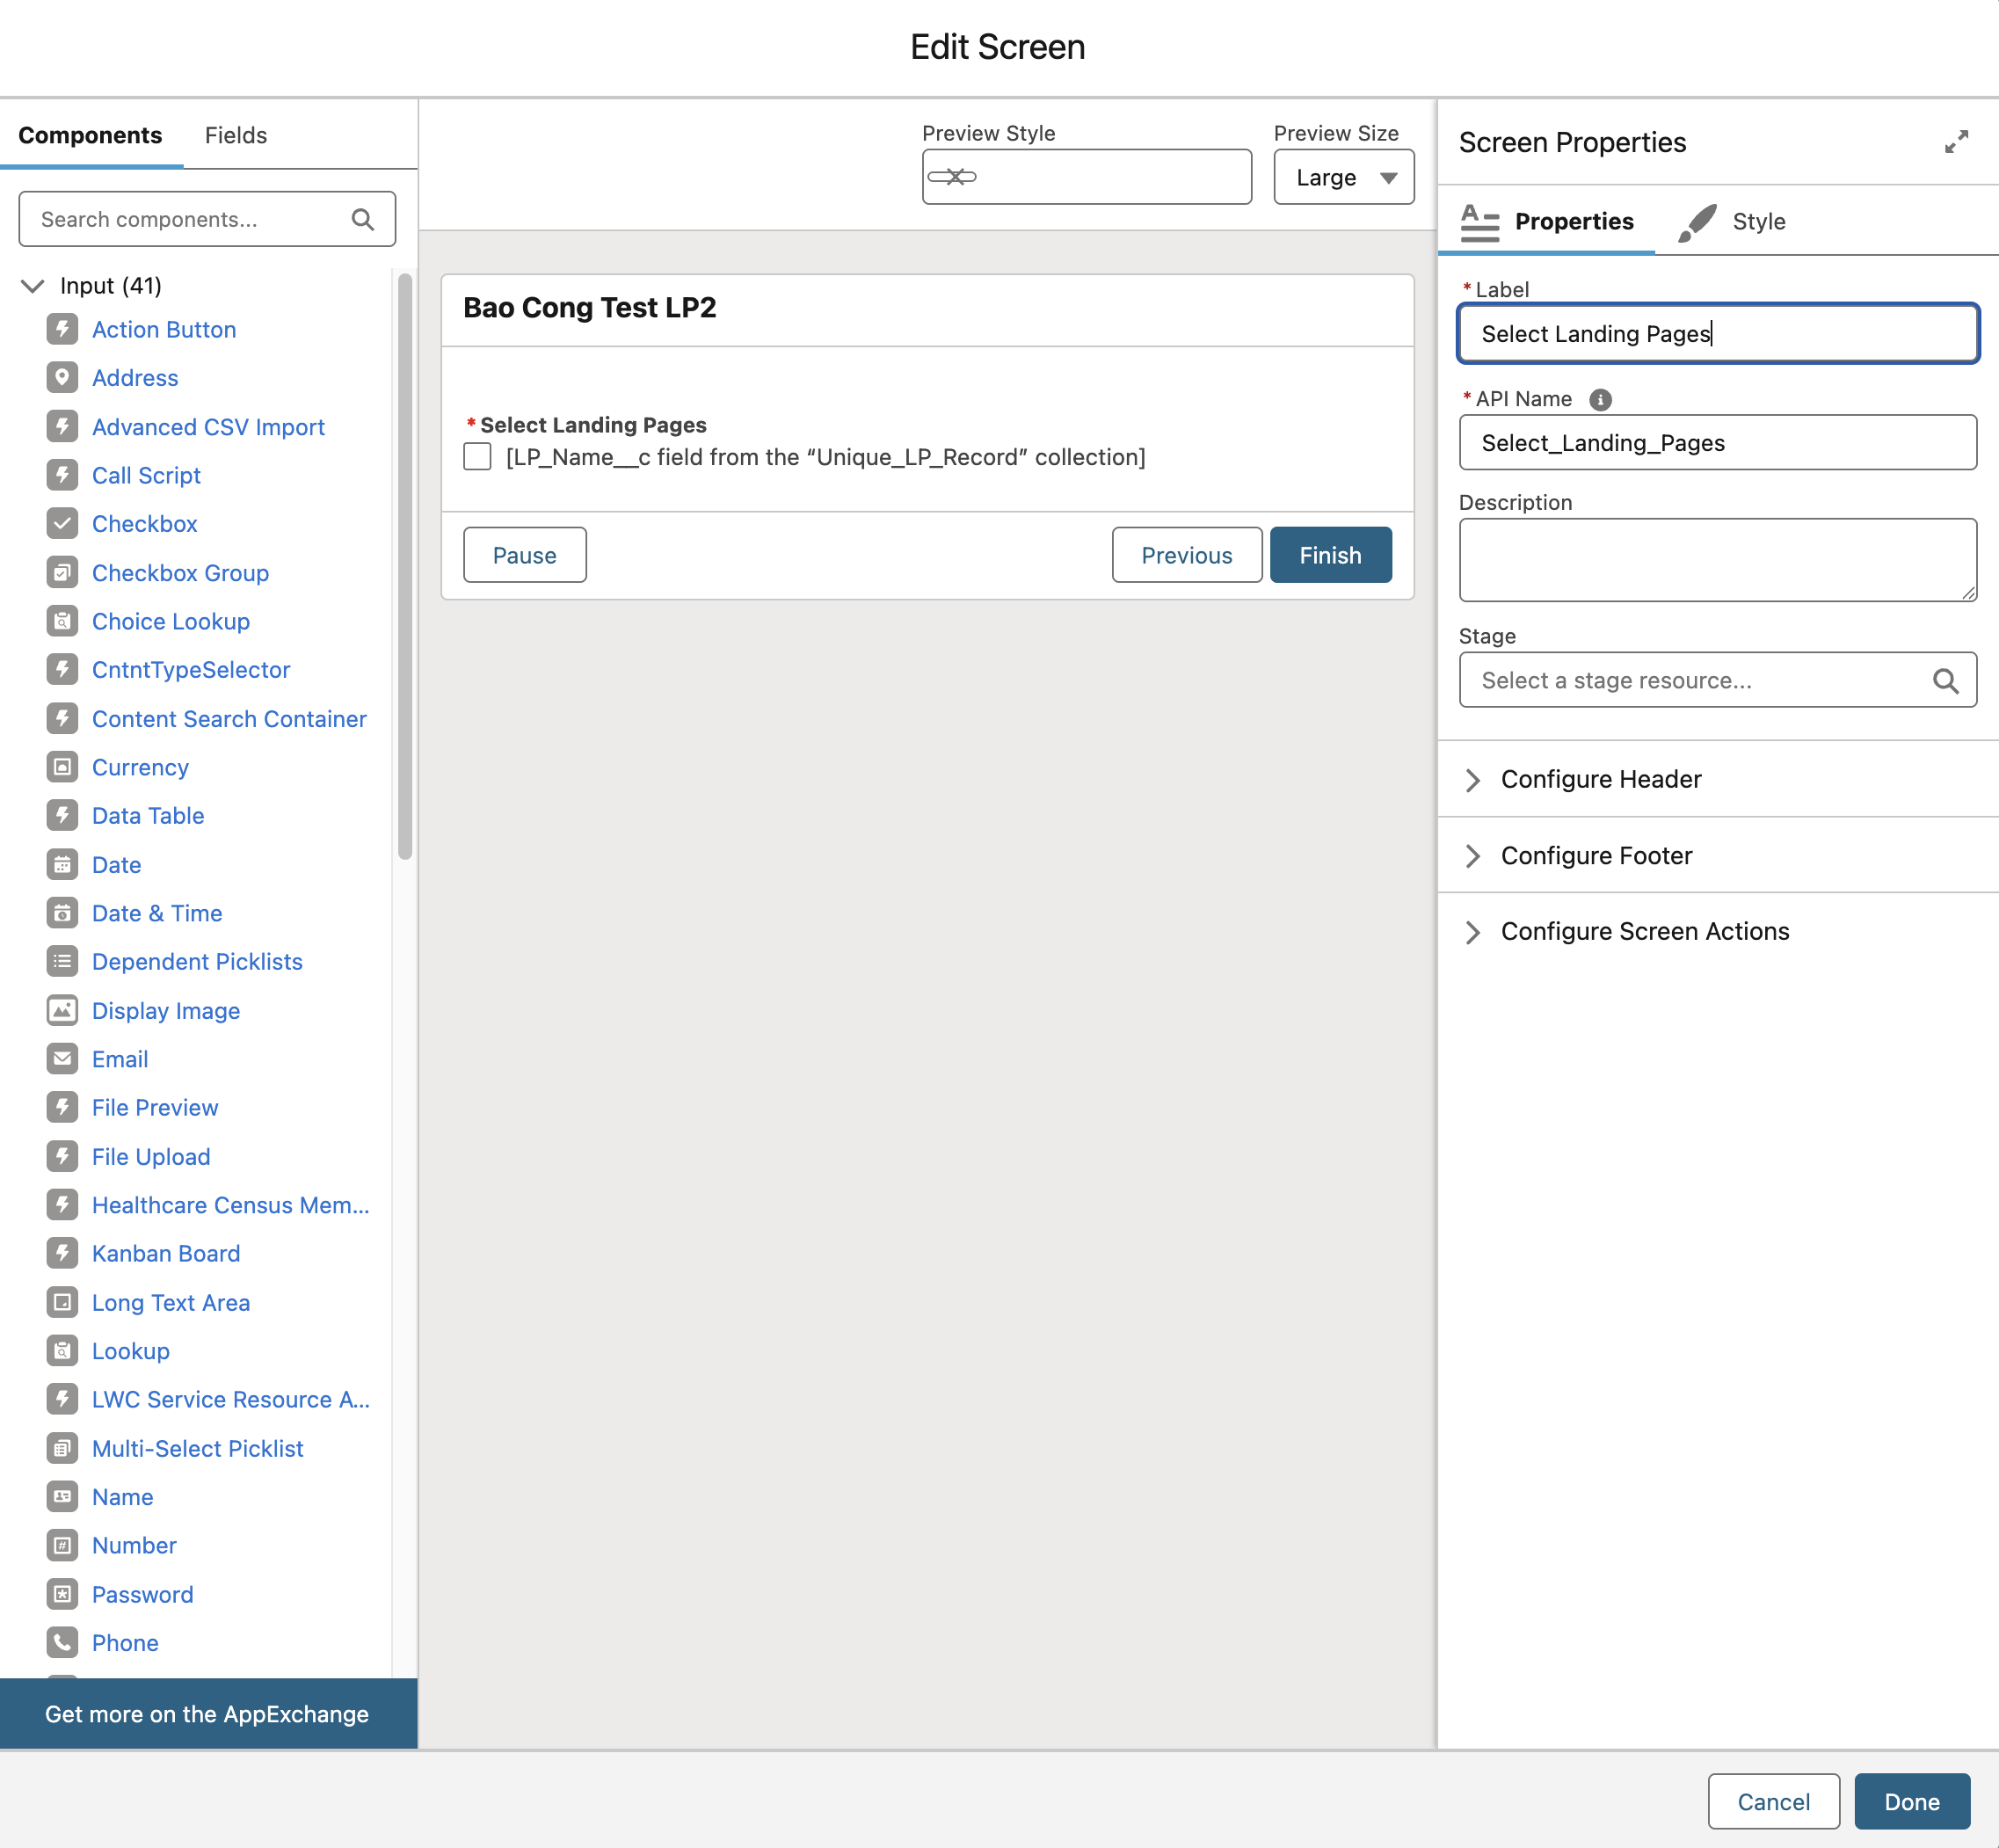
Screen: Select Landing Pages
This is the first screen shown to the user — it presents the Landing Page picklist built in the previous step, so they can select which Landing Page(s) their investor should be invited to.
- Component: a multi-select input bound to the
ccs_LandingPagesCollection Choice Set created above
- Component: a multi-select input bound to the
-
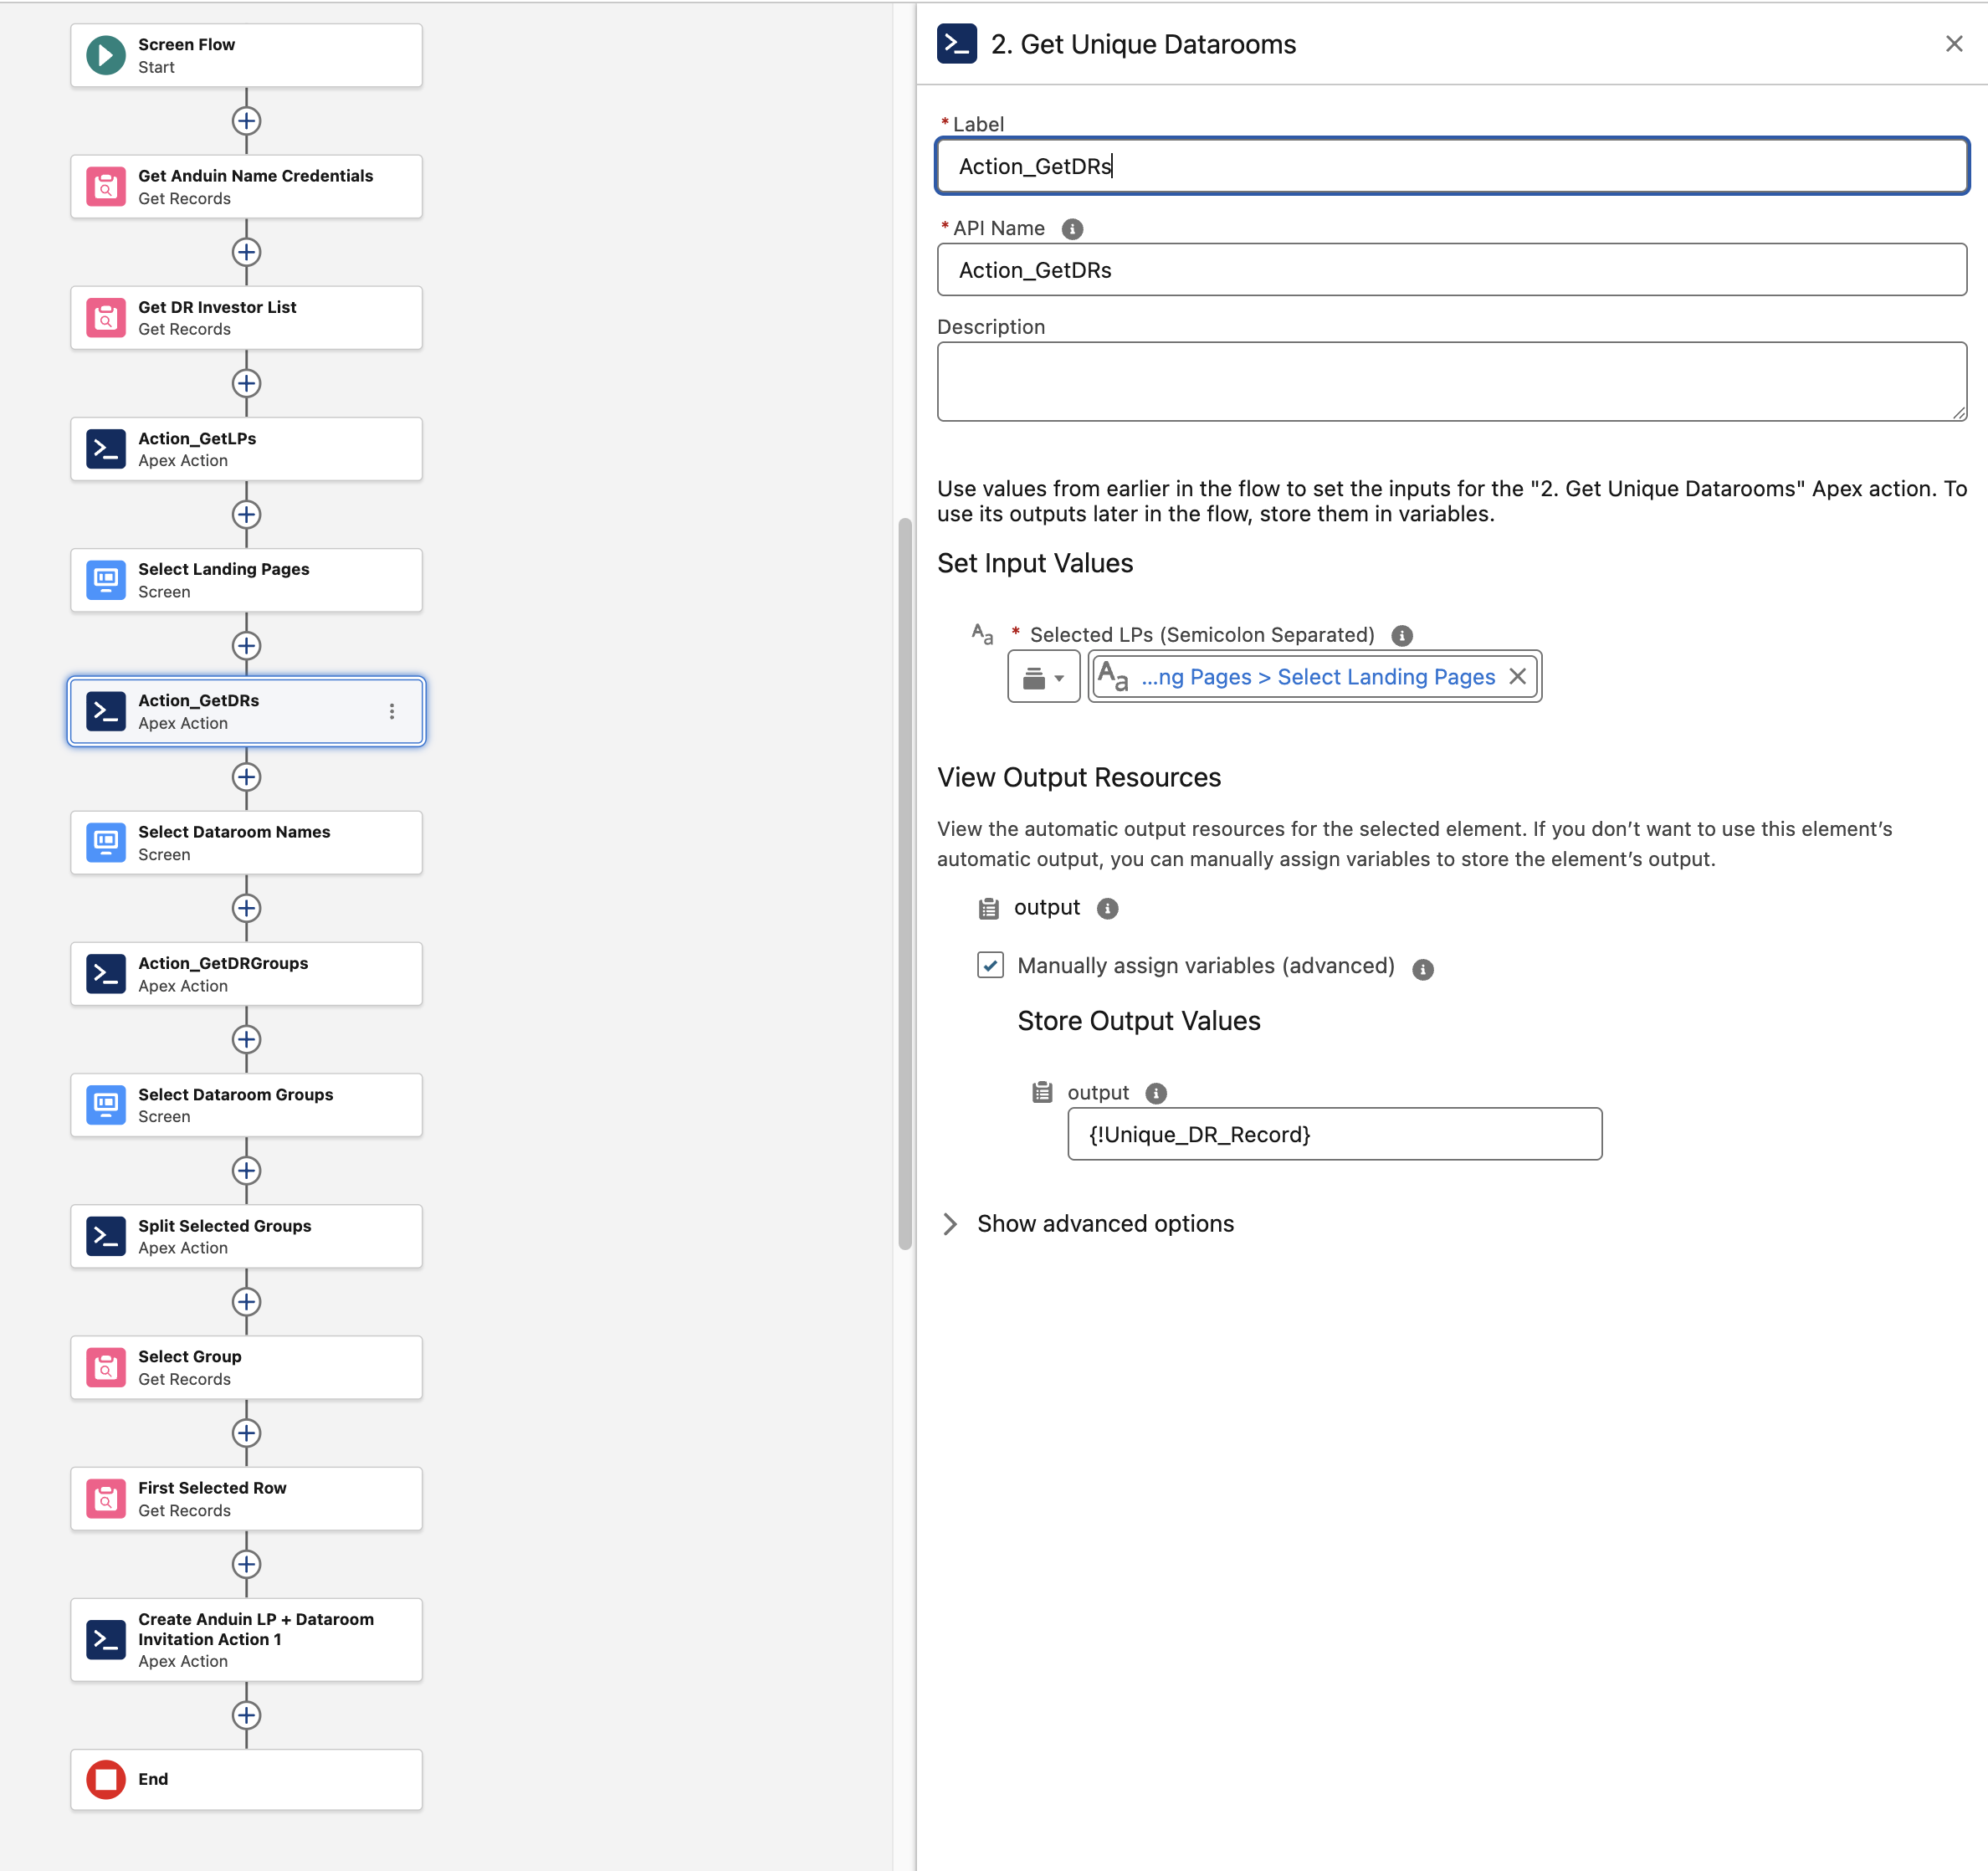
Get Unique Datarooms (Apex Action, labeled
Action_GetDRs)This Apex action retrieves every Data Room linked to the Landing Page(s) selected in the previous screen. The output of this component narrows the next Data Room picklist to only the rooms relevant to the user's Landing Page selection.
- Input: Selected LPs (Semicolon Separated) = the output of the "Select Landing Pages" screen
- Output stored in
{!Unique_DR_Record}
-
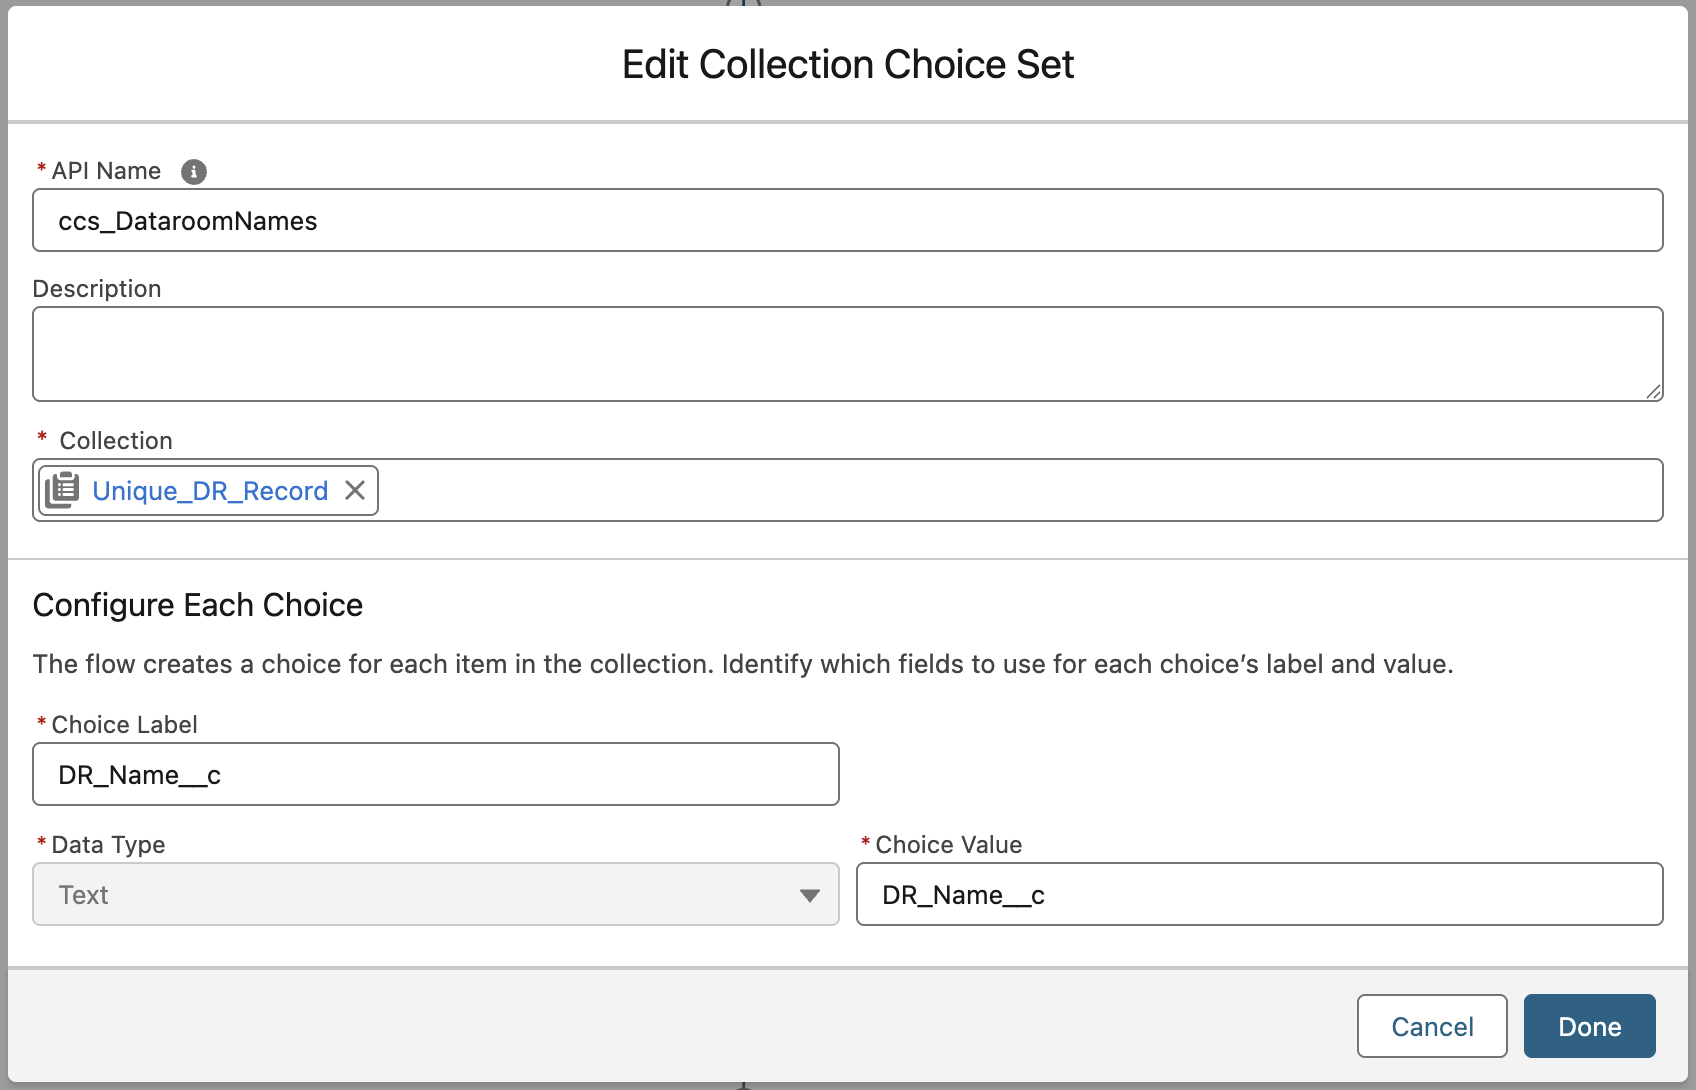
Create a Collection Choice Set Resource (
ccs_DataroomNames)Create a new Collection Choice Set resource to allow selection from the output of the retrieved Data Rooms.
- Open the left panel and select New Resource.
- Resource Type:
Collection Choice Set - API Name:
ccs_DataroomNames - Collection:
Unique_DR_Record - Choice Label:
DR_Name__c - Data Type:
Text - Choice Value:
DR_Name__c - Click Done.
-
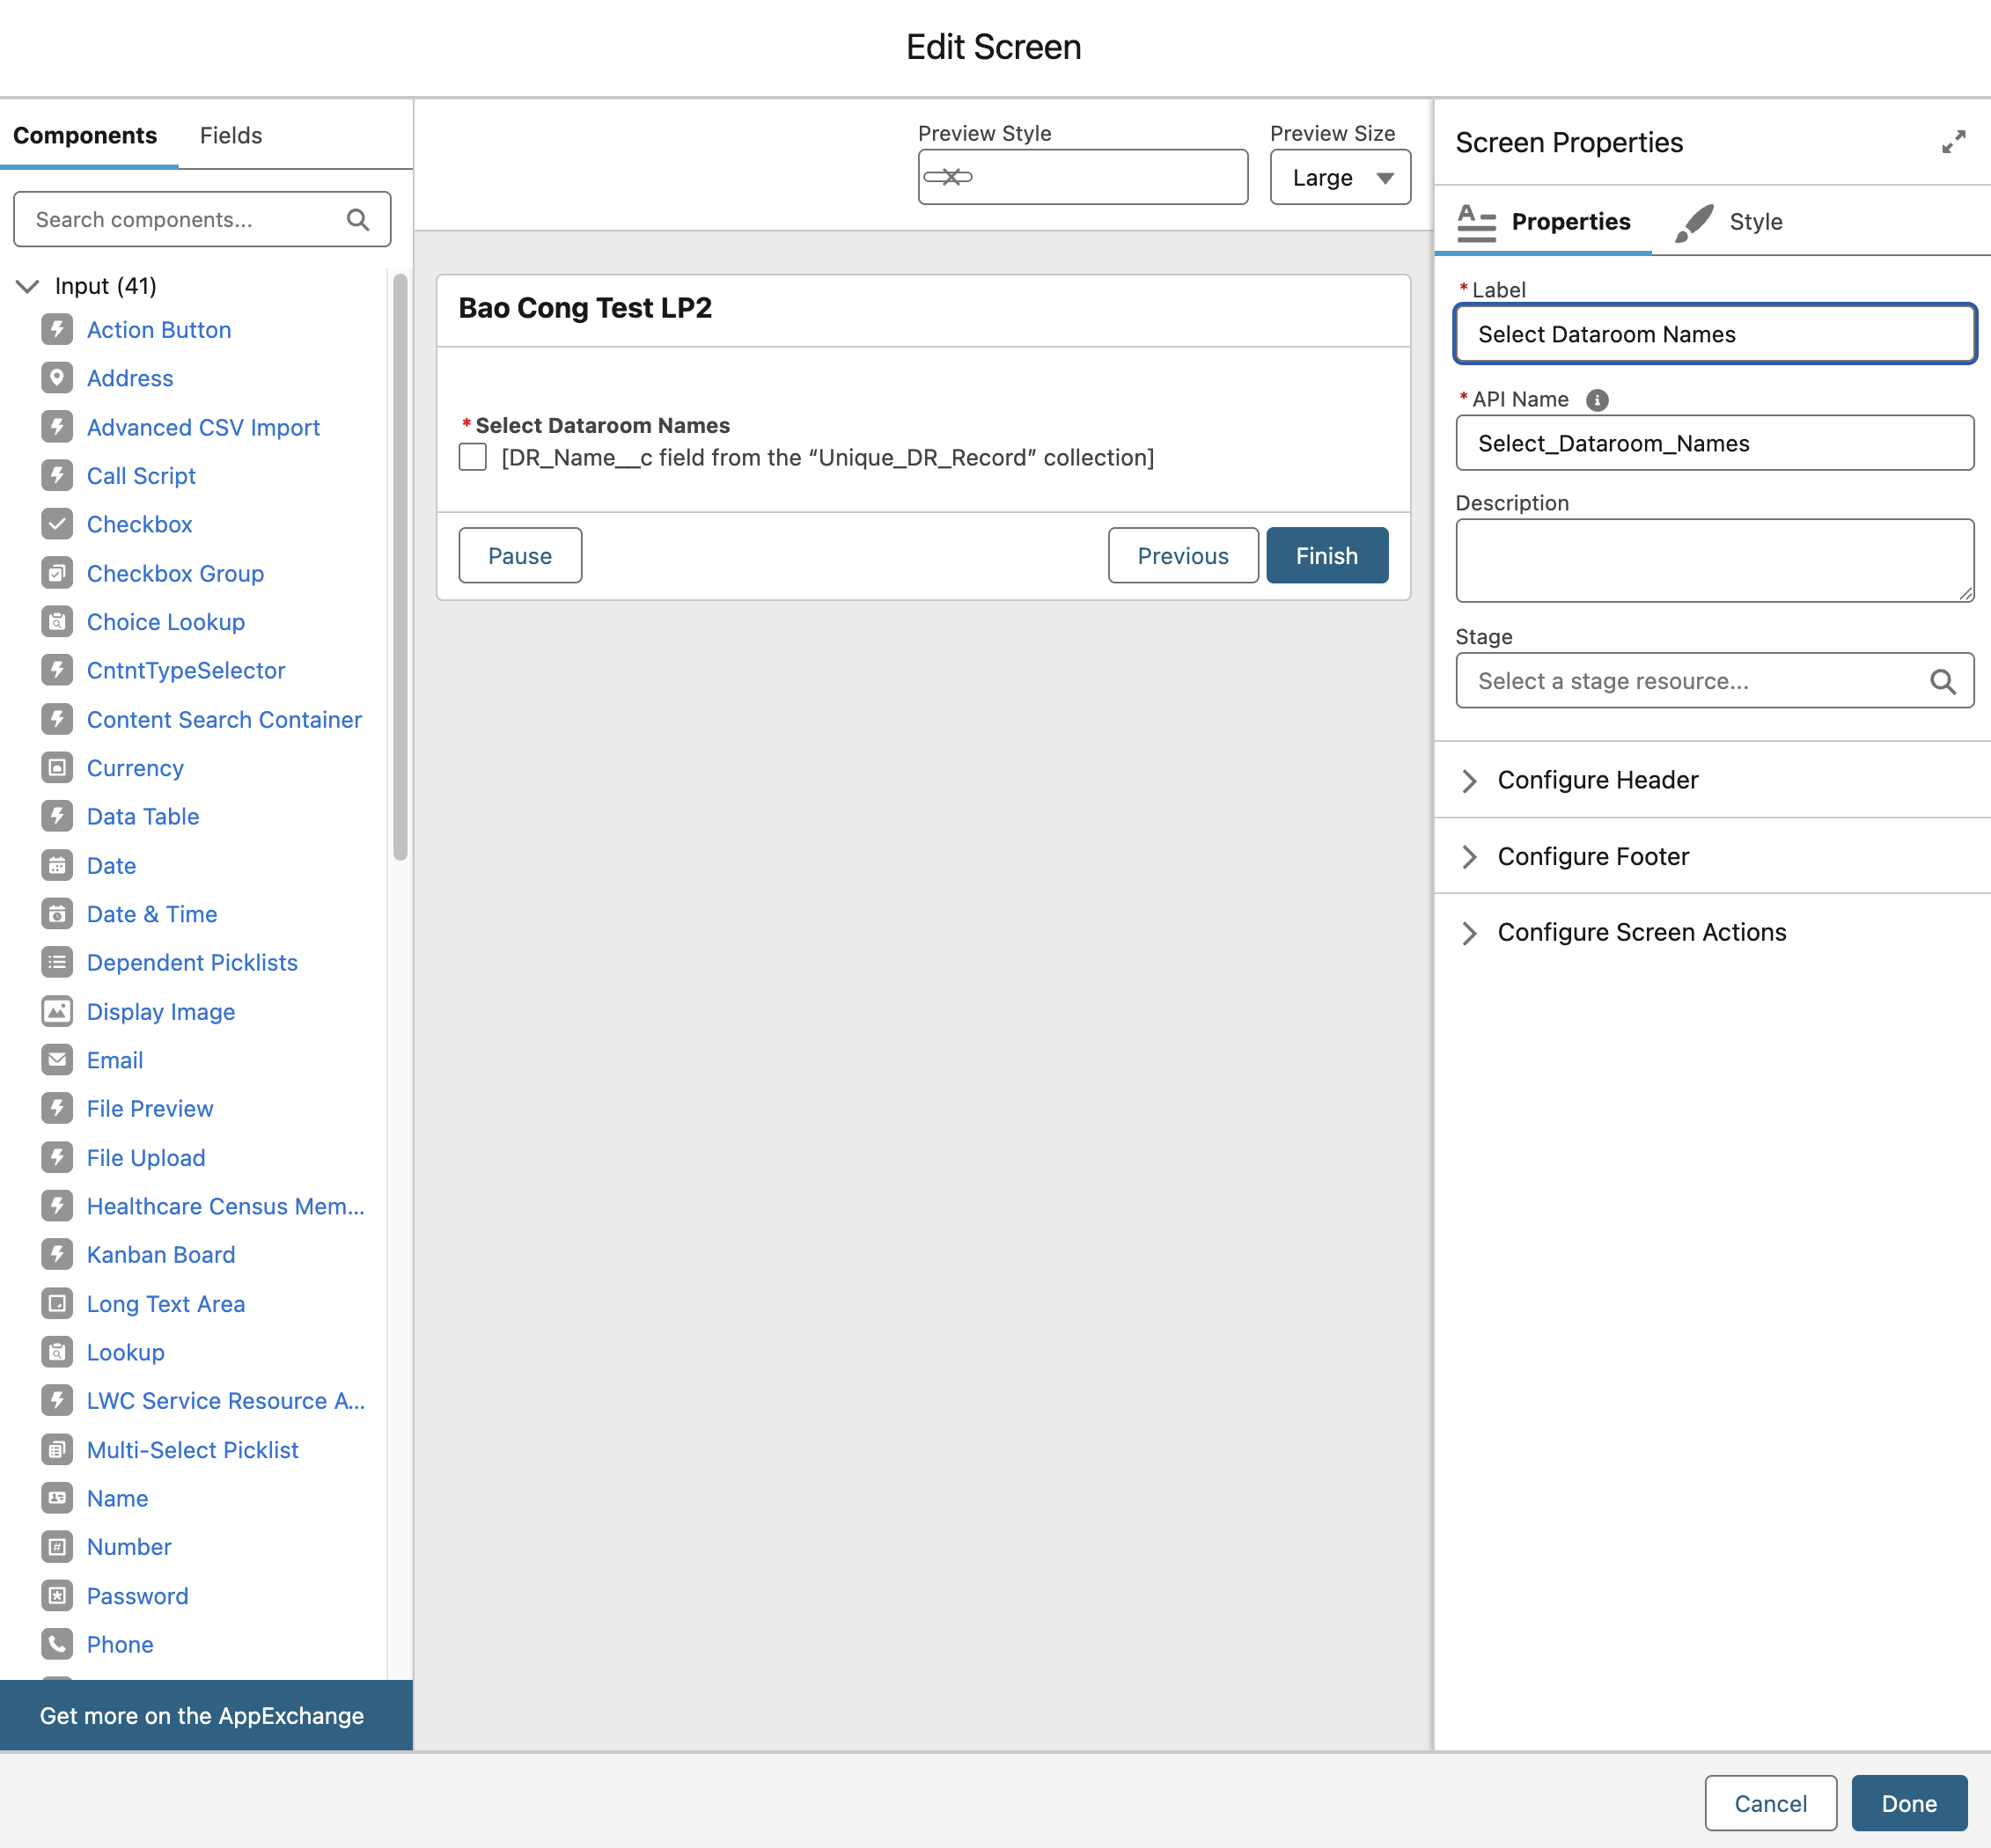
Screen: Select Dataroom Names
This screen presents the Data Room picklist, narrowed to only the rooms linked to the Landing Page(s) already selected.
- Component: a multi-select input bound to the
ccs_DataroomNamesCollection Choice Set created above
- Component: a multi-select input bound to the
-
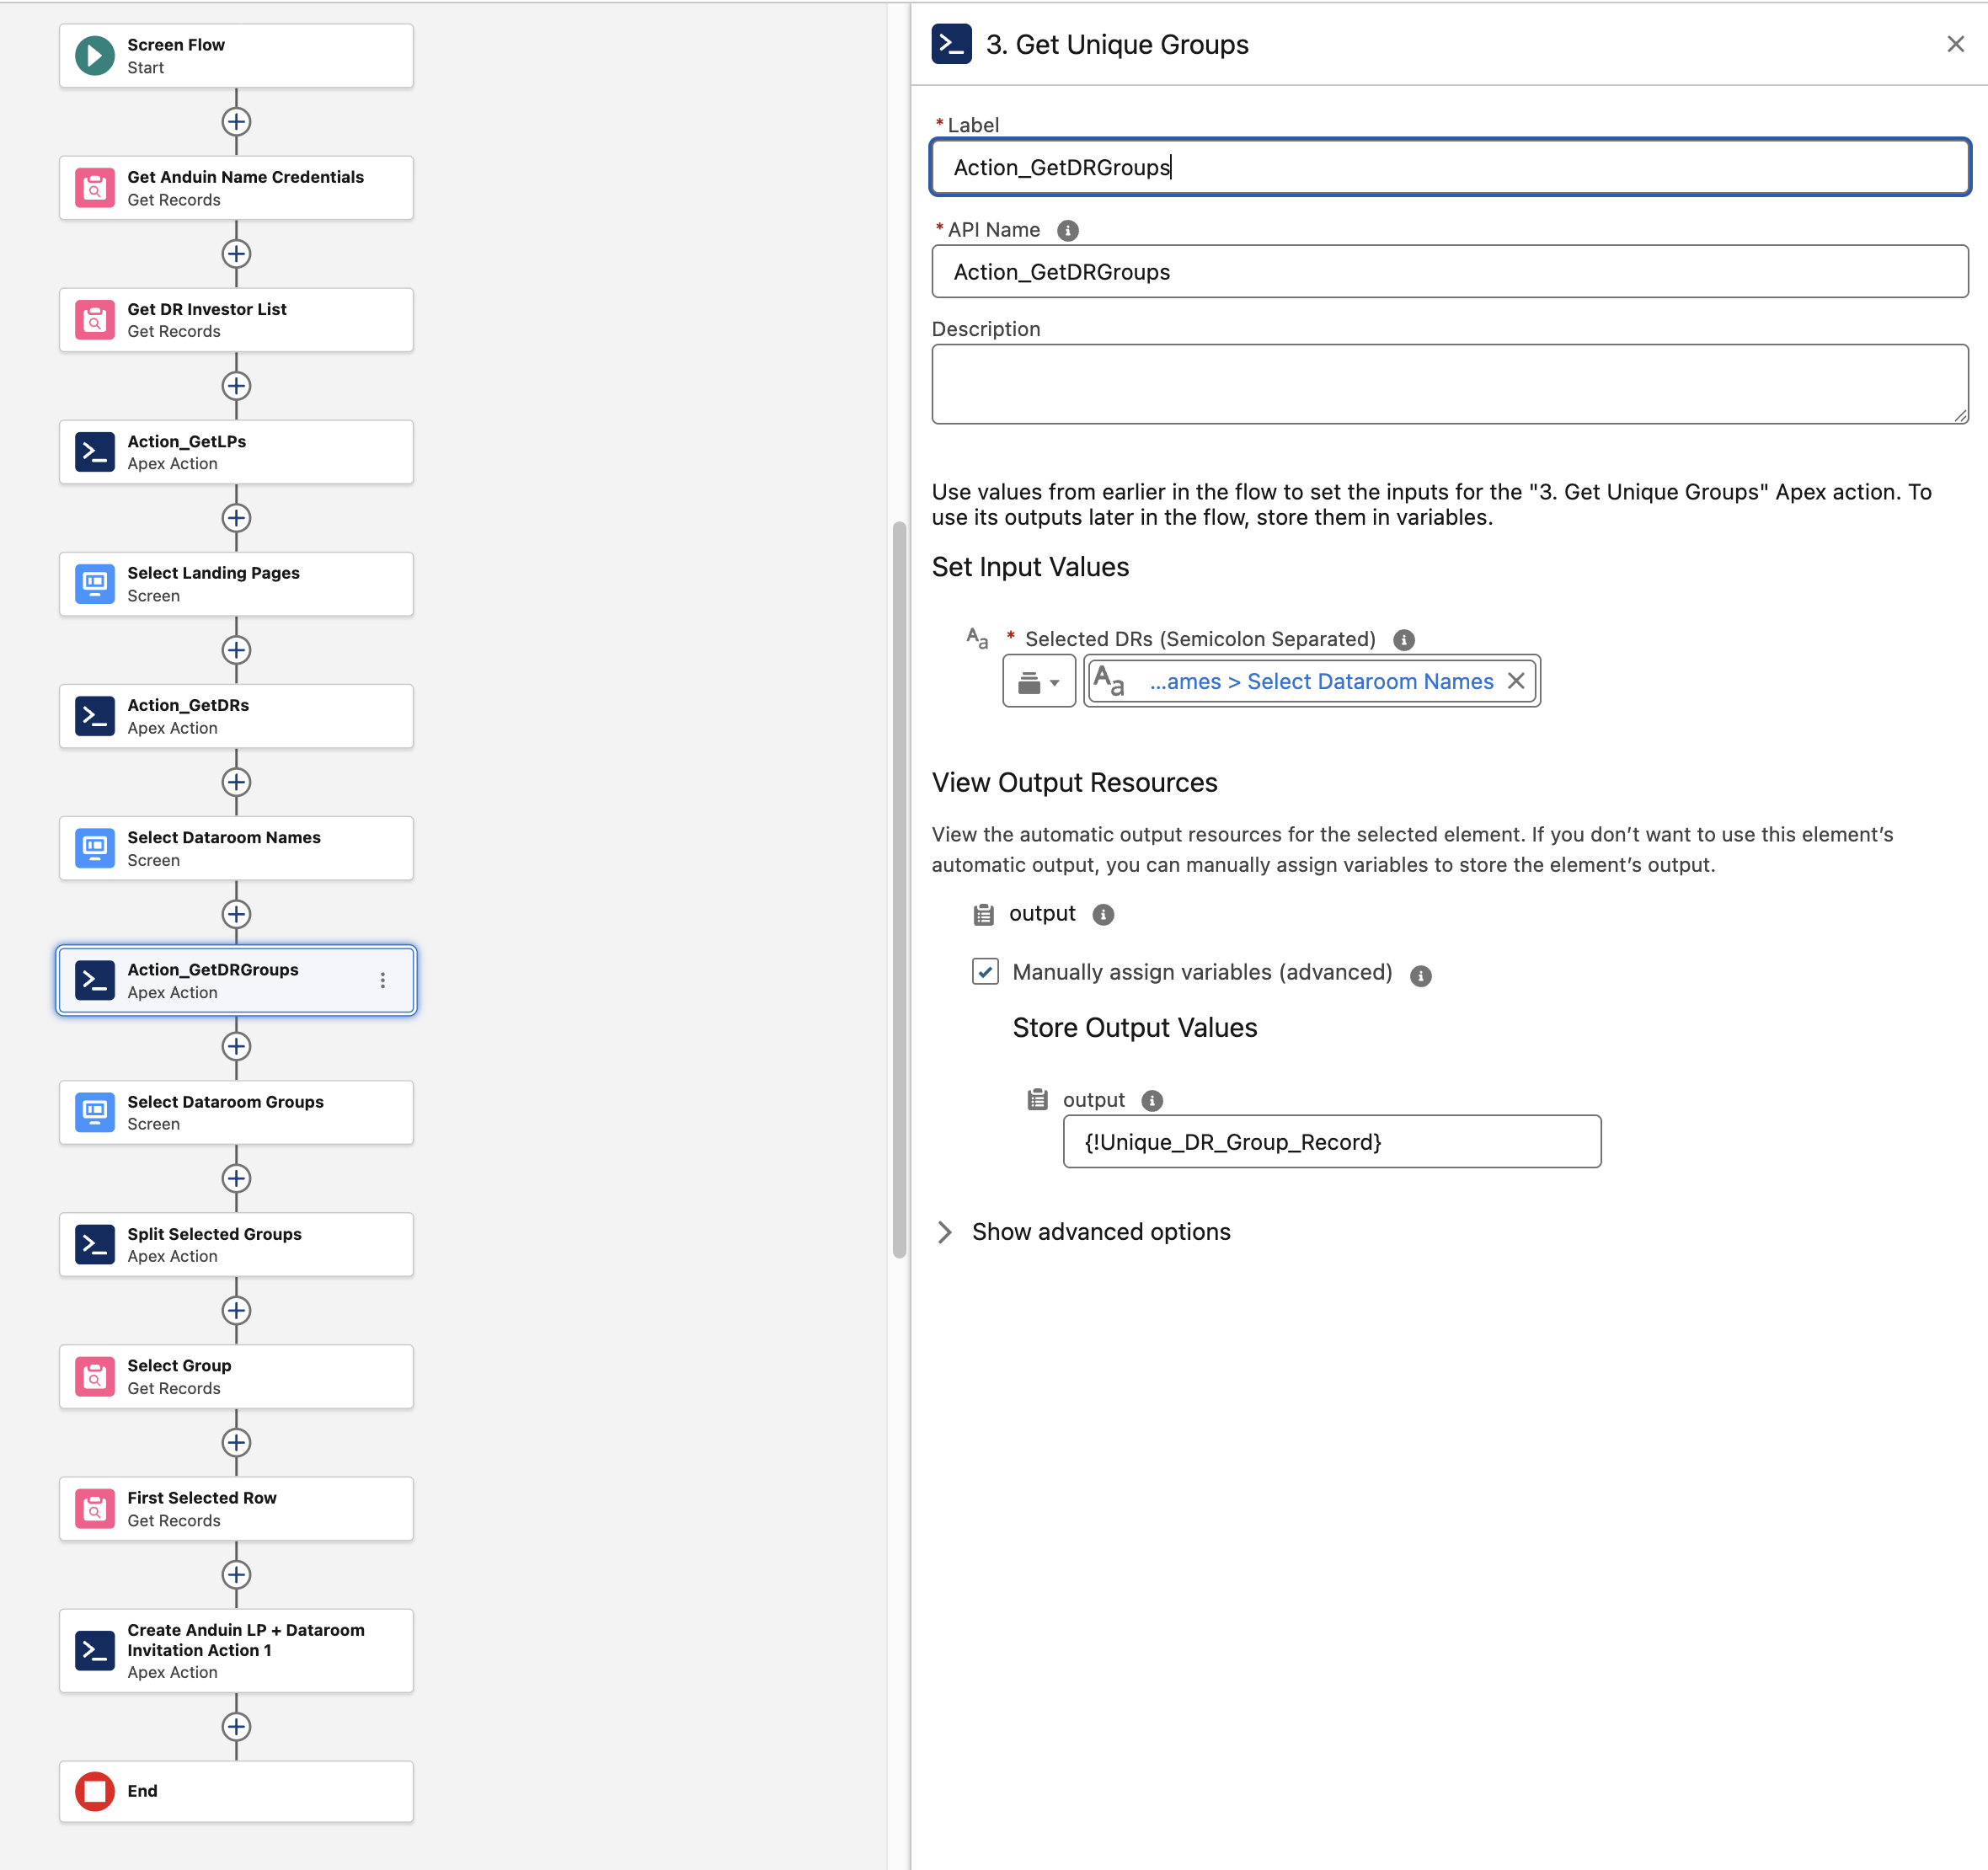
Get Unique Groups (Apex Action, labeled
Action_GetDRGroups)This Apex action retrieves every Group available within the Data Room(s) selected in the previous screen. The output of this component feeds the final Collection Choice Set, so the user can pick exactly which permission group their investor should join.
- Input: Selected DRs (Semicolon Separated) = the output of the "Select Dataroom Names" screen
- Output stored in
{!Unique_DR_Group_Record}
-
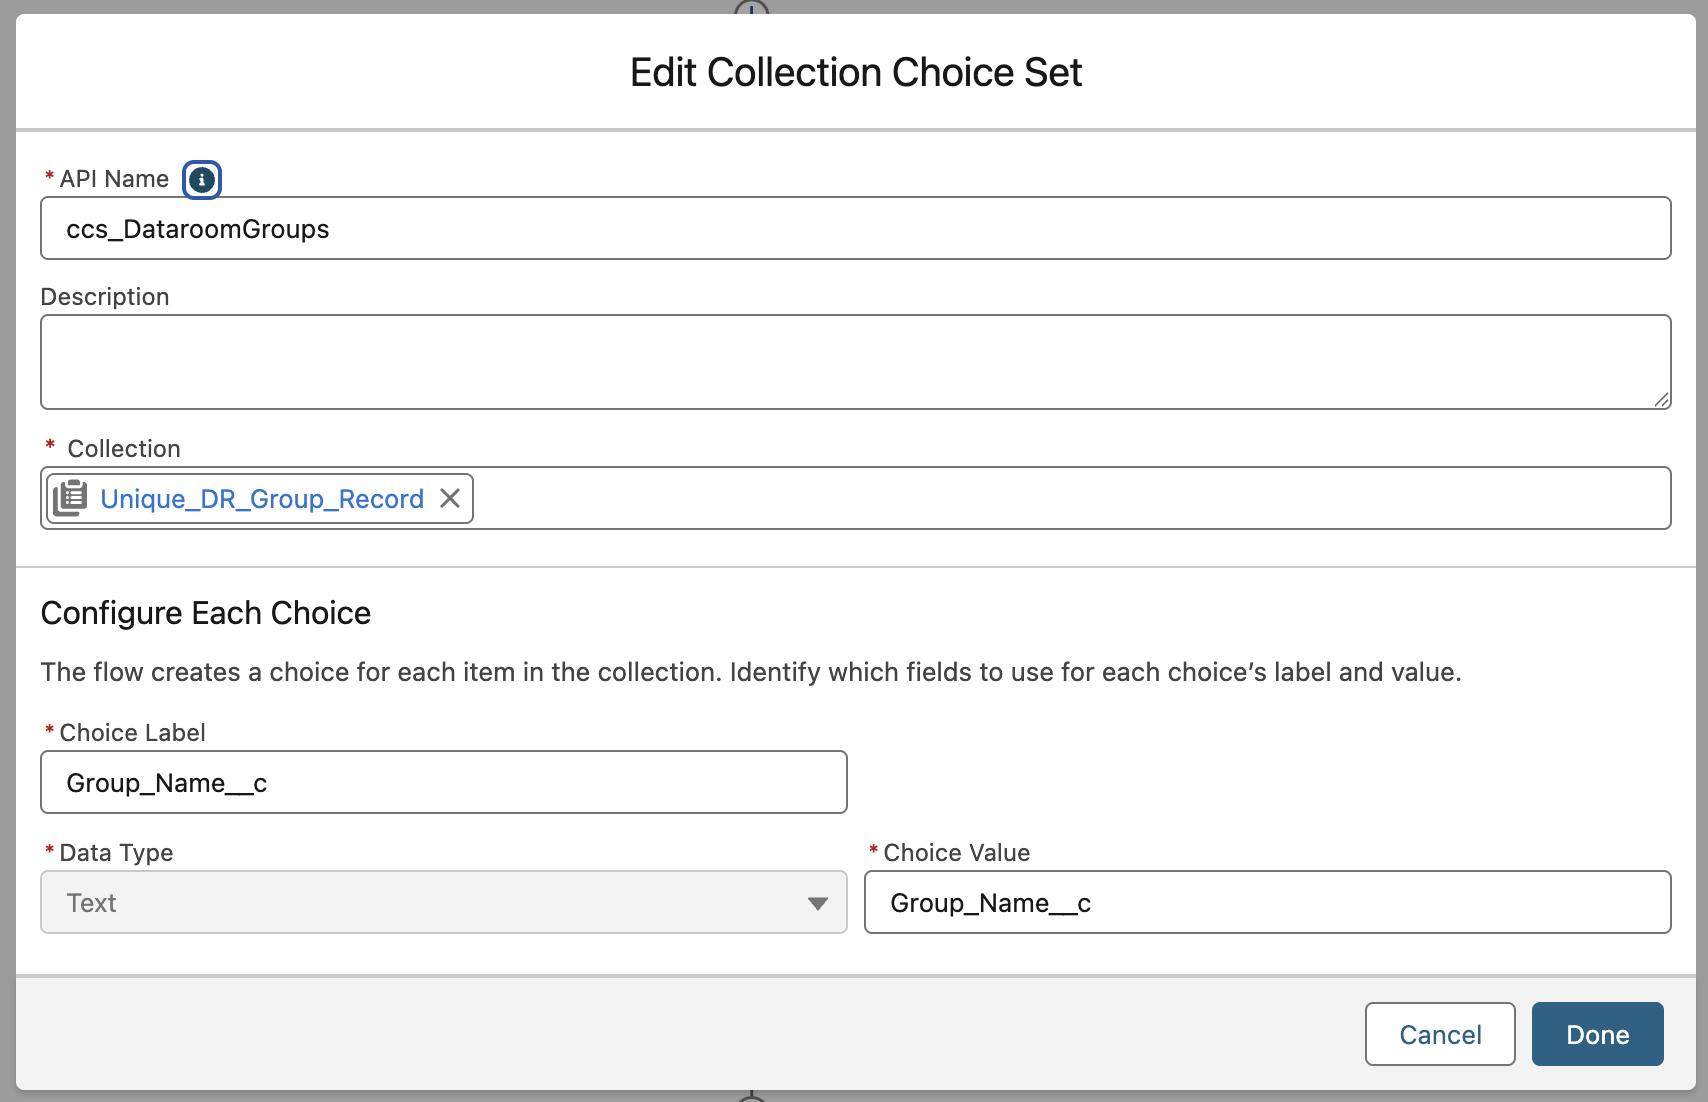
Create a Collection Choice Set Resource (
ccs_DataroomGroups)Create a new Collection Choice Set resource to allow selection from the output of the retrieved Groups.
- Open the left panel and select New Resource.
- Resource Type:
Collection Choice Set - API Name:
ccs_DataroomGroups - Collection:
Unique_DR_Group_Record - Choice Label:
Group_Name__c - Data Type:
Text - Choice Value:
Group_Name__c - Click Done.
-
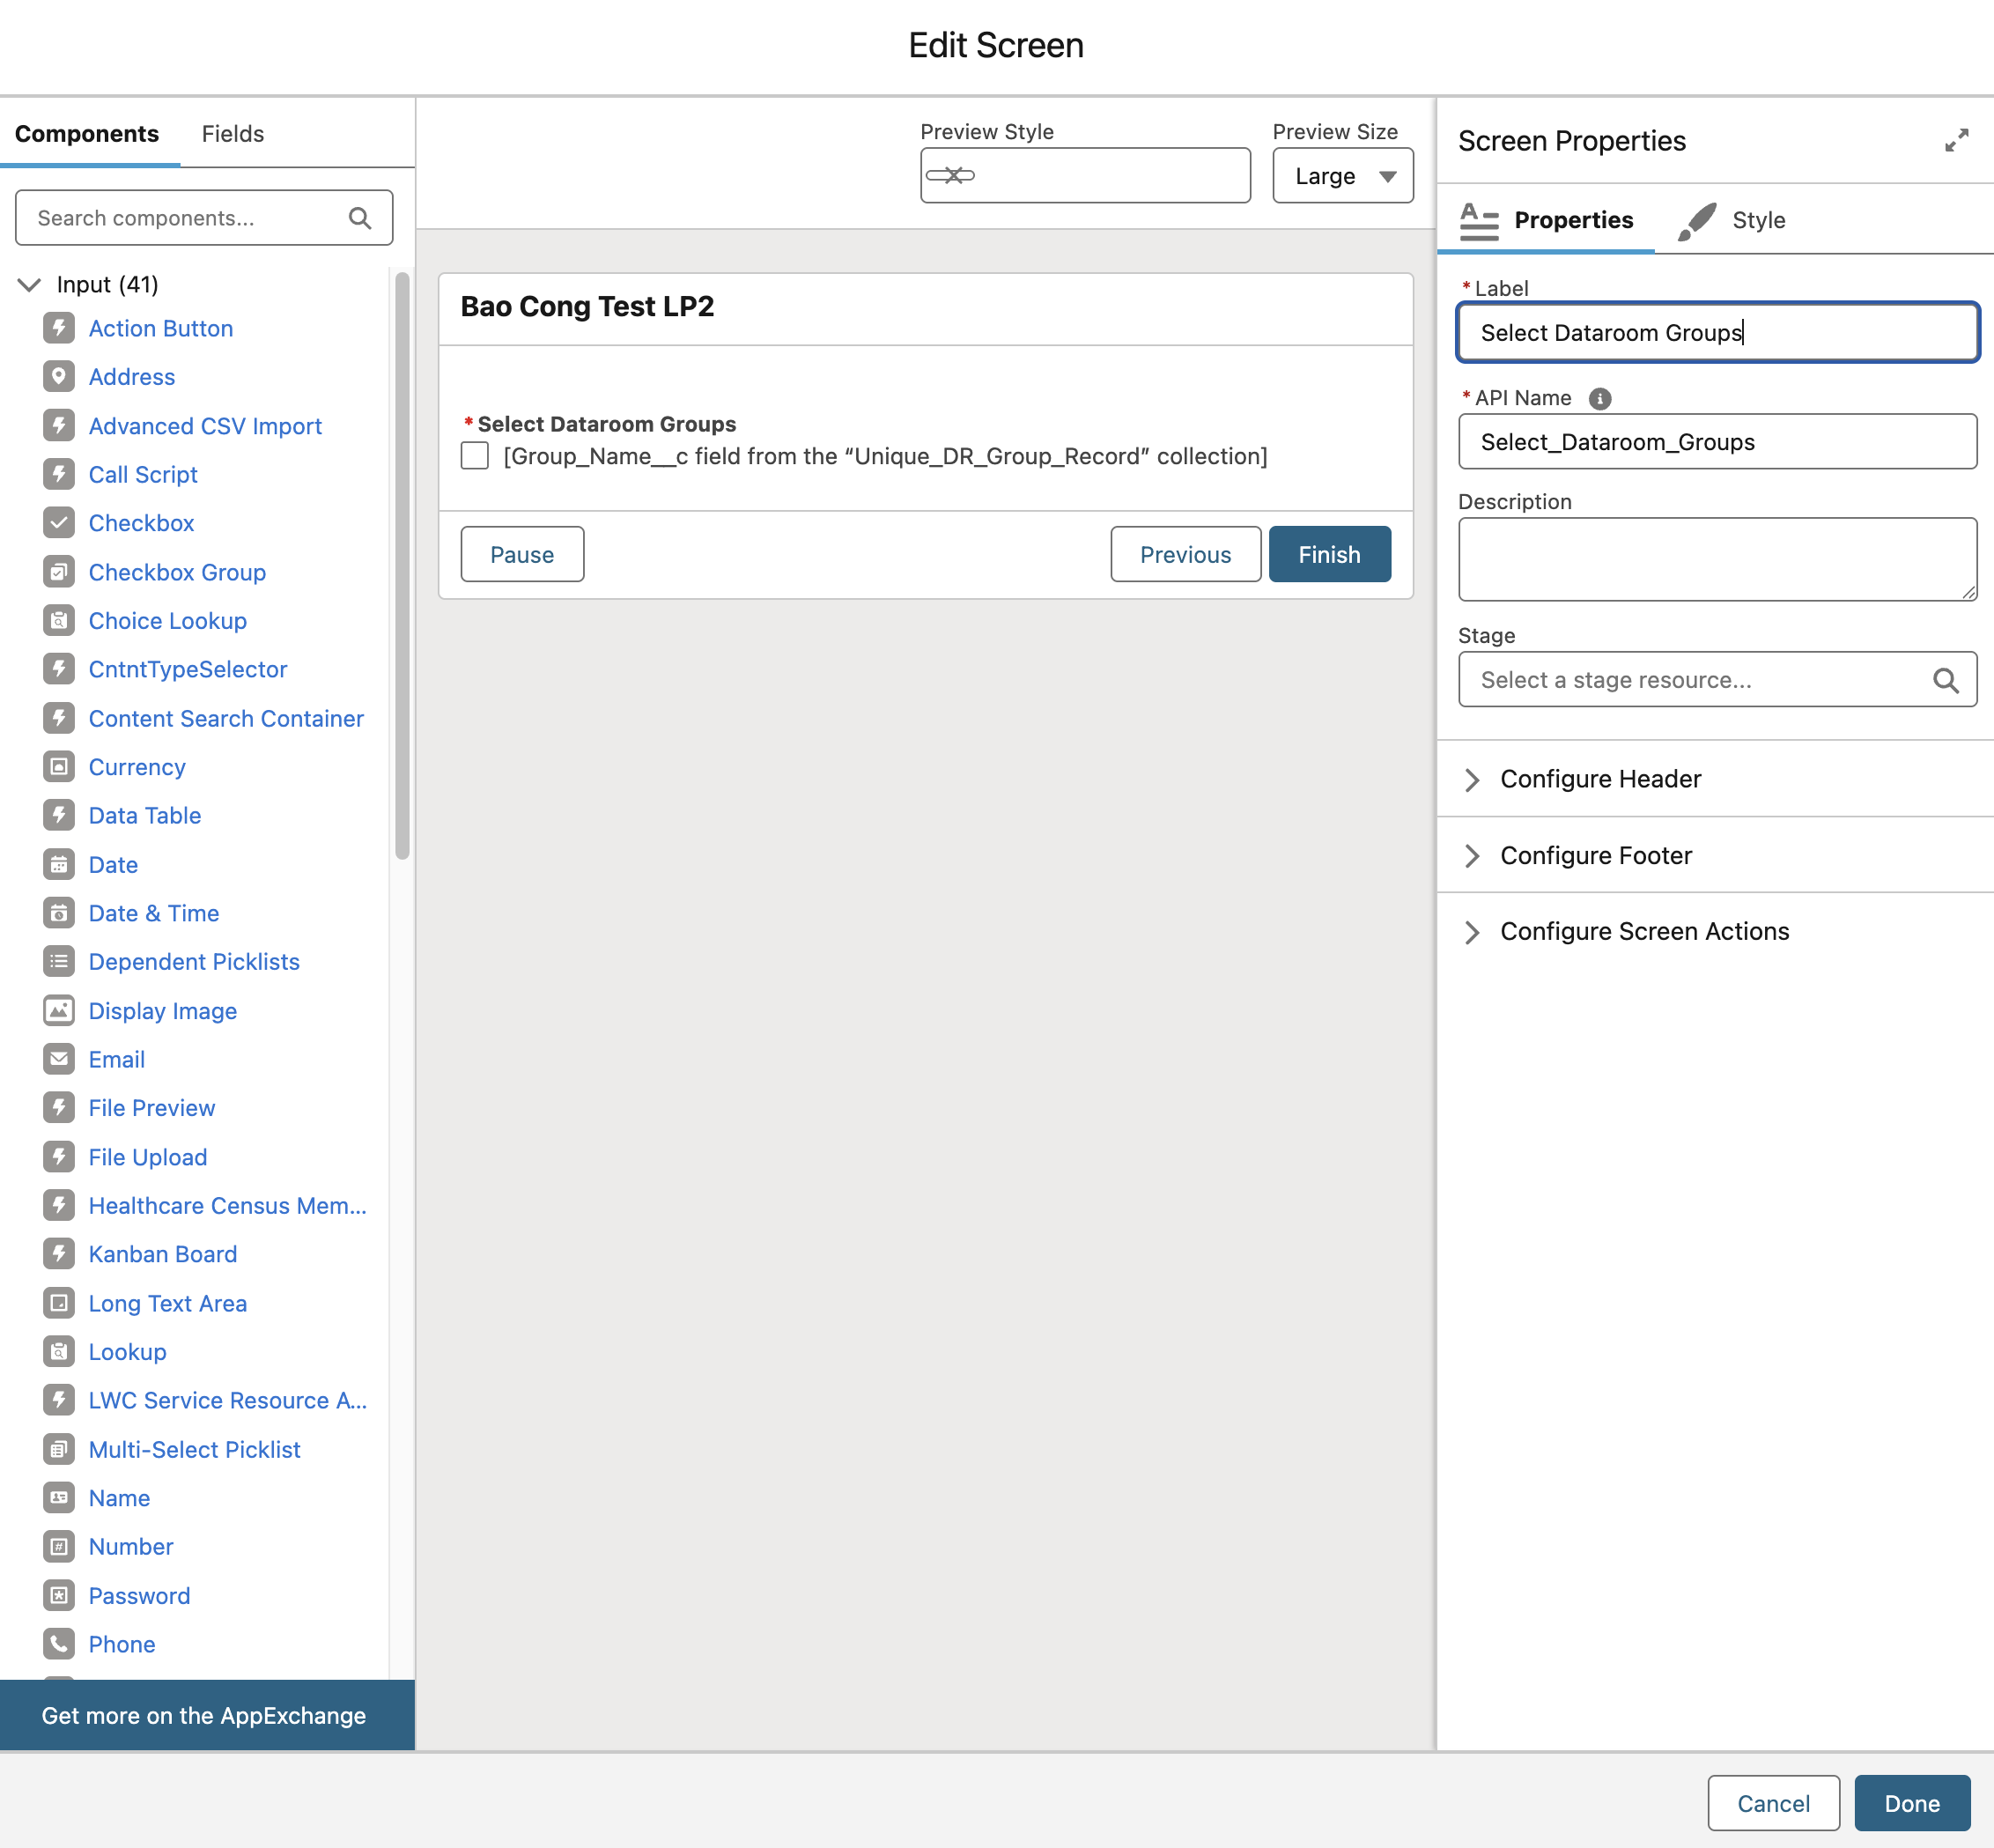
Screen: Select Dataroom Groups
This screen presents the Group picklist, letting the user pick the specific Group(s) within the selected Data Room(s) their investor will be added to.
- Component: a multi-select input bound to the
ccs_DataroomGroupsCollection Choice Set created above
- Component: a multi-select input bound to the
-
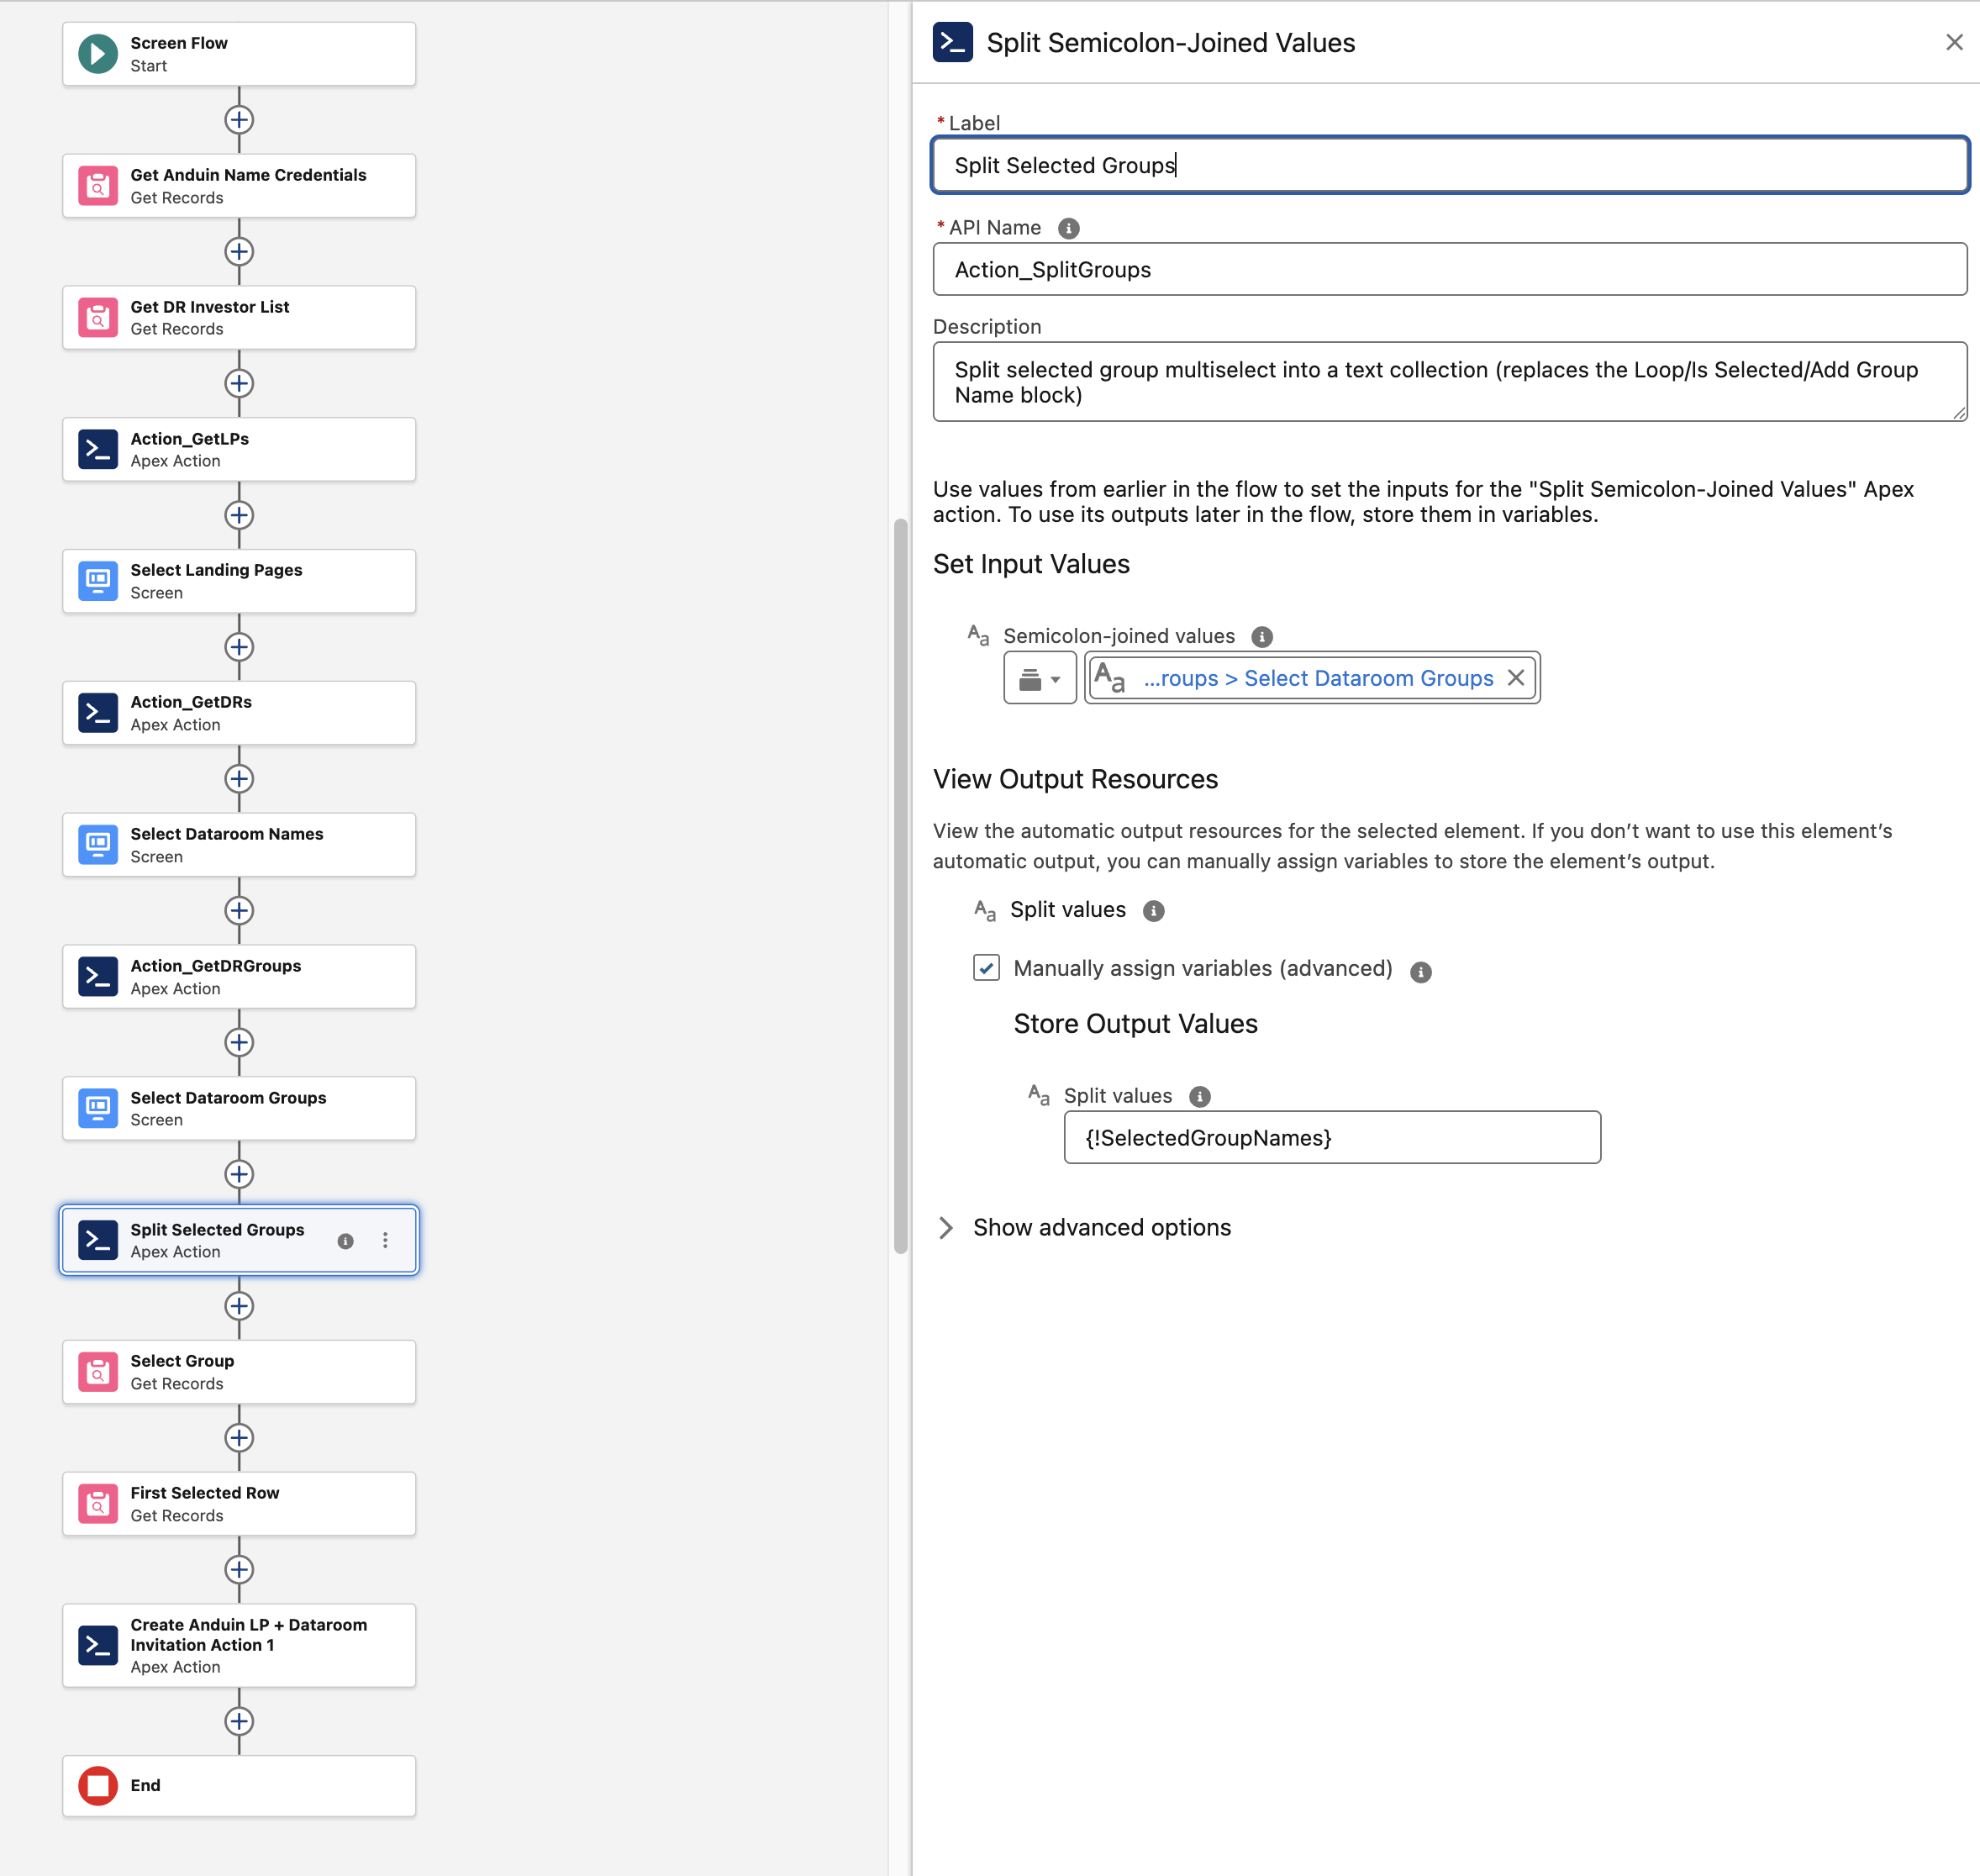
Split Selected Groups (Apex Action, labeled
Action_SplitGroups/ "Split Semicolon-Joined Values")This Apex action splits the semicolon-joined multi-select values from the previous screen into a plain text collection, replacing the older Loop / Is Selected / Add Group Name block pattern used in earlier flow versions.
- Input: the semicolon-joined values from "Select Dataroom Groups"
- Output stored in
{!SelectedGroupNames}
-
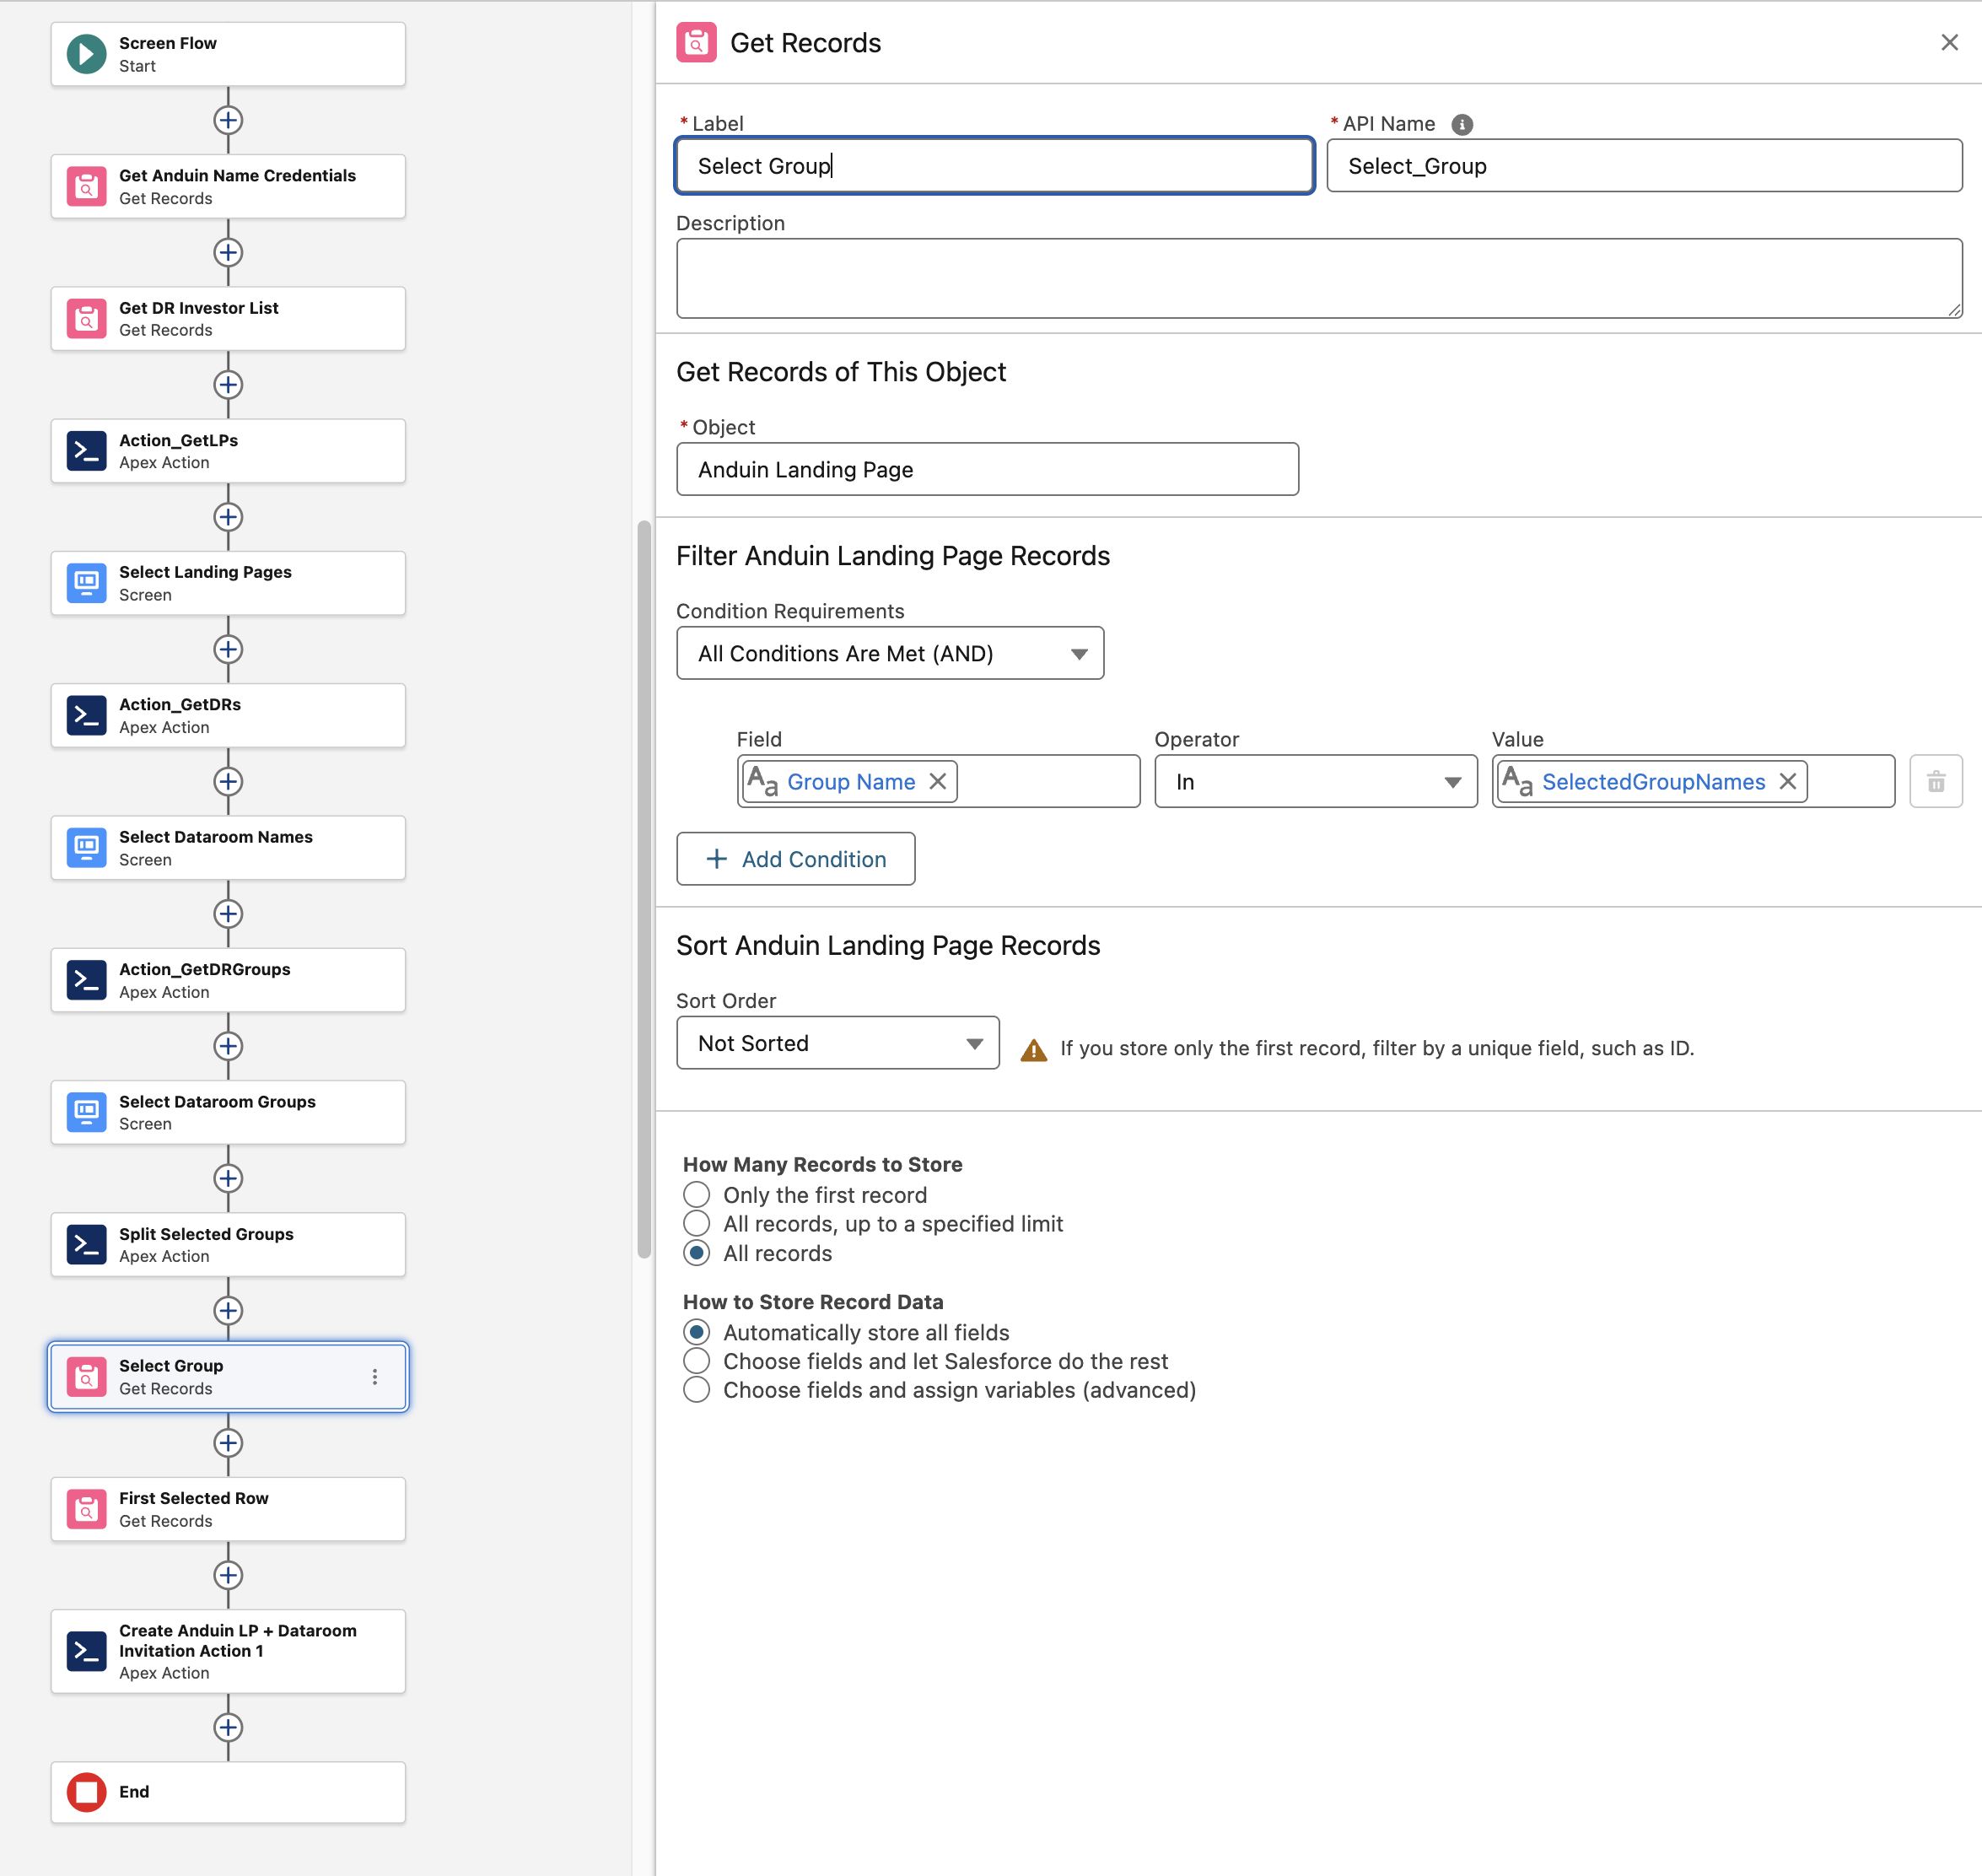
Select Group (Get Records)
This element retrieves the full Landing Page + Data Room + Group rows corresponding to every group name the user selected. We'll use this complete collection as the payload sent to Anduin in the final invitation step.
- Object:
Anduin Landing Page(the linking object created during setup — despite the name, it carries the joined LP/DR/Group rows) - Filter:
Group NameInSelectedGroupNames - Store: all records
- Object:
-
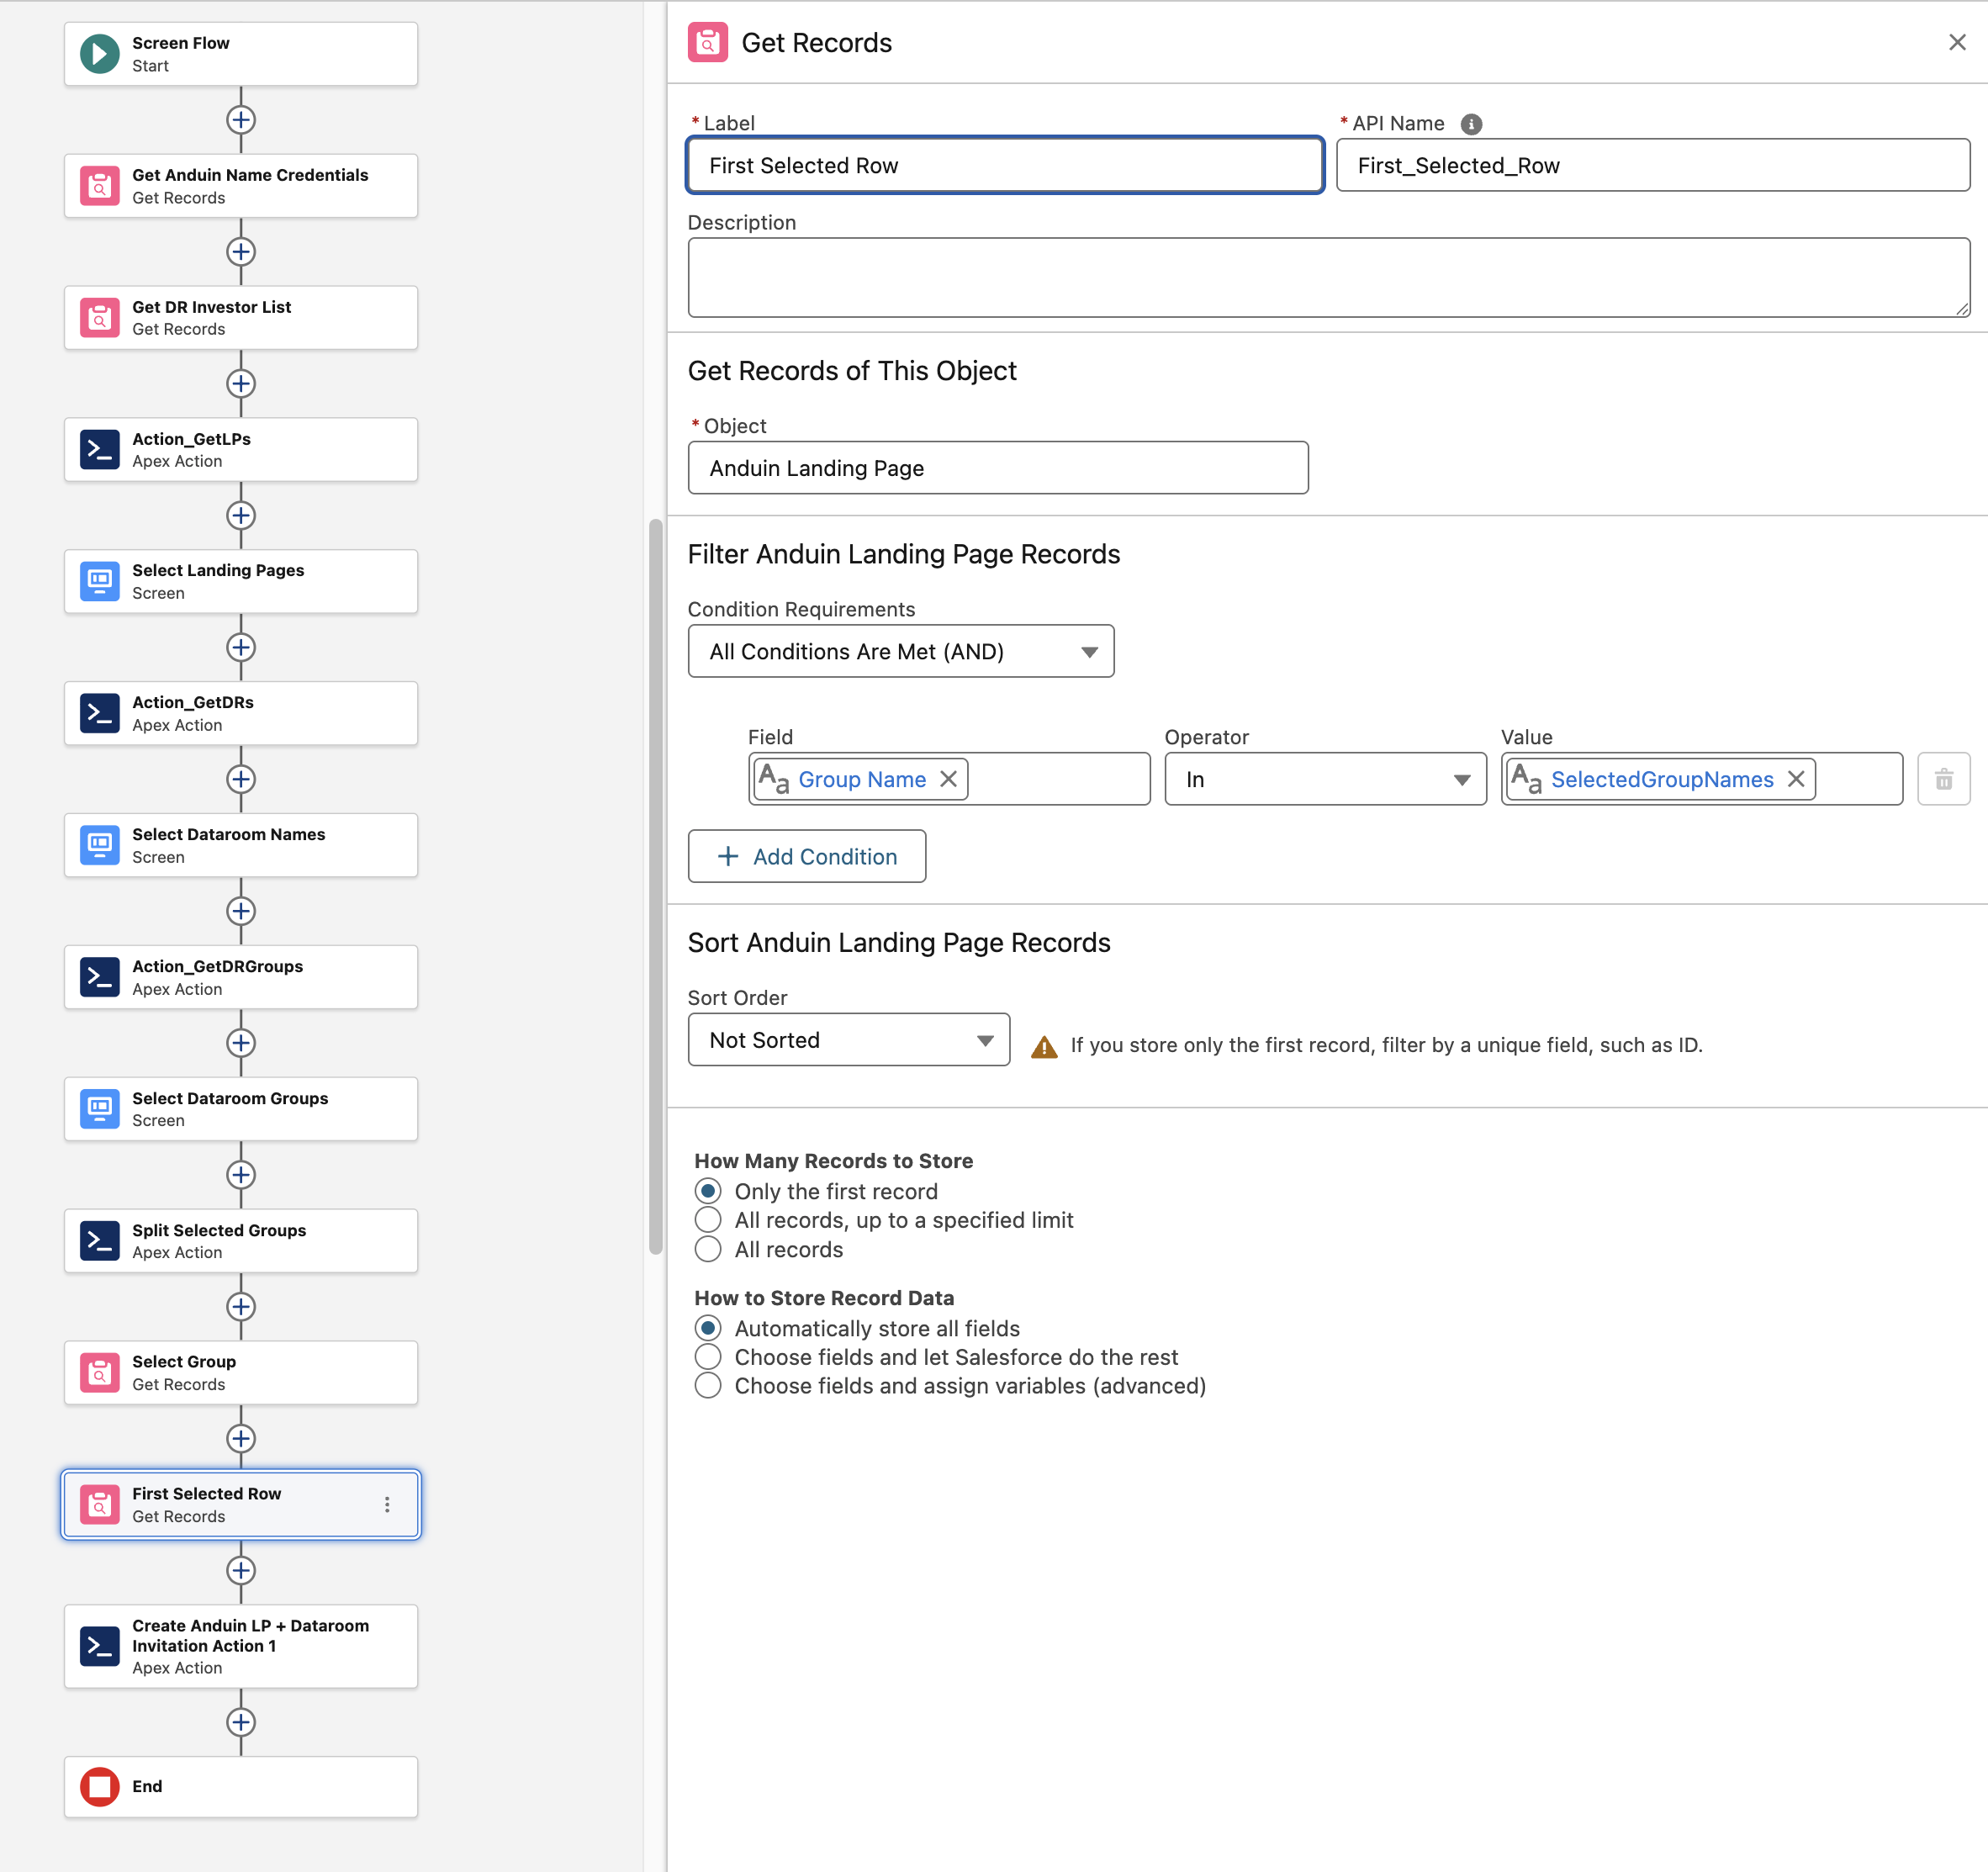
First Selected Row (Get Records)
This element retrieves just the first matching row from the same selection, used only to read a single Named Credential alias — since every row the user selected resolves to the same integration instance, only one is needed to know which Named Credential to invoke.
- Same object and filter as step 13, but store only the first record
-
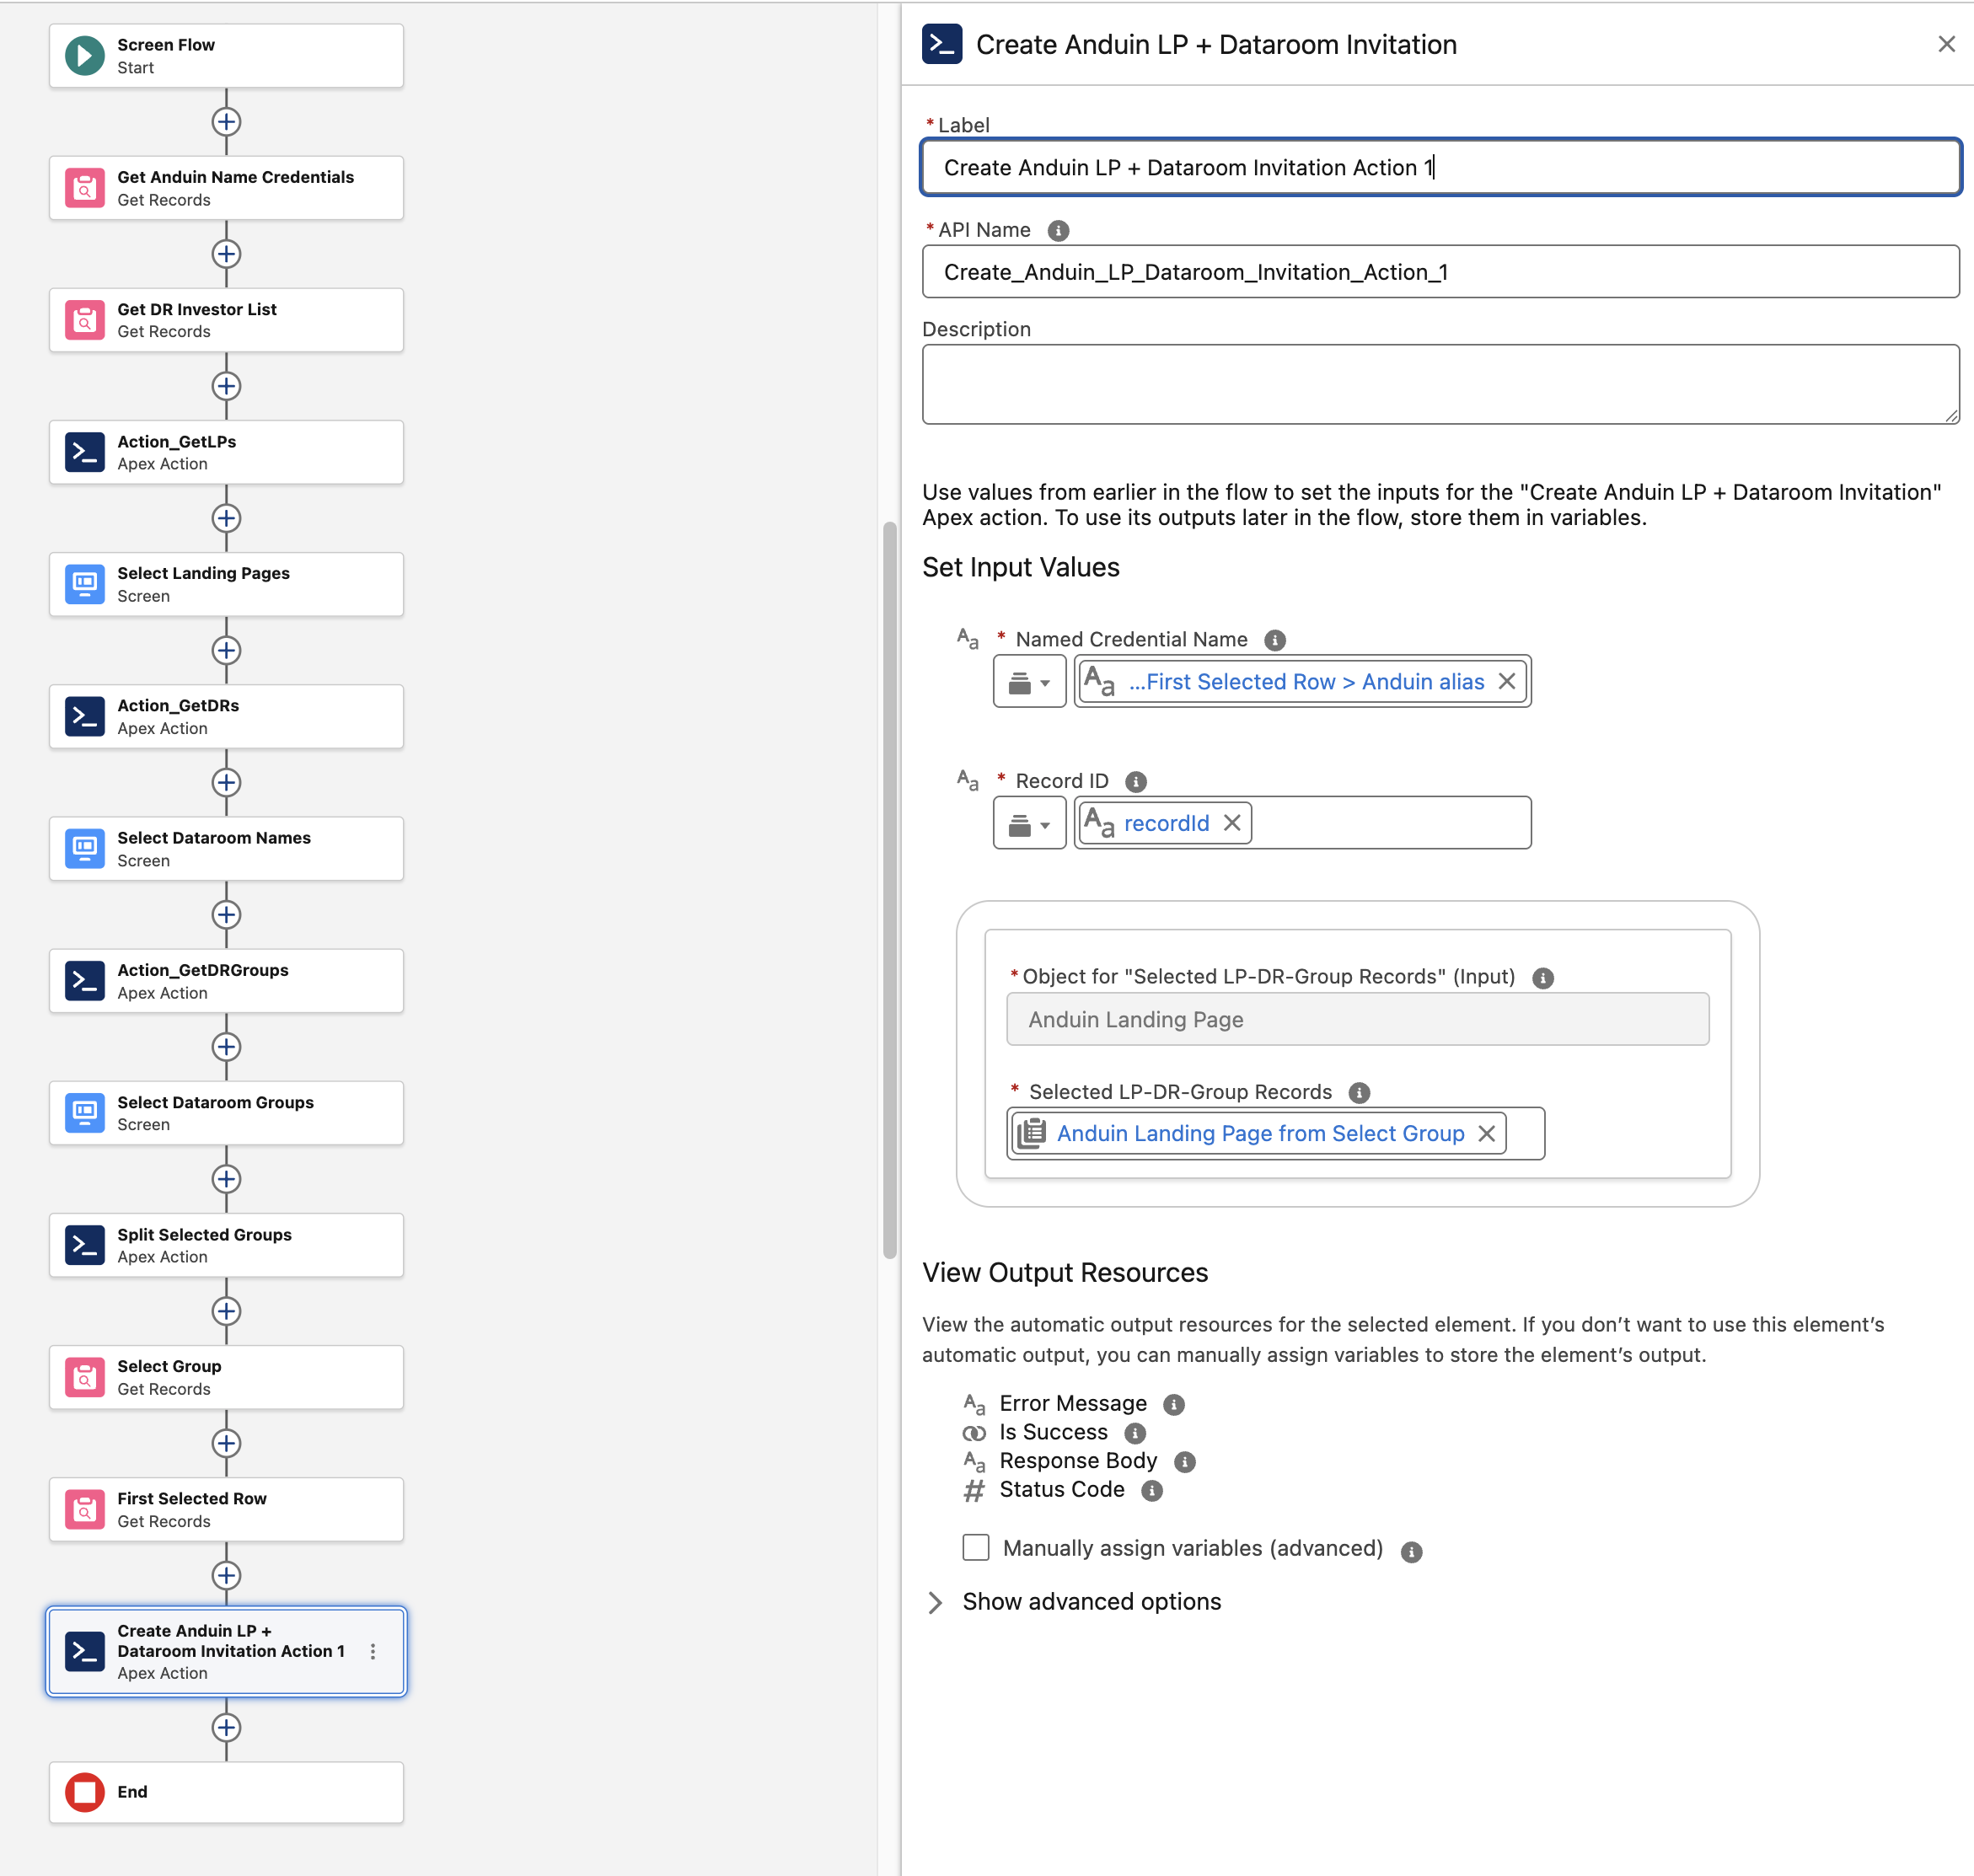
Create Anduin LP + Dataroom Invitation (Apex Action)
This Apex action invokes the Anduin invitation endpoint, securely triggering the invite using the Named Credential resolved above, the investor's
recordId, and the full set of selected Landing Page/Data Room/Group rows.- Action:
apex-AnduinLPDRInvitationV2→invite - Inputs:
- Named Credential Name:
First Selected Row > Anduin alias - Record ID:
recordId - Selected LP-DR-Group Records: the full collection from Select Group (step 13)
- Named Credential Name:
- Action:
-
Save and Activate Flow:
- Save a new version of the Flow.
- Activate it via the Activate button in the top right of Flow Builder.
4. Create the button to trigger
This section shows you how to create a button on a Lightning Record Page to open the Screen Flow created above.
- Navigate to Object Manager:
- In Salesforce, go to Object Manager.
- Select the object used to source investor data for invitations.
- Create New Action:
- Go to Buttons, Links, and Actions → New Action.
- Action Type:
Flow - Flow: the Screen Flow created above
- Standard Label Type:
–None– - Label:
Invite to Landing Page & Dataroom(name it your way) - Click Save.
- Action Type:
- Go to Buttons, Links, and Actions → New Action.
- Add Button to Lightning Record Page:
- Go to Lightning Record Pages, select the target page, click Edit.
- Add the button to the desired area (e.g. Add Action to the Highlights Panel). Once saved, navigate to the target object and trigger the flow with that button.
Production setup
1. Object creation
Navigate to the configuration wizard and replace your Salesforce credentials with production info. Once done, the same Named Credential and External Credential described in Sandbox step 1 are automatically created in your Salesforce production org.
2. Deploy Apex Class from Sandbox to Production
To deploy AnduinLPDRInvitationV2 and AnduinLPDRInvitationV2Test from Sandbox to Production, use the Change Sets method (Salesforce CLI / Ant Migration Tool also work).
2.1 Ensure the Apex Class and Test Class are available in Sandbox
In your Sandbox, go to Setup > Apex Classes and confirm both AnduinLPDRInvitationV2 and AnduinLPDRInvitationV2Test are present. They're created automatically during Sandbox setup (step 1 above); if missing, create them manually via Setup > Apex Classes > New using the code below.
public with sharing class AnduinLPDRInvitationV2 {
    public class InvitationRequest {
        @InvocableVariable(label='Record ID' required=true)
        public String recordId;
        @InvocableVariable(label='Named Credential Name' required=true)
        public String namedCredentialName;
        @InvocableVariable(label='Selected LP-DR-Group Records' required=true)
        public List<SObject> selections;
    }

    public class InvitationResult {
        @InvocableVariable(label='Is Success')
        public Boolean isSuccess;
        @InvocableVariable(label='Status Code')
        public Integer statusCode;
        @InvocableVariable(label='Response Body')
        public String responseBody;
        @InvocableVariable(label='Error Message')
        public String errorMessage;
    }

    @InvocableMethod(label='Create Anduin LP + Dataroom Invitation' description='Sends contact + all selected LP-DR-Group rows to Anduin in one call' callout=true)
    public static List<InvitationResult> invite(List<InvitationRequest> requests) {
        List<InvitationResult> results = new List<InvitationResult>();
        for (InvitationRequest req : requests) {
            results.add(sendInvitation(req));
        }
        return results;
    }

    private static String safeStr(Object v) {
        return v == null ? null : String.valueOf(v);
    }

    private static InvitationResult sendInvitation(InvitationRequest req) {
        InvitationResult result = new InvitationResult();
        try {
            List<Map<String, Object>> selections = new List<Map<String, Object>>();
            if (req.selections != null) {
                for (SObject row : req.selections) {
                    String drId = safeStr(row.get('DR_ID__c'));
                    String groupId = safeStr(row.get('Group_ID__c'));
                    if (String.isBlank(drId) || String.isBlank(groupId)) { continue; }
                    selections.add(new Map<String, Object>{
                        'lpId' => safeStr(row.get('LP_ID__c')),
                        'drId' => drId,
                        'groupId' => groupId
                    });
                }
            }

            Map<String, Object> payload = new Map<String, Object>{
                'recordId' => req.recordId,
                'selections' => selections
            };

            HttpRequest httpReq = new HttpRequest();
            httpReq.setEndpoint('callout:' + req.namedCredentialName);
            httpReq.setMethod('POST');
            httpReq.setHeader('Content-Type', 'application/json');
            httpReq.setBody(JSON.serialize(payload));

            Http http = new Http();
            HttpResponse res = http.send(httpReq);
            result.statusCode = res.getStatusCode();
            result.responseBody = res.getBody();
            if (res.getStatusCode() >= 200 && res.getStatusCode() < 300) {
                result.isSuccess = true;
            } else {
                result.isSuccess = false;
                result.errorMessage = 'HTTP ' + res.getStatusCode() + ': ' + res.getBody();
            }
        } catch (Exception e) {
            result.isSuccess = false;
            result.errorMessage = e.getMessage();
            result.statusCode = null;
            result.responseBody = null;
        }
        return result;
    }
}
@isTest
private class AnduinLPDRInvitationV2Test {
private class MockSuccess implements HttpCalloutMock {
public HTTPResponse respond(HTTPRequest req) {
HttpResponse res = new HttpResponse();
res.setStatusCode(200);
res.setBody('{"status":"accepted"}');
return res;
}
}
private class MockError implements HttpCalloutMock {
public HTTPResponse respond(HTTPRequest req) {
HttpResponse res = new HttpResponse();
res.setStatusCode(400);
res.setBody('{"error":"bad request"}');
return res;
}
}
@isTest
static void testInviteSuccess() {
Test.setMock(HttpCalloutMock.class, new MockSuccess());
AnduinLPDRInvitationV2.InvitationRequest r = new AnduinLPDRInvitationV2.InvitationRequest();
r.recordId = '003000000000001AAA';
r.namedCredentialName = 'TestCredential';
r.selections = new List<SObject>();
Test.startTest();
List<AnduinLPDRInvitationV2.InvitationResult> results =
AnduinLPDRInvitationV2.invite(new List<AnduinLPDRInvitationV2.InvitationRequest>{ r });
Test.stopTest();
System.assertEquals(1, results.size());
System.assertEquals(true, results[0].isSuccess);
System.assertEquals(200, results[0].statusCode);
System.assertEquals(null, results[0].errorMessage);
}
@isTest
static void testInviteError() {
Test.setMock(HttpCalloutMock.class, new MockError());
AnduinLPDRInvitationV2.InvitationRequest r = new AnduinLPDRInvitationV2.InvitationRequest();
r.recordId = '003000000000001AAA';
r.namedCredentialName = 'TestCredential';
r.selections = new List<SObject>();
Test.startTest();
List<AnduinLPDRInvitationV2.InvitationResult> results =
AnduinLPDRInvitationV2.invite(new List<AnduinLPDRInvitationV2.InvitationRequest>{ r });
Test.stopTest();
System.assertEquals(false, results[0].isSuccess);
System.assertEquals(400, results[0].statusCode);
System.assert(results[0].errorMessage.contains('HTTP 400'));
}
@isTest
static void testInviteMultipleRequests() {
Test.setMock(HttpCalloutMock.class, new MockSuccess());
AnduinLPDRInvitationV2.InvitationRequest r1 = new AnduinLPDRInvitationV2.InvitationRequest();
r1.recordId = '003000000000001AAA';
r1.namedCredentialName = 'TestCredential';
r1.selections = new List<SObject>();
AnduinLPDRInvitationV2.InvitationRequest r2 = new AnduinLPDRInvitationV2.InvitationRequest();
r2.recordId = '003000000000002AAA';
r2.namedCredentialName = 'TestCredential';
r2.selections = new List<SObject>();
Test.startTest();
List<AnduinLPDRInvitationV2.InvitationResult> results =
AnduinLPDRInvitationV2.invite(new List<AnduinLPDRInvitationV2.InvitationRequest>{ r1, r2 });
Test.stopTest();
System.assertEquals(2, results.size());
}
}2.2 Ensure your Sandbox and Production are connected
Go to Setup > Deployment Settings and verify your Sandbox can push changes to Production (a green arrow indicates the connection is active).
2.3 Setup and push Apex from your Sandbox
- Navigate to Setup > Outbound Change Sets > New
- Create and name your outbound change set
- Under Change Set Components, add
AnduinLPDRInvitationV2andAnduinLPDRInvitationV2Test - Select Upload, choose the target Production environment, and click Upload
2.4 Approve the Apex in your Production
- Go to Setup > Inbound Change Sets in Production
- Click Validate, then Deploy
- Go to Setup > Apex Classes and verify both classes are present
3. Remaining steps
After the Apex Classes are successfully deployed, repeat the remaining Sandbox steps (screen flow build + trigger button) in Production, and you're good to go!
Updated 2 months ago