
FIS Digital Data Exchange Integration
1. Purpose
Automatically push subscription documents and AML/KYC supporting files from FundSub to the customer's FIS Digital Data Exchange (DDX), eliminating manual downloads and ensuring all post-close investor documents are archived in the GP's designated repository.
2. Key Benefits & Features
- Establishes FIS Digital Data Exchange as the central, authoritative archive for post-close investor documents. GP teams can trust the DDX repository reflects final, signed subscription agreements and all associated supporting files.
- Eliminates repetitive administrative work: subscription documents are delivered automatically when a subscription reaches the configured trigger status, and AML/KYC documents are pushed immediately upon upload.
- Maintains a complete version history: updated documents (re-signed subscriptions, corrected W-9s) are accumulated as new files alongside previous versions, ensuring a full audit trail.
3. Target Personas
- Valuable for any FundSub customer using FIS Digital Data Exchange as their post-close document archival system
- Especially useful for firms that need to automate delivery of subscription and AML/KYC documents to FIS DDX across multiple funds
4. Prerequisites
4.1 Third-party app requirements (FIS Digital Data Exchange)
Credentials
The integration authenticates with FIS DDX using the customer's account credentials. Customers must have an active FIS DDX account and gather the following details from their FIS DDX administrator:
- Host: Hostname of the FIS DataExchange server (without protocol or trailing slash)
- Email: Email address used for the
CreateSessionByContactEmailSOAP call - Password: Password used for the
EnterPasswordSOAP call - Application: Application identifier registered with FIS
- License Identifier: License key provided by FIS for this integration (UUID format)
Credential changes: If any credentials change (e.g., password reset or account update), the integration configuration must be updated immediately to avoid sync failure.
Data Room prerequisite
The integration requires a pre-existing Data Room in FIS DDX as the top-level document container. The Data Room must be provisioned by the GP admin or FIS administrator before setup.
If the Data Room does not exist at the time of the first integration run, the document push will fail with an error. Anduin cannot auto-create the top-level Data Room.
4.2 Anduin app requirements
Fund access — the user must either:
- Have admin access to the intended funds, or
- Know a team member with admin access who can grant the necessary permissions during setup
Document types: Understand the two categories of documents that will be pushed:
- Subscription document: PDF of the completed subscription form, pushed when the subscription reaches the configured trigger status
- Supporting document (AML/KYC): Files uploaded by investors (W-9, passport, entity formation certificate, and other supporting docs), pushed immediately upon upload — independent of subscription status
5. Pre-Setup Checklist
| Task | Owner | Note | Anduin Guide |
|---|---|---|---|
| FIS DDX credentials — obtain all required credentials (Host, Email, Password, Application, License Identifier) | Customer | Guided by Anduin to ensure correct inputs | |
| FIS DDX credentials — aware of credential update requirement | Customer | Consulted by Anduin | If credentials change, the integration configuration must be updated immediately to avoid sync failure. |
| Data Room provisioning — ensure Data Room exists in FIS DDX and retrieve the Parent Document ID | Customer | Consulted by Anduin | Provisioned by GP admin or FIS administrator. |
| Fund access | Customer | Consulted by Anduin | |
| Document type awareness | Anduin |
6. Internal Step-By-Step Rollout Guide
6.1 Grant access to the Integration Hub
Customers should contact their Implementation Manager to ensure they have access to the Hub and the correct integration flow.
6.2 Locate the solution
In the Browse tab of the Integration Hub, locate the FIS Digital Data Exchange solution.
6.3 Install the solution
- Step 1: Click Install to begin setup.
- Step 2: Name the integration.
- Recommend a clear and descriptive name (e.g.,
FIS Digital Data Exchange - Fund Alpha) - Click Next: Link to Anduin objects
- Recommend a clear and descriptive name (e.g.,
- Step 3: Grant integration permission to customer's intended objects (funds).
- Step 3.1: A list of accessible Anduin objects (e.g., Funds) will appear.
- Step 3.2: Click Open next to the relevant fund.
- Step 3.3: In the permission module, find the integration name and click Add.
- Step 3.4: Return to the Integration Hub — the fund should now show a "Linked" tag.
If the target fund is not listed, there are 2 options
- Customer needs to be added with admin role for that fund, then return to step 3.2. Customer should be able to see the target fund there.
- Customer requests their team member who has admin role in that fund to perform step 3.3 using Settings > Integrations in the FundSub app and they can continue with step 3.4.
6.4 Configure the solution
The configuration wizard has 5 steps shown in the left-hand navigation:
Step 1 — Initial Configuration
- Review and optionally rename the integration instance.
Step 2 — Getting Started: Authentication
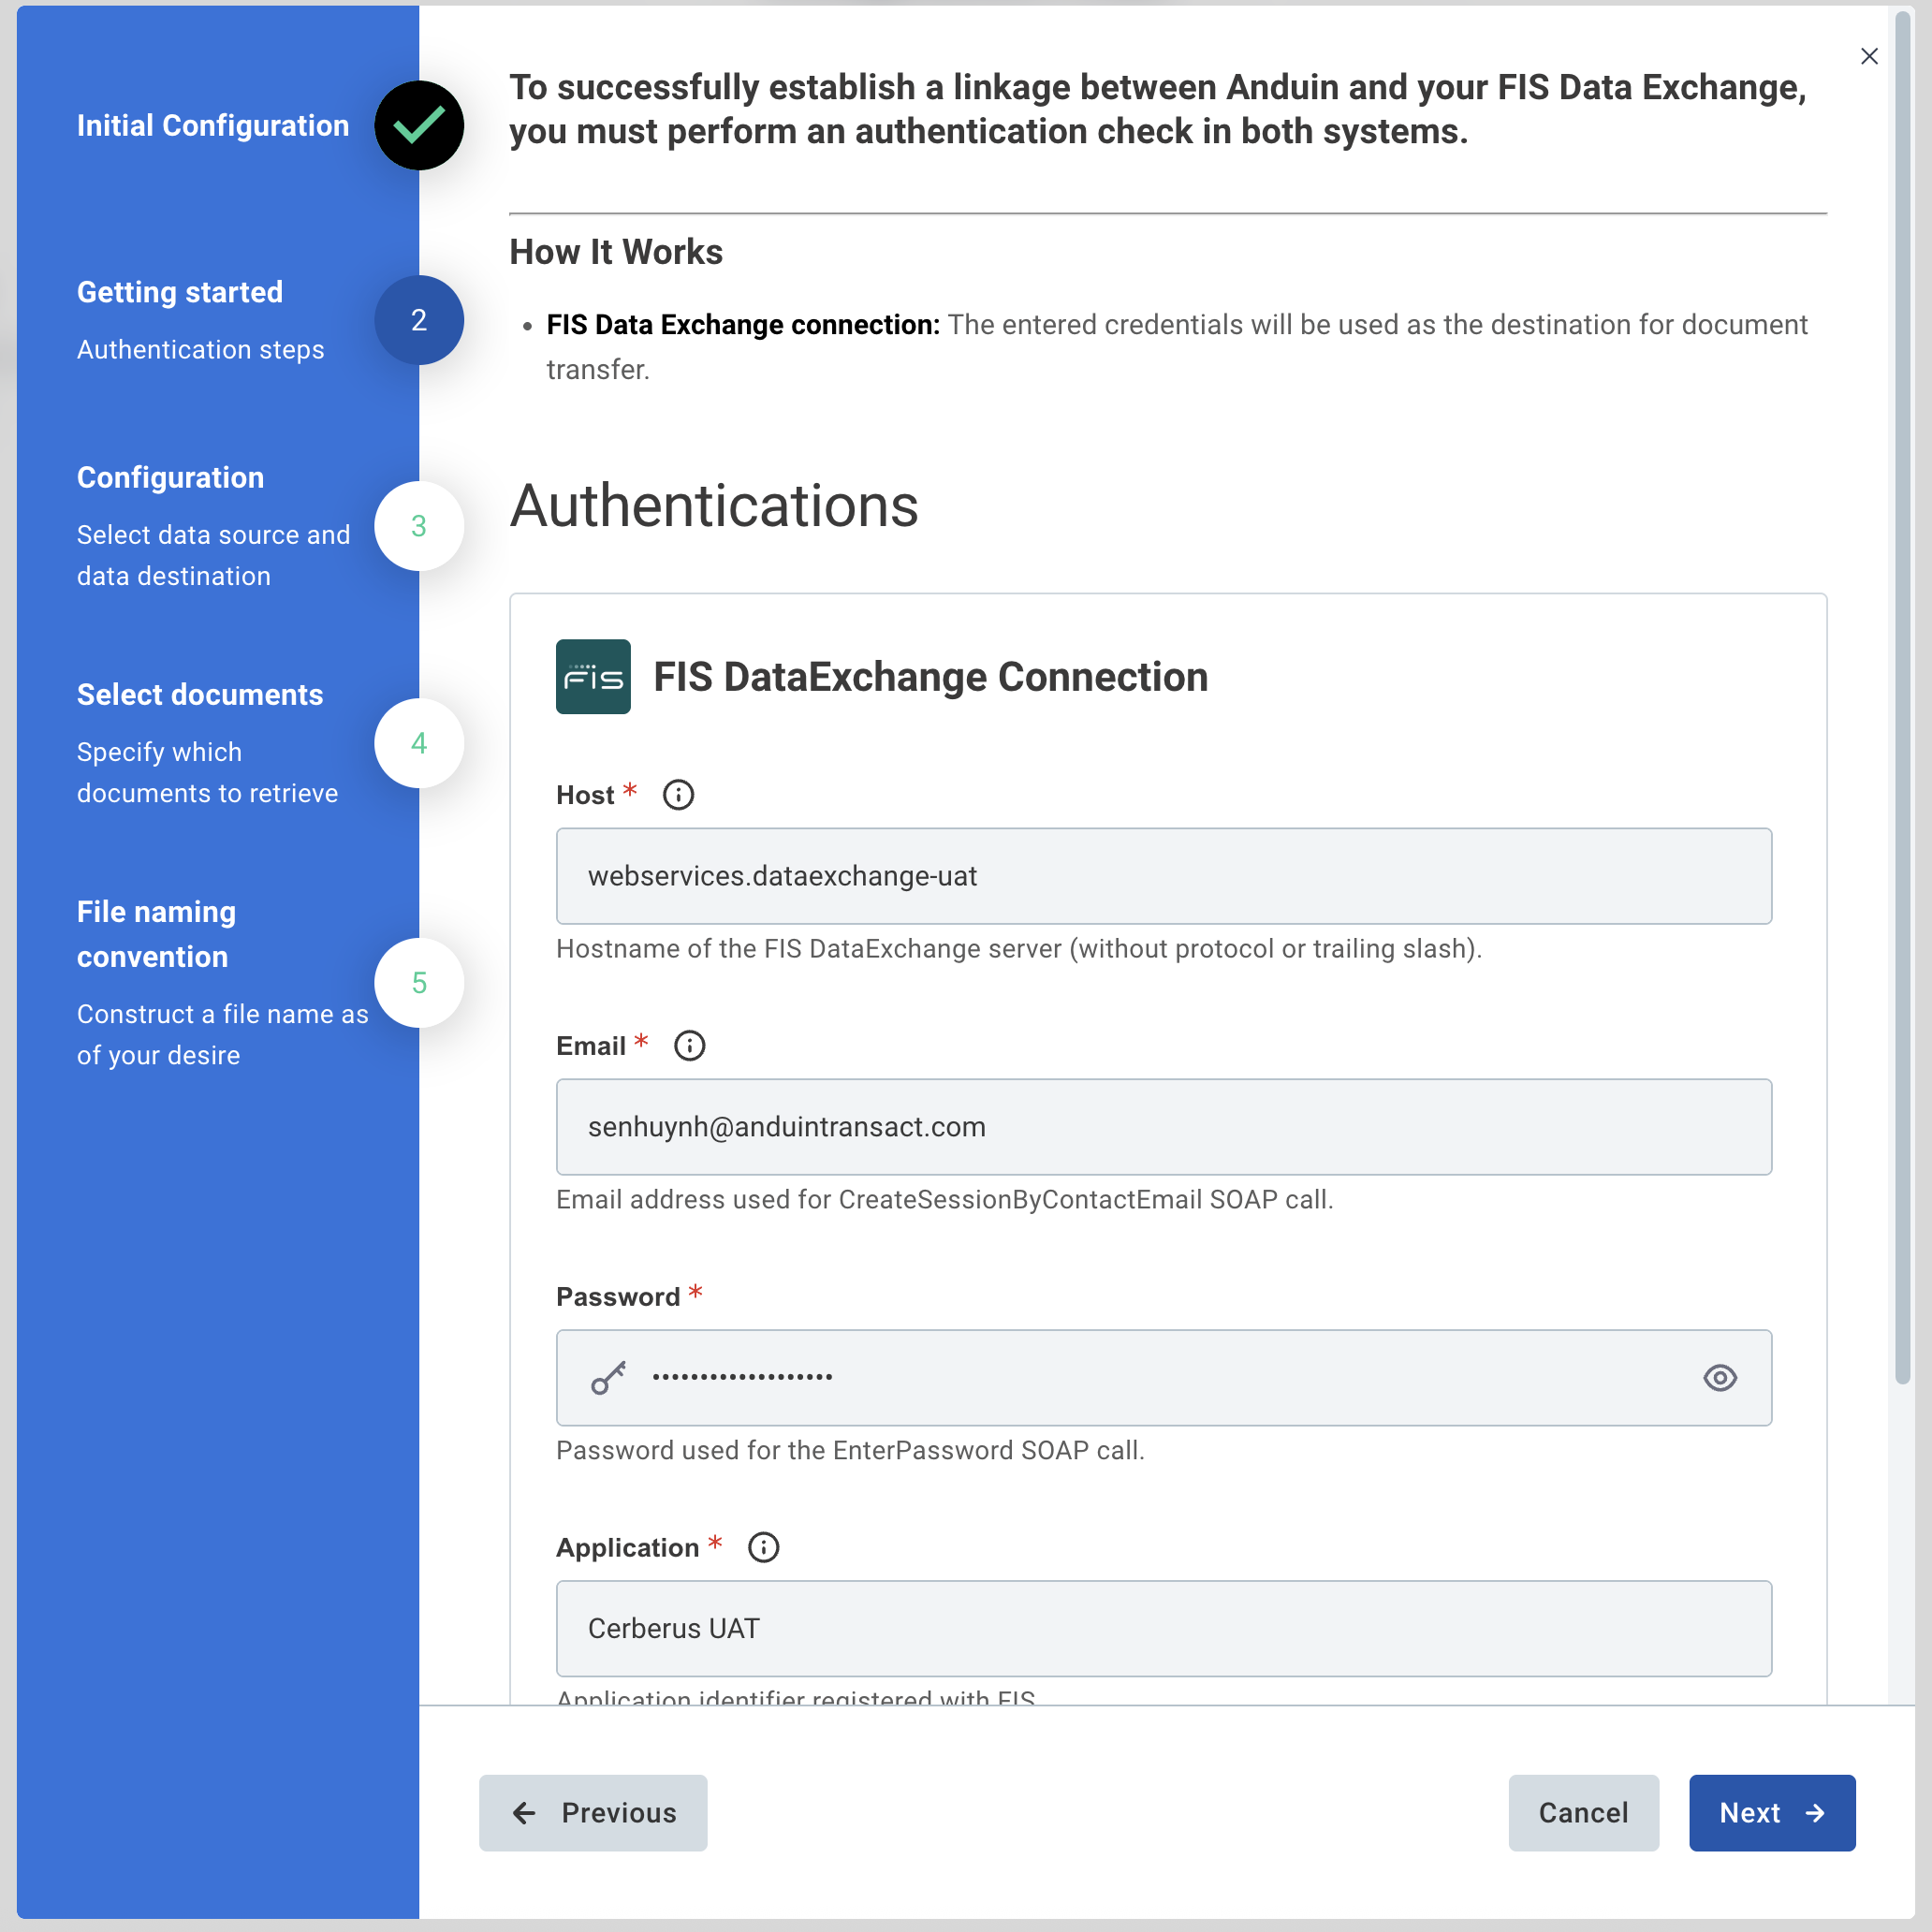
Two connections must be authenticated:
- Anduin Connection: Pre-configured by Anduin. No action required from the customer.
- FIS DataExchange Connection: Enter the following credentials to authenticate with FIS Digital Data Exchange:
| Field | Description |
|---|---|
| Host | Hostname of the FIS DataExchange server (without protocol or trailing slash) |
Email address used for the CreateSessionByContactEmail SOAP call | |
| Password | Password used for the EnterPassword SOAP call |
| Application | Application identifier registered with FIS |
| License Identifier | License key provided by FIS for this integration |
Step 3 — Configuration: Select Anduin fund(s) and FIS destination
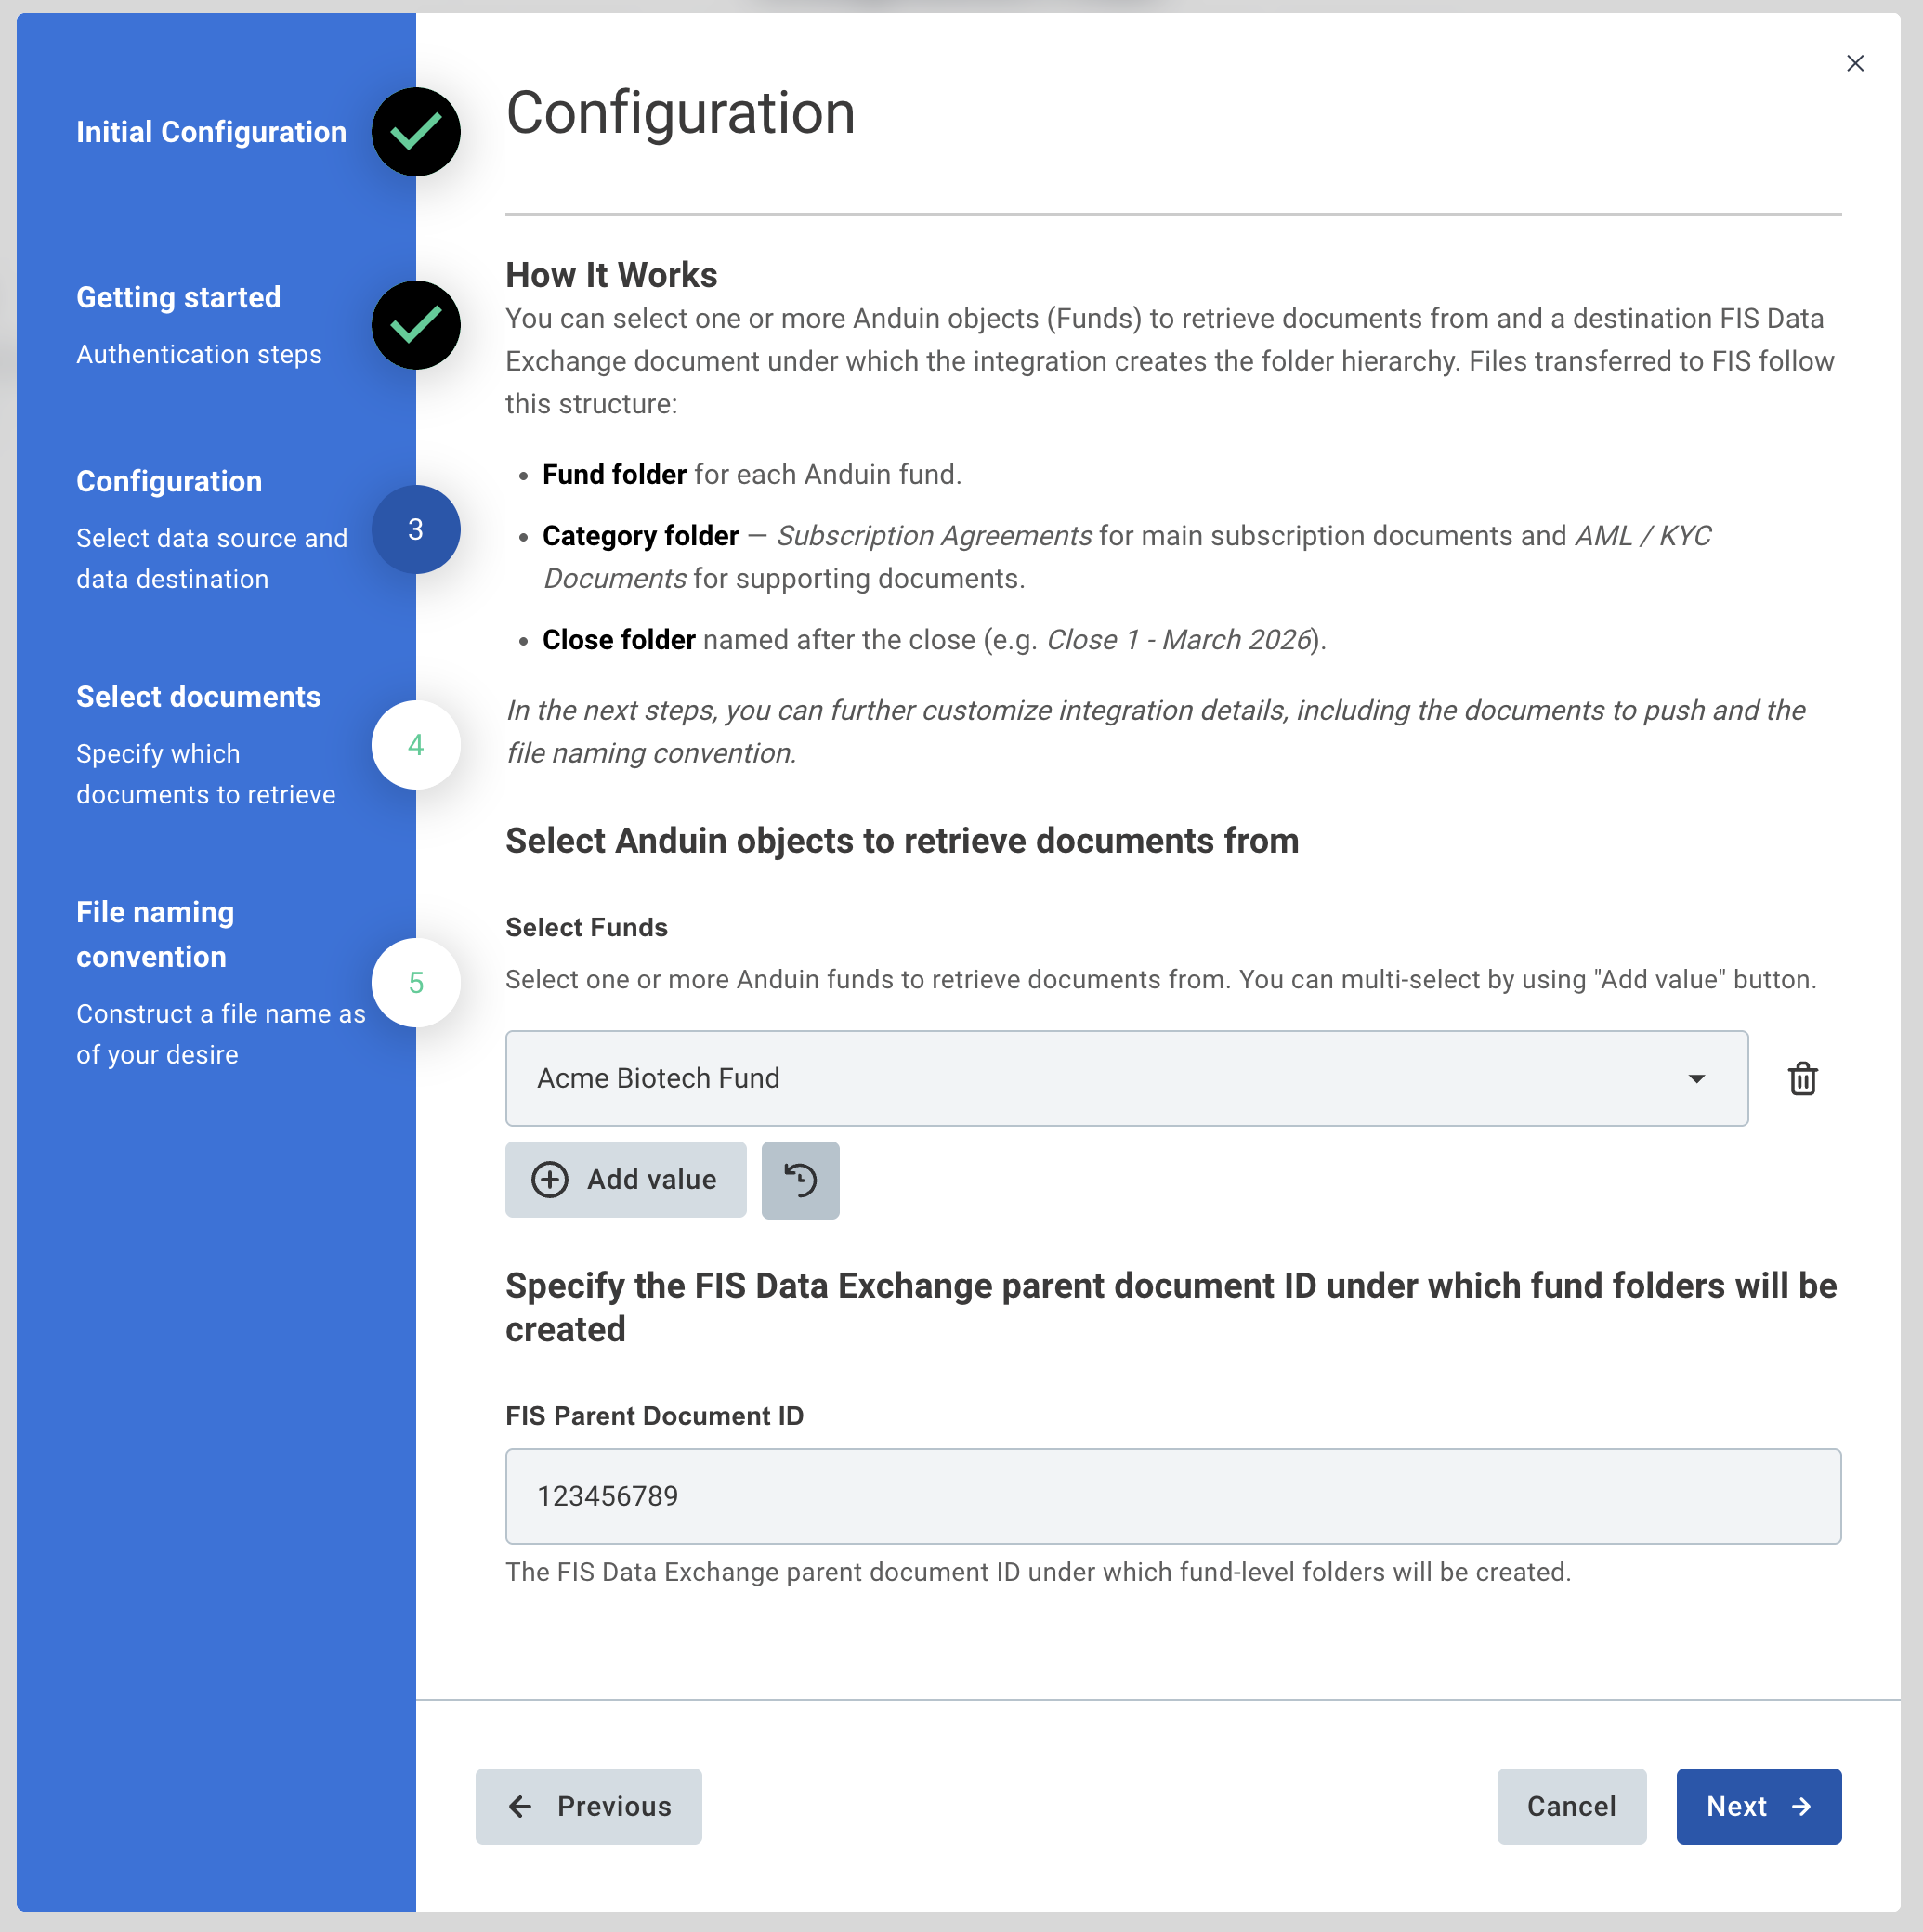
- Select Funds: Select the Anduin fund(s) this integration should work with. Multi-select is supported — click Add value to add more funds. Only funds granted integration permission in Step 6.3 will appear here.
- FIS Parent Document ID: Enter the numeric Document ID of the pre-provisioned Data Room in FIS DDX. Fund-level folders and all sub-folders will be created under this document.
Step 4 — Select Documents
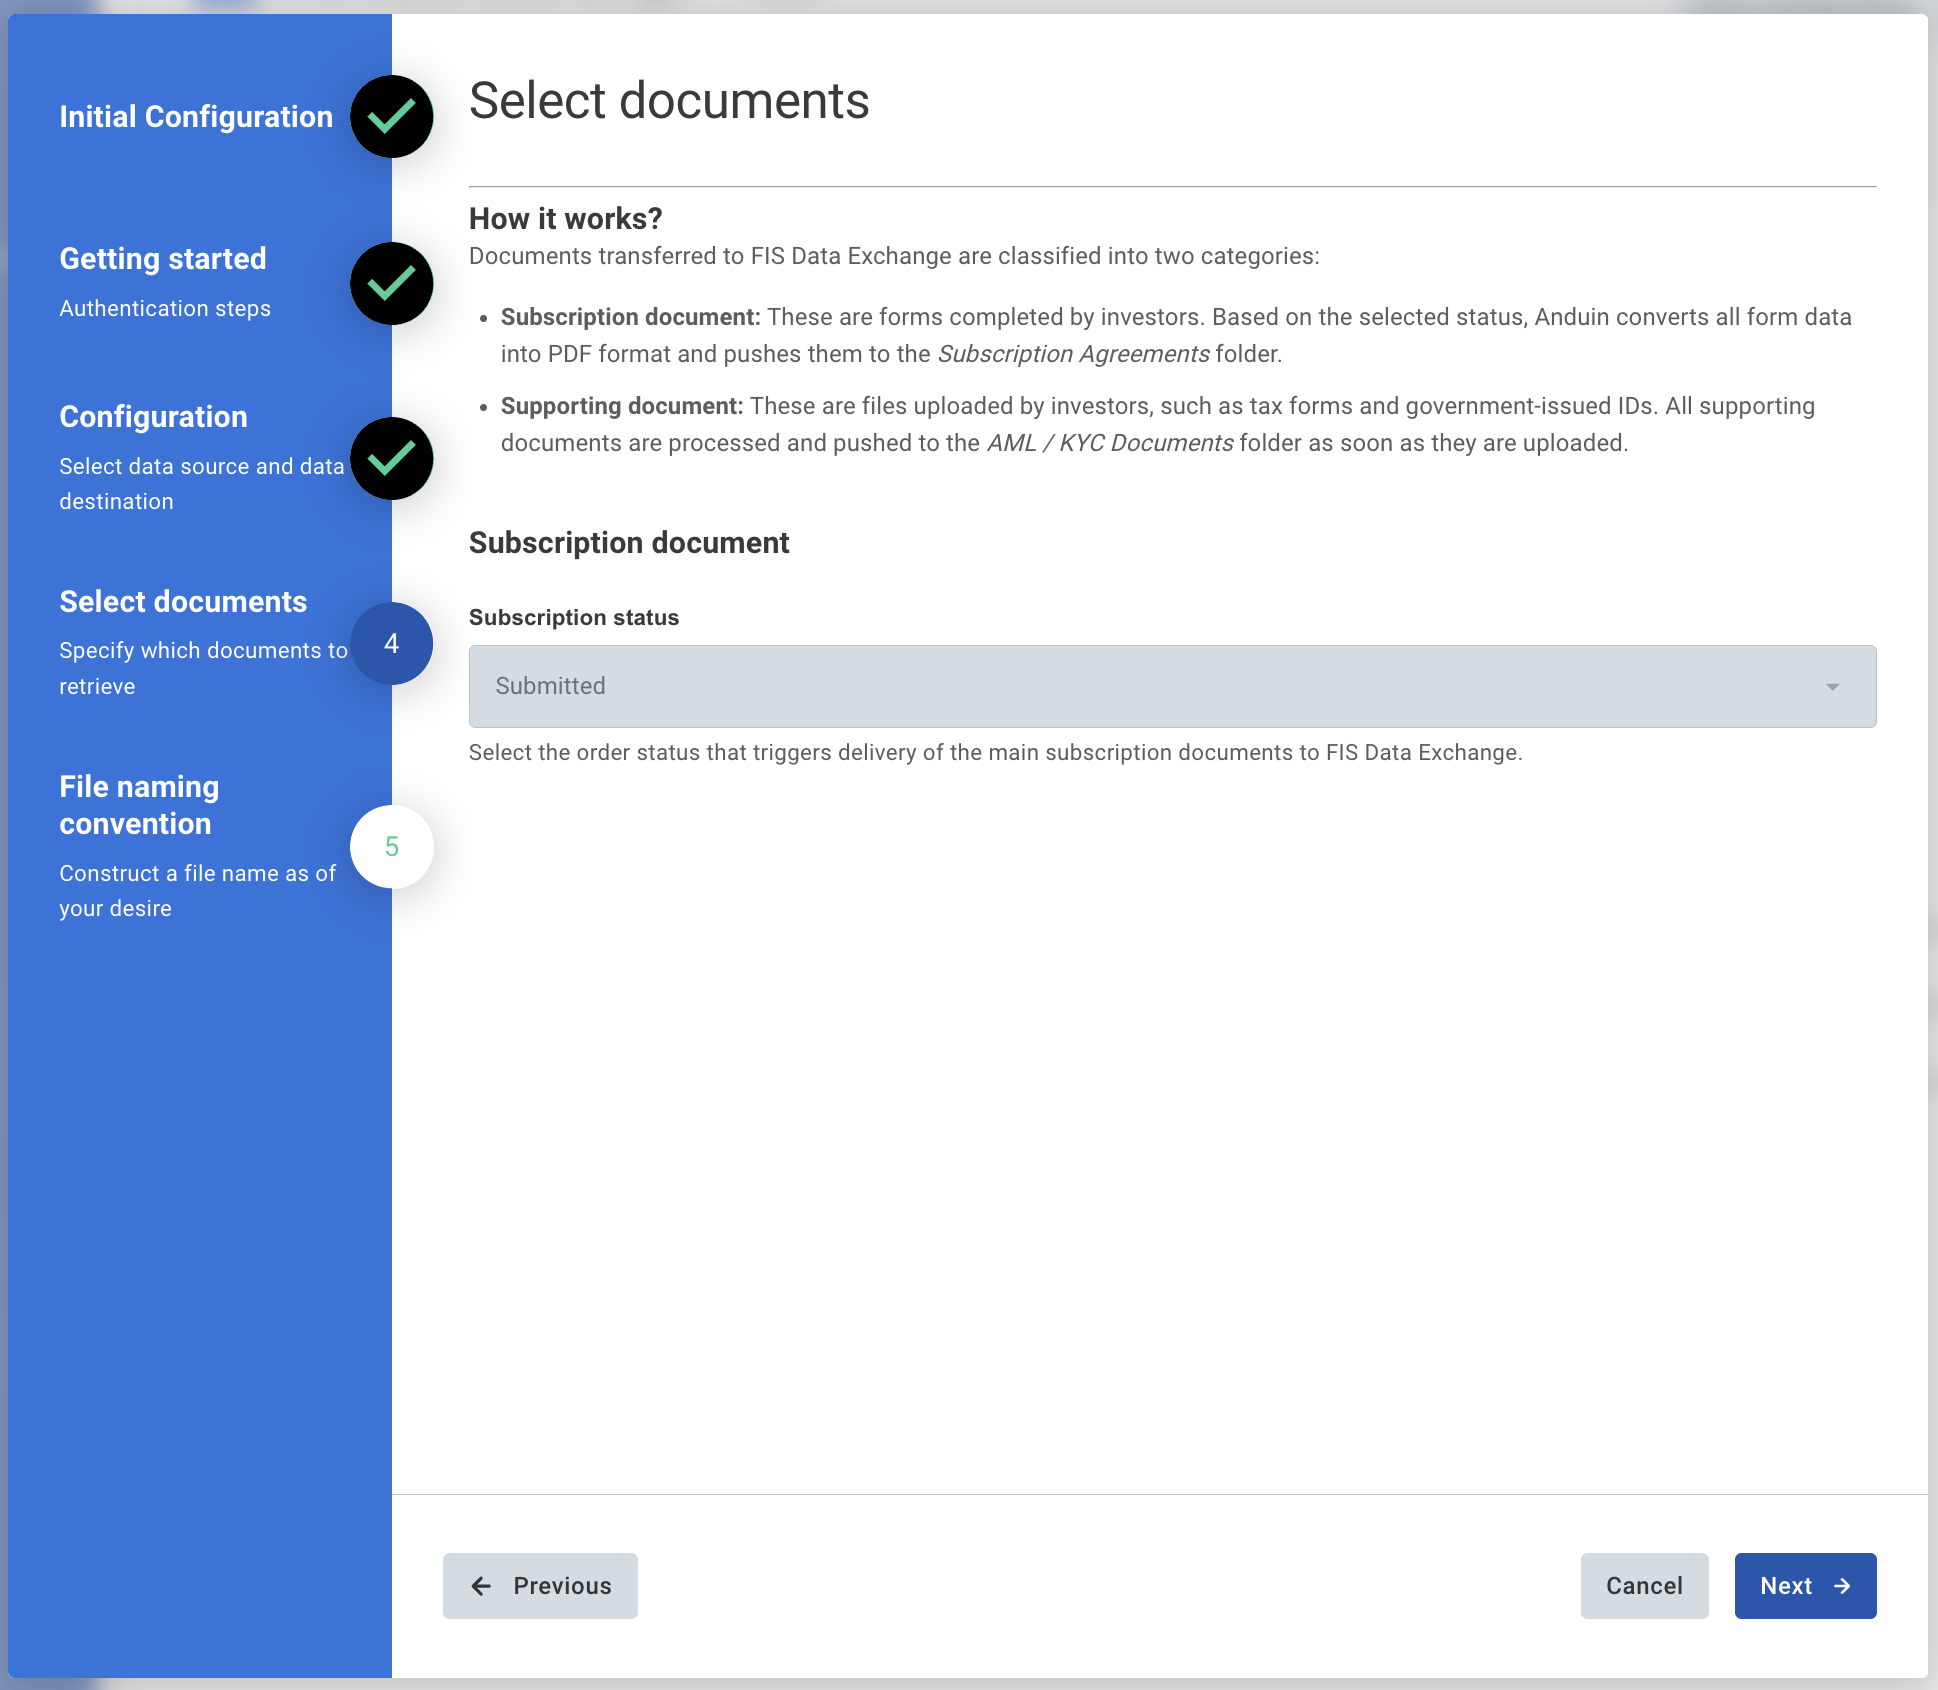
Documents pushed to FIS DDX are classified into two categories:
- Subscription document: Forms completed by investors. Anduin converts all form data into PDF format and pushes them to the Subscription Agreements folder.
- Supporting document (AML/KYC): Files uploaded by investors (tax forms, government-issued IDs, etc.). All supporting documents are pushed to the AML / KYC Documents folder immediately upon upload.
- Subscription status: Select the status that triggers a subscription document push. A push is triggered every time a subscription reaches this status.
- Supporting documents are pushed immediately upon upload — no trigger status applies to them.
Step 5 — File Naming Convention
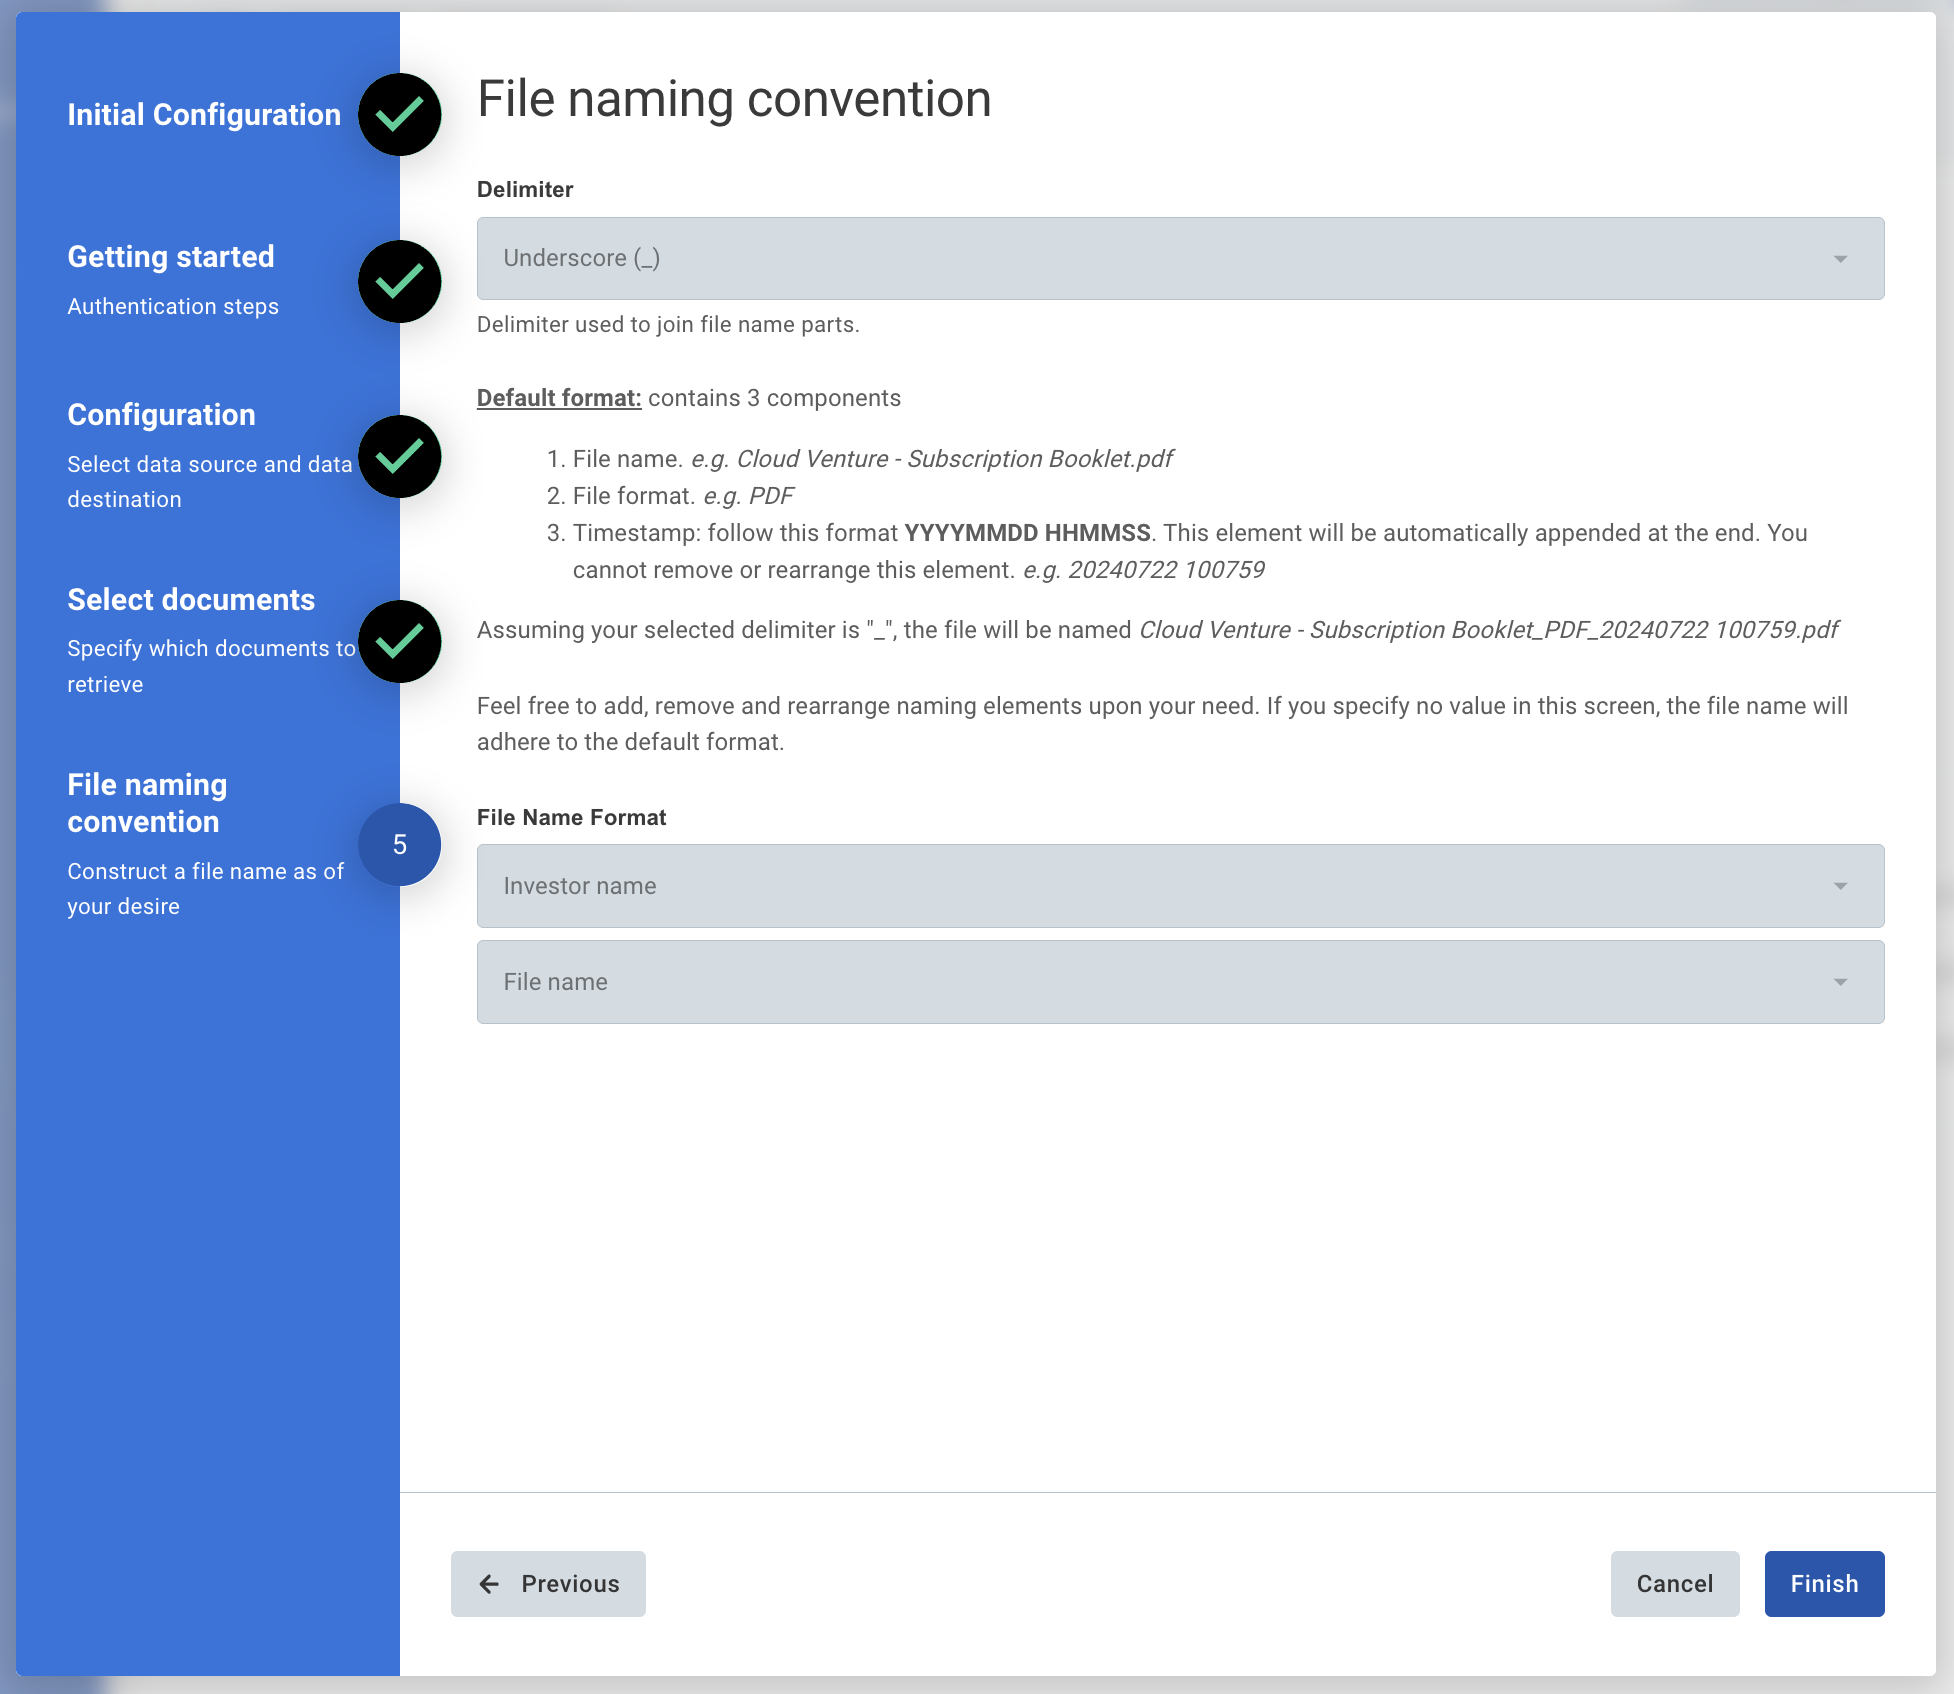
Configure how pushed files will be named in FIS DDX:
- Choose your delimiter (e.g., Underscore
_) - Default format contains 3 components:
- File name — e.g. Cloud Venture - Subscription Booklet.pdf
- File format — e.g. PDF
- Timestamp — follows format YYYYMMDD HHMMSS. This element is automatically appended at the end and cannot be removed or rearranged.
- File Name Format: Configurable. Add, remove, and rearrange naming elements as needed. If no value is specified, the file name will adhere to the default format.
Click Finish to complete setup.
6.5 Validate the solution
Once configuration is complete:
- The customer can verify the integration by checking that fund-level folders have been created inside the Data Room in FIS DDX (or confirm they will be created on the first trigger).
- The customer can then create a subscription in the target fund, fill out the data, and move the subscription to the configured triggering status.
- This will initiate the integration, resulting in:
- The subscription document (PDF) being uploaded to the Subscription Agreements folder under the corresponding close
- All supporting documents uploaded by the LP being pushed to the AML / KYC Documents folder
If the automation works end-to-end, the setup is successfully validated.
Updated 3 months ago