Create custom flow and trigger point in Salesforce [FundSub/IDM]
Sandbox setup
1. Object and Apex creation
After installing any of the investor onboarding flows, the following objects will be automatically created in your Salesforce sandbox:
- Named Credential:
- Label:
[FundName](FundNameis the name of the fund subscription instance selected in step 3 - URL: The URL of the “Create Orders in Anduin” flow, which can be found in the “Trigger details” of step 1
- Authentication:
- External Credential:
Credential: [FundName](as described below)
- External Credential:
- Label:
- External Credential:
- Label:
Credential: [FundName] - Name:
AnduinSFDCCredential_[InstanceId]InstanceIdis the unique ID of the instance of the configured integration.
- Authentication Protocol:
Custom - Related Named Credentials:
- Include the Named Credential created by the integration as described above
- Custom Header:
- Name:
Api-Key - Value: The API key of the “Create Orders in Anduin” flow, found in the Trigger details of step 1
- Name:
- Label:
- Apex Class:
- Name:
AnduinFSOrderManager - Invokable Method
invite:- Securely trigger the “Create Orders in Anduin” via invoking the URL and Api-key setup in then pre-populated
Named CredentialandExternal Credentialabove. - Pass the
IDof the Salesforce record that is used to retrieve the data for creating and pre-filling the Anduin order, as configured in the Step 4 in the Configuration Wizard.
- Securely trigger the “Create Orders in Anduin” via invoking the URL and Api-key setup in then pre-populated
- Name:
- Apex Test Class:
- Name:
AnduinFSOrderManagerTest - Purpose: To conduct unit testing of the Apex Class, ensuring it is ready for deployment to Production.
- Name:
2. Configure Permissions
To grant your Salesforce users the permission to create orders on Anduin, follow these steps. Permissions can be granted through Salesforce “Profiles” or “Permission Sets.”
Grant Permission via Profile:
-
Navigate to Profiles:
- In Salesforce, go to Setup > Administration > Users > Profiles
-
Select Profile:
- Choose the profile (e.g., “Standard User”) to which you intend to grant permission.
-
Edit Permissions:
- Under the Apps section, select “External Credential Principal Access”
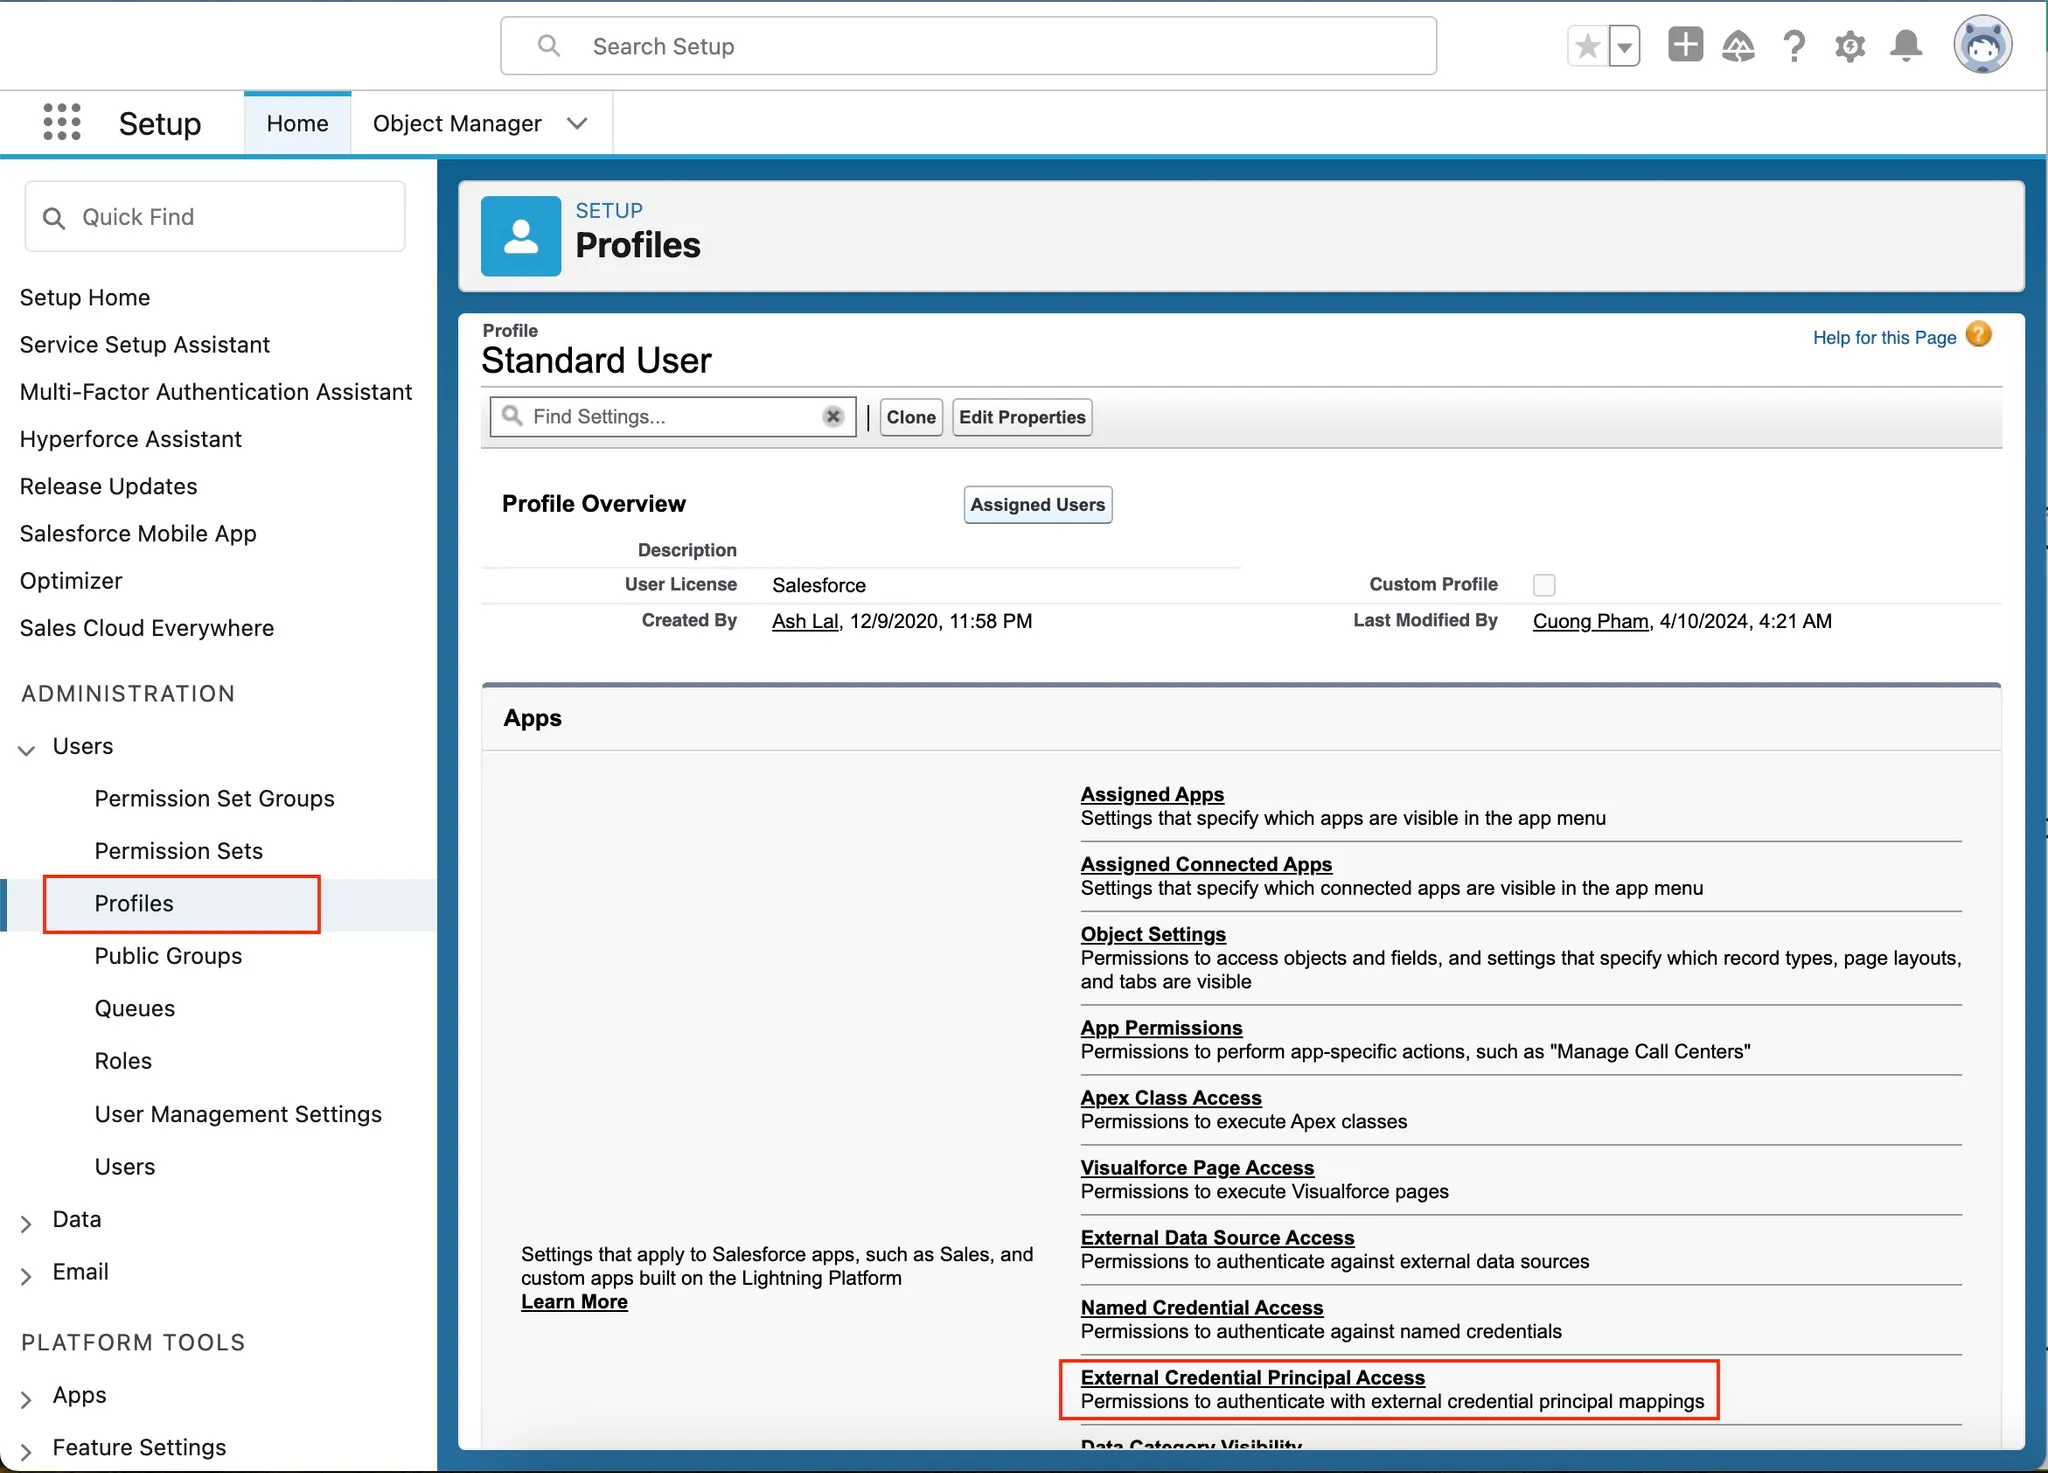
- Click Edit next to the “External Credential Principal Access.”
-
Assign External Credential:
- In the “External Credential Principal Access” table, select the External Credential of the integration flow

- Click “Save”
-
Verify Assigned Users:
- To see the users granted this permission, click the Assigned Users button on the Profile overview page.
3. Create a Screen Flow to Trigger the Create Order Flow on Anduin
This section guides you through creating a screen flow and adding a button to the record details page of the Salesforce object that generates Anduin orders. Although you may have multiple funds on Anduin, and thus multiple instances of this integration, you need to set up the screen flow only once. It will automatically work with all integration instances. This is a straightforward implementation designed to help you get started quickly. For a customized setup, consider consulting your Salesforce experts or the Anduin team.
Steps to Create a Screen Flow
-
Navigate to Flows:
- In Salesforce, go to Setup > Platform Tools > Process Automation > Flows.
-
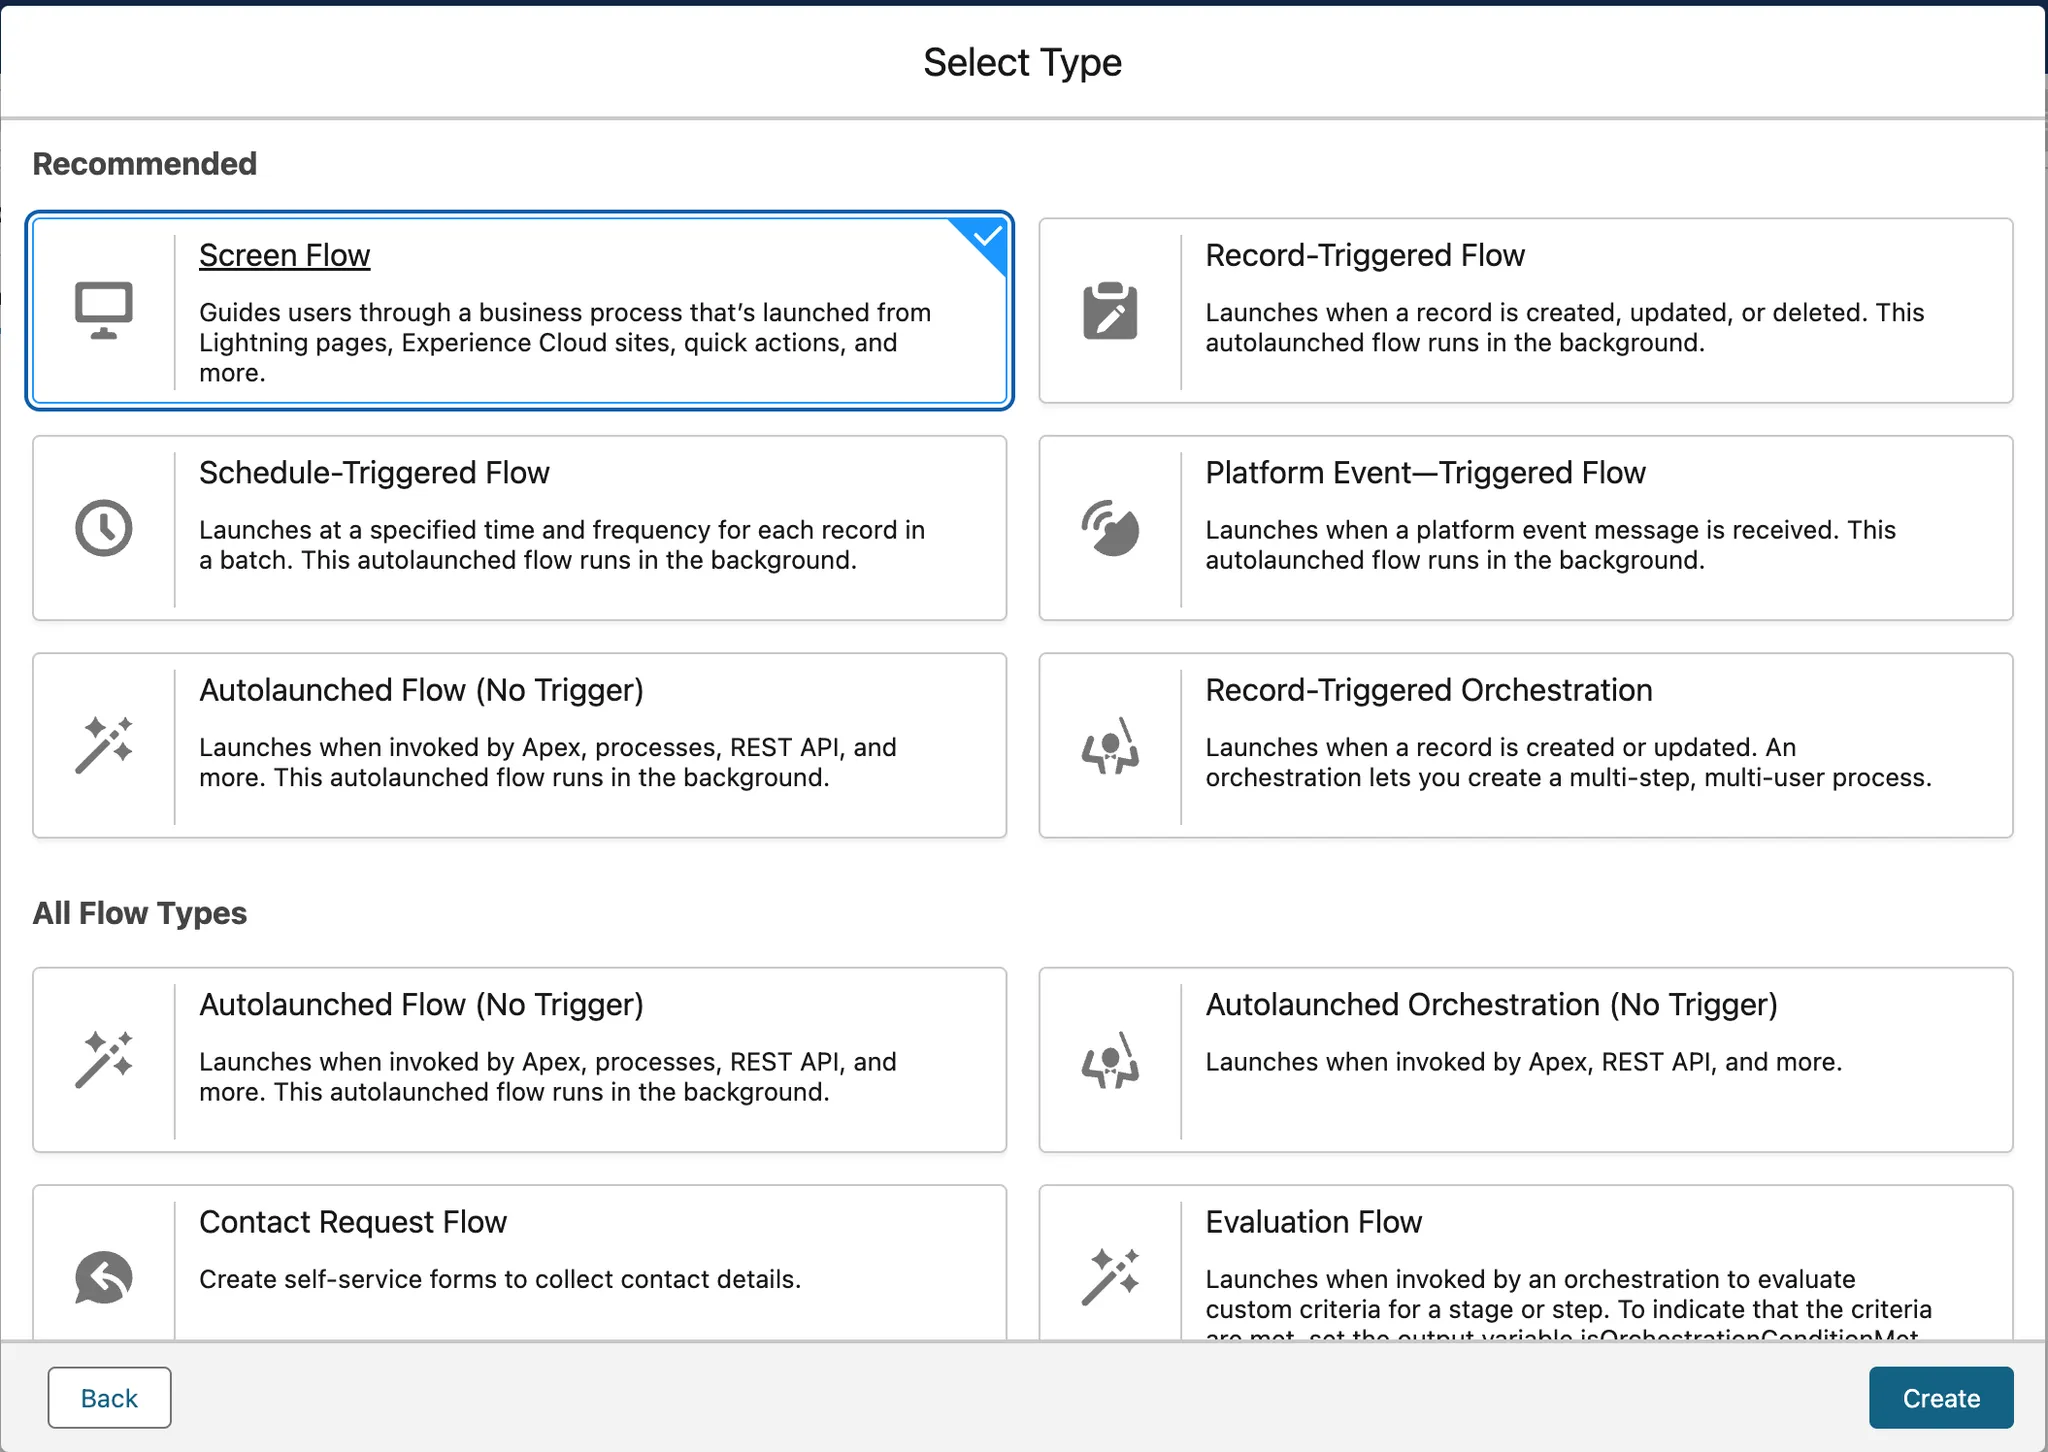
Create New Flow:
- Click New Flow.
- Select Start From Scratch, then click Next.
- Choose Screen Flow and click Create.
-
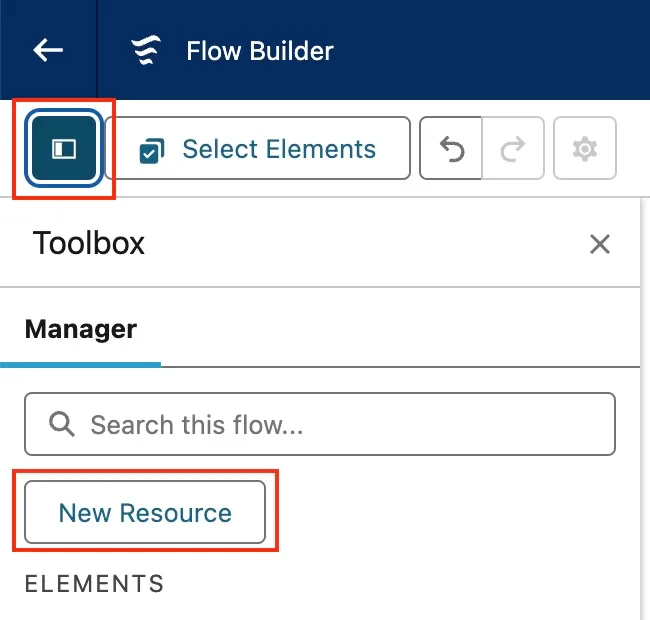
Create recordId Variable:
- Open the left panel and select New Resource.
-
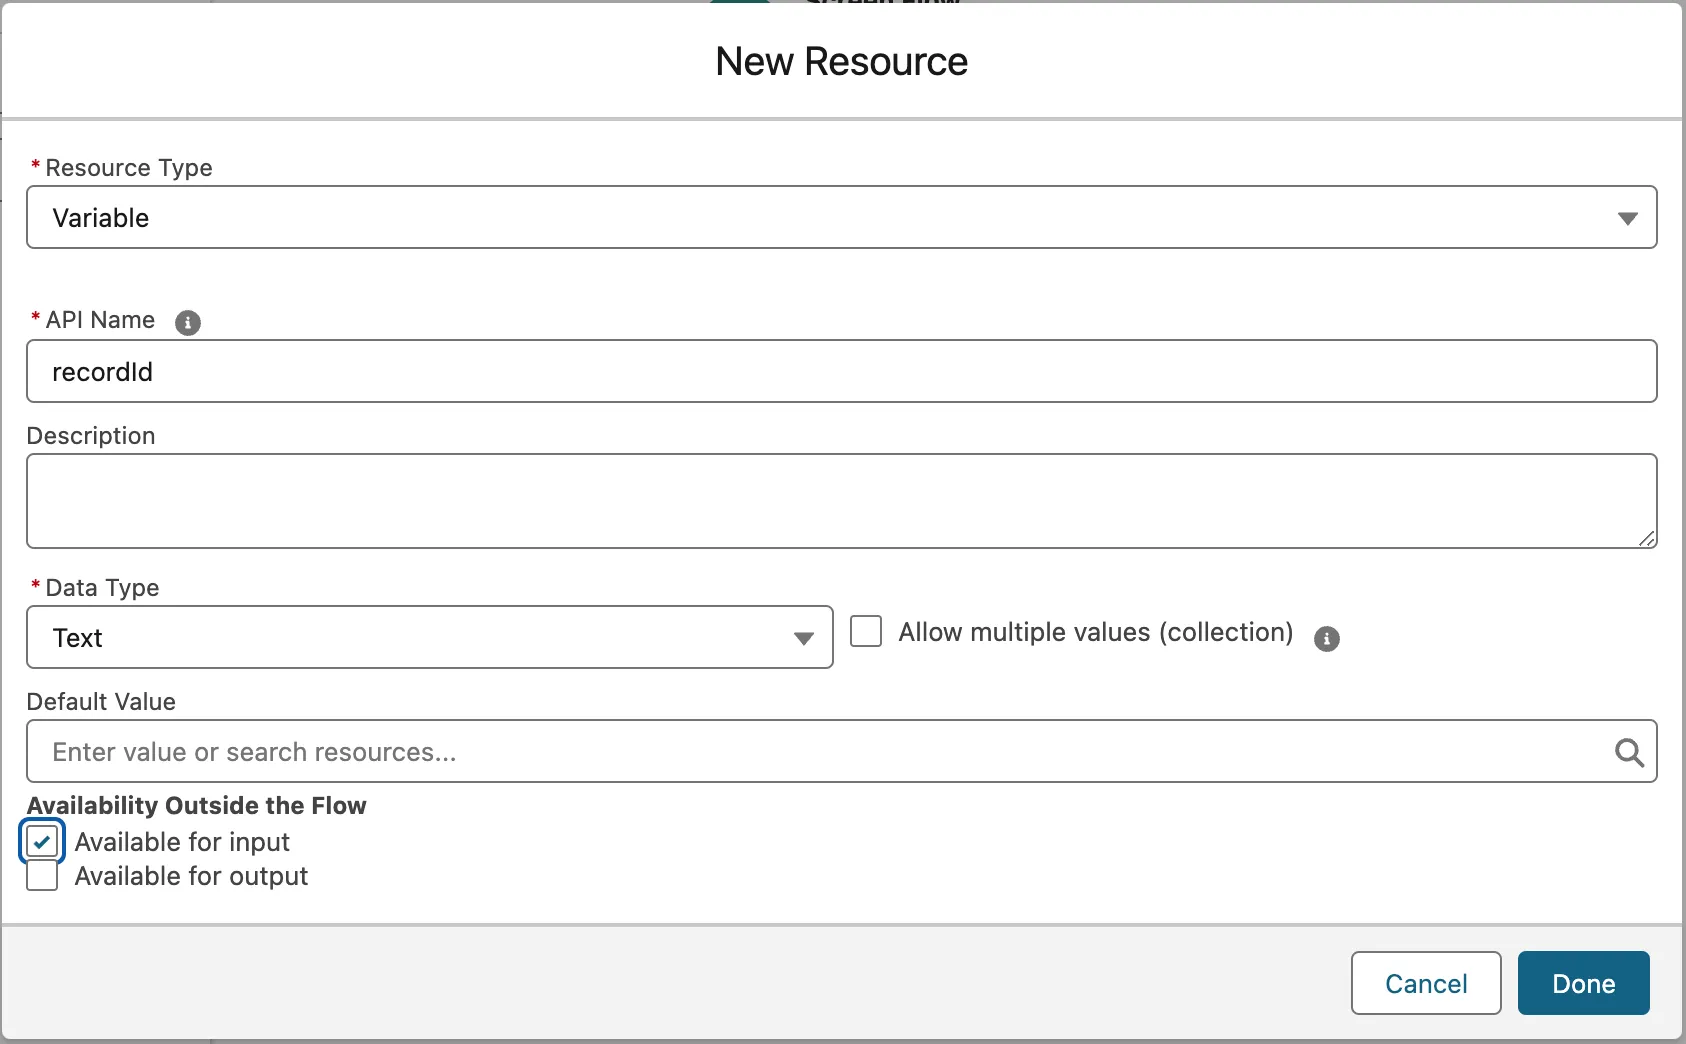
Create a variable named recordId to hold the Id of the record selected to create the new order.
- Resource Type:
Variable - API Name:
recordId - Data Type:
Text - Availability Outside the Flow: Check Available for input
- Resource Type:
-
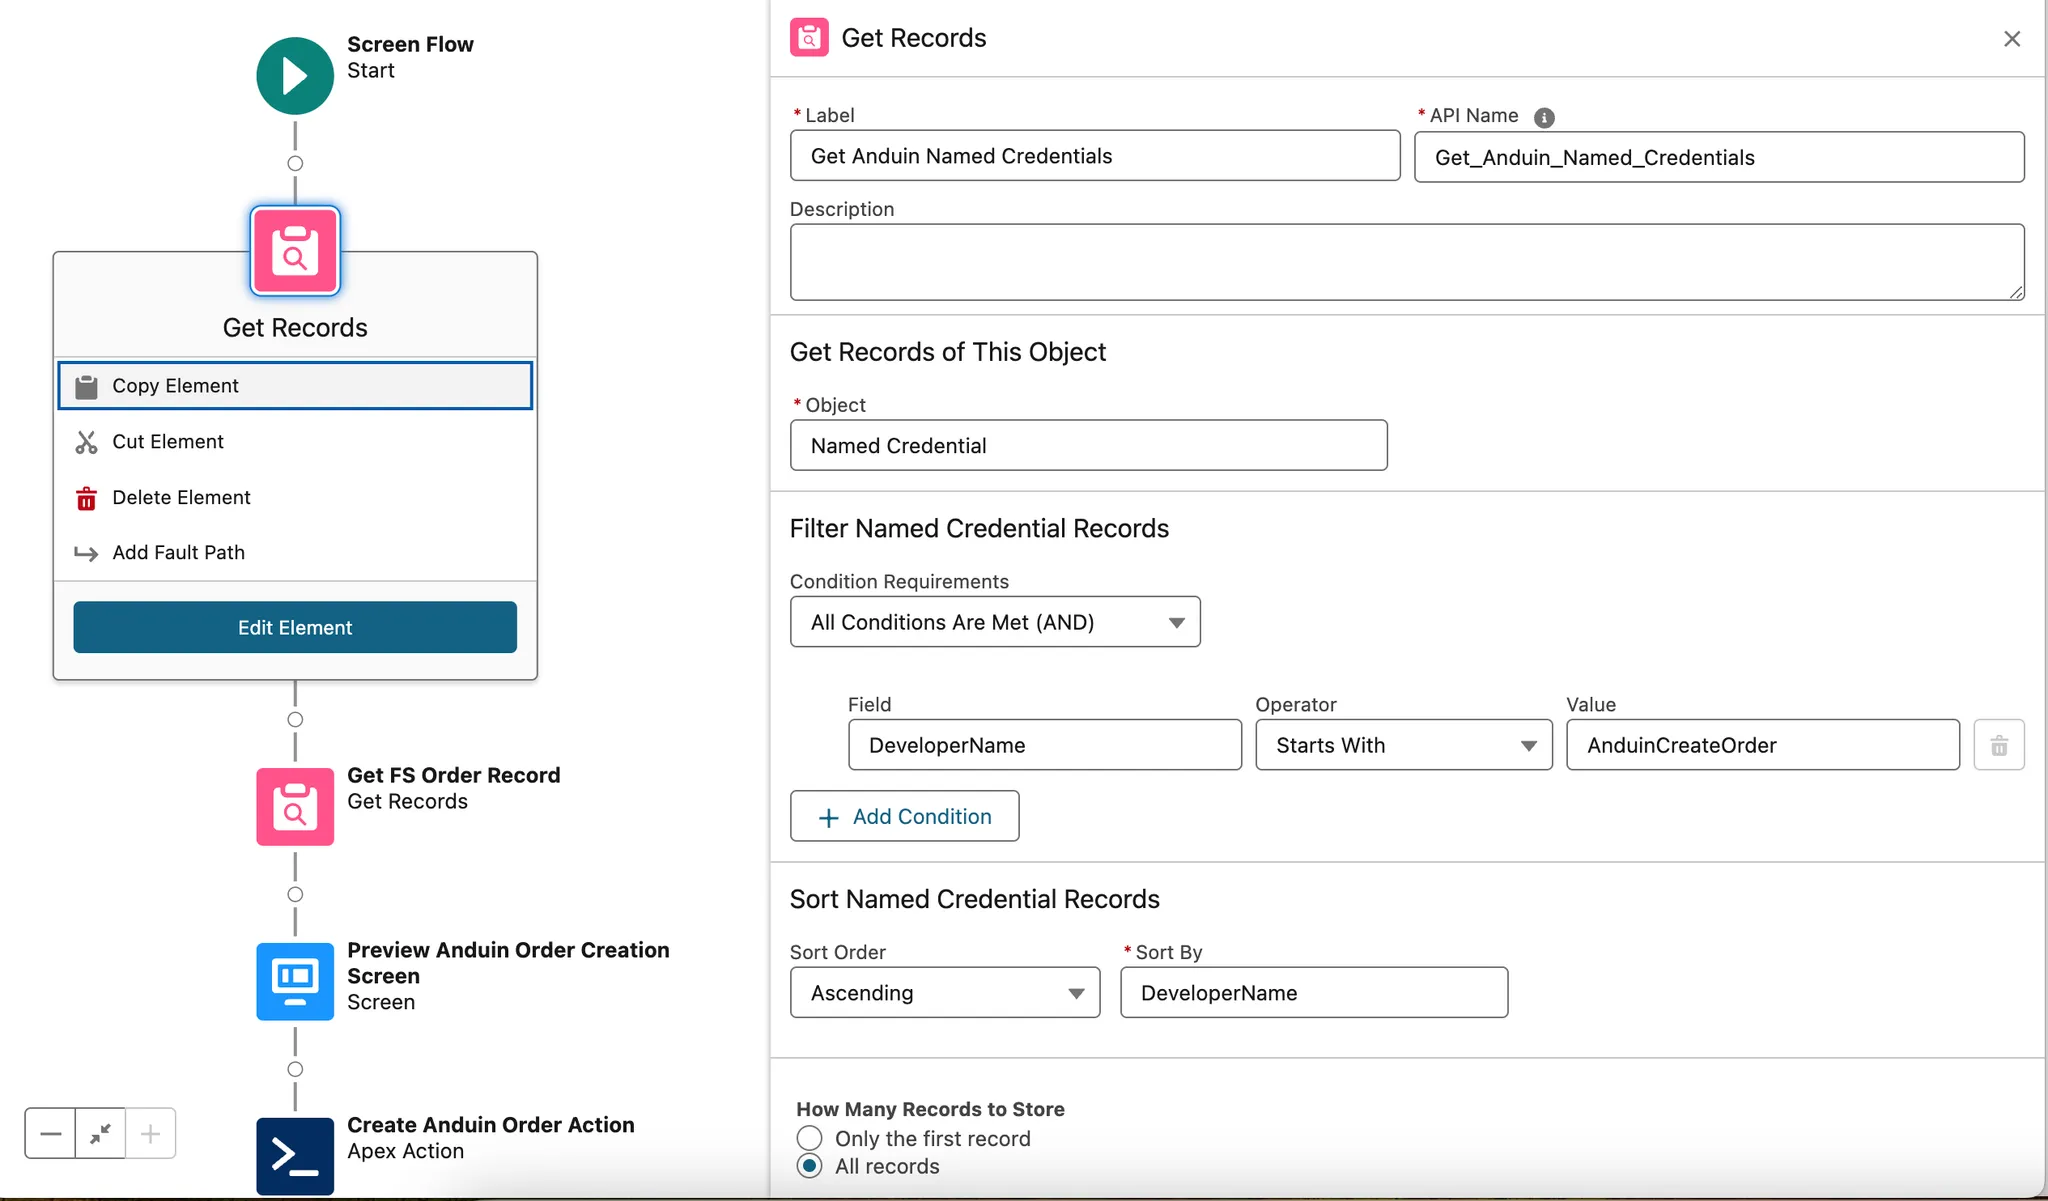
Get Anduin Named Credentials:
This component retrieves all Named Credentials created by the integration. The output of this component is a list of Named Credentials, each represents a fund subscription instance on Anduin. We will use the output of this element to create a picklist that allows users to select which fund subscription on Anduin they wish to create a new order on.
Create a new Get Records element:- Element type:
Get Records - Label:
Get Anduin Named Credentials - Object:
Named Credential - Condition Requirements:
All Conditions Are Met (AND) - Field:
DeveloperName - Operator:
Starts With - Value:
AnduinCreateOrder
- Element type:
-
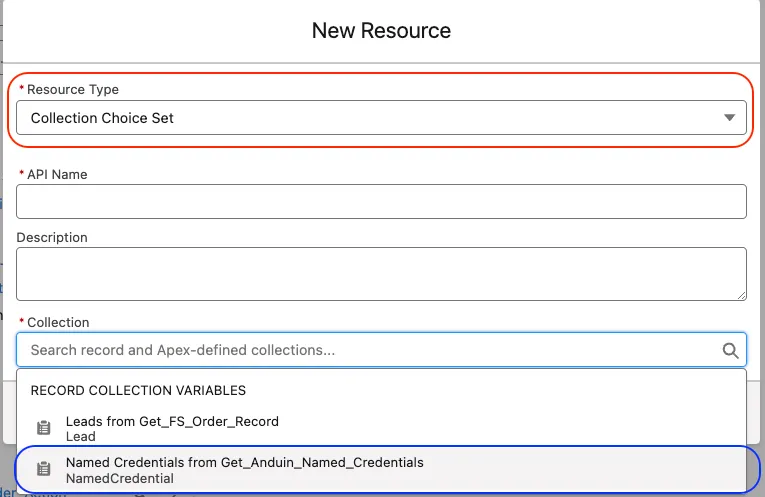
Create a Collection Choice Set Resource:
- Open the left panel and select New Resource.
-
Create a new Collection Choice Set resource to allow selection from the output of the retrieved Named Credentials.
- Resource Type:
Collection Choice Set - API Name:
NamedCredentialChoiceSet - Collection:
Named Credentials from Get_Anduin_Named_Credentials - Choice Label:
MasterLabel - Data type:
Text - Choice Value:
DeveloperName - Click Done.
- Resource Type:
-
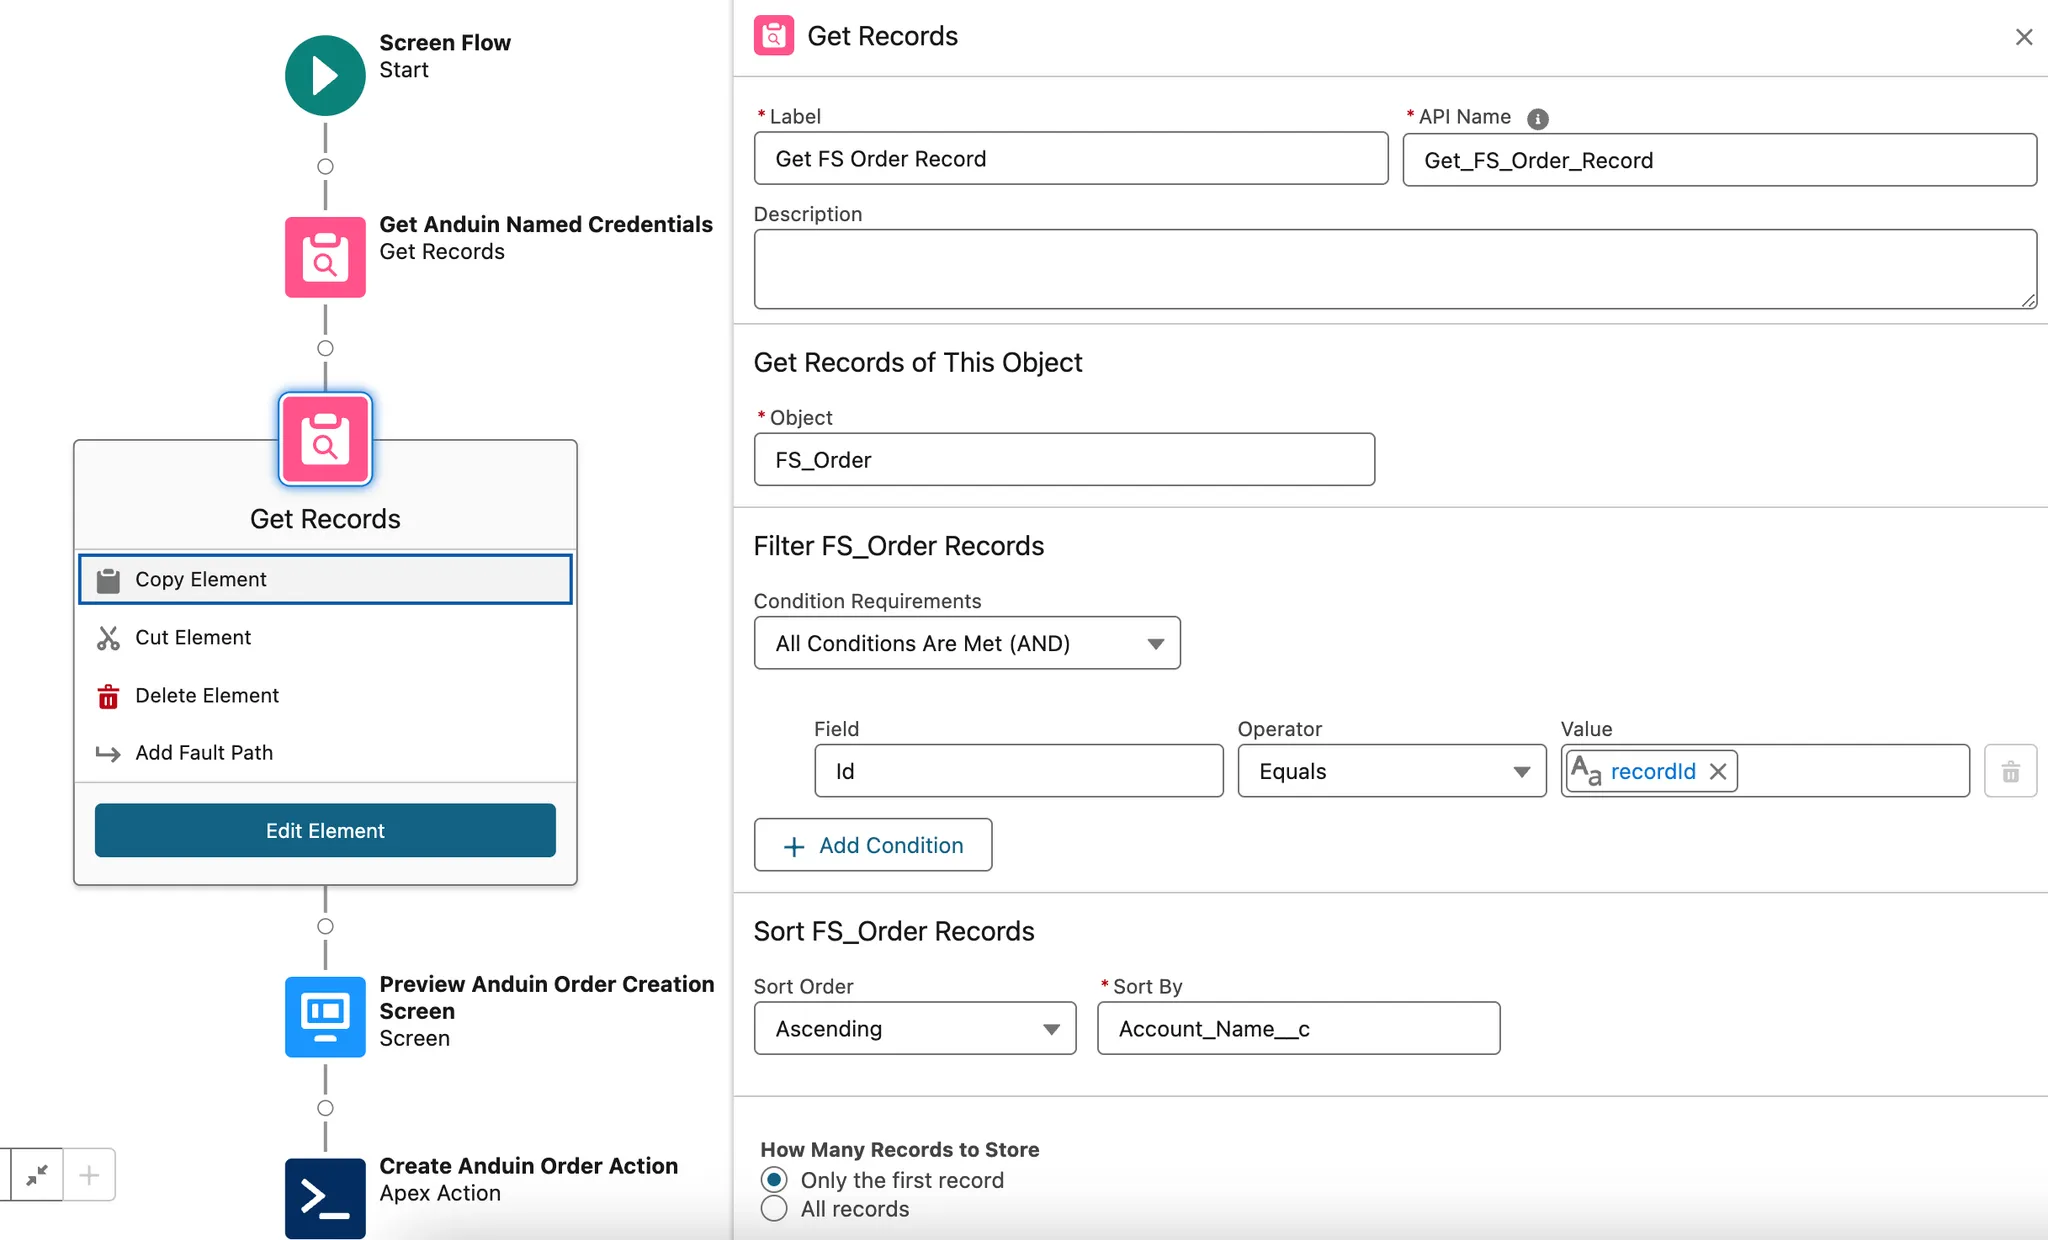
Get FS Order Record:
This element retrieves the record that is used to create and prefill data into the new order on Anduin. We will use the output of this component render some information of the selected record for users to review before proceed to create an order on Anduin.
Create a new Get Records element:
- Element type:
Get Records - Label:
Get FS Order Record - Object: Select the Salesforce object used to create and pre-fill orders on Anduin.
- Condition Requirements:
All Conditions Are Met (AND) - Field:
Id - Operator:
Equals - Value:
Select variable recordId
- Element type:
-
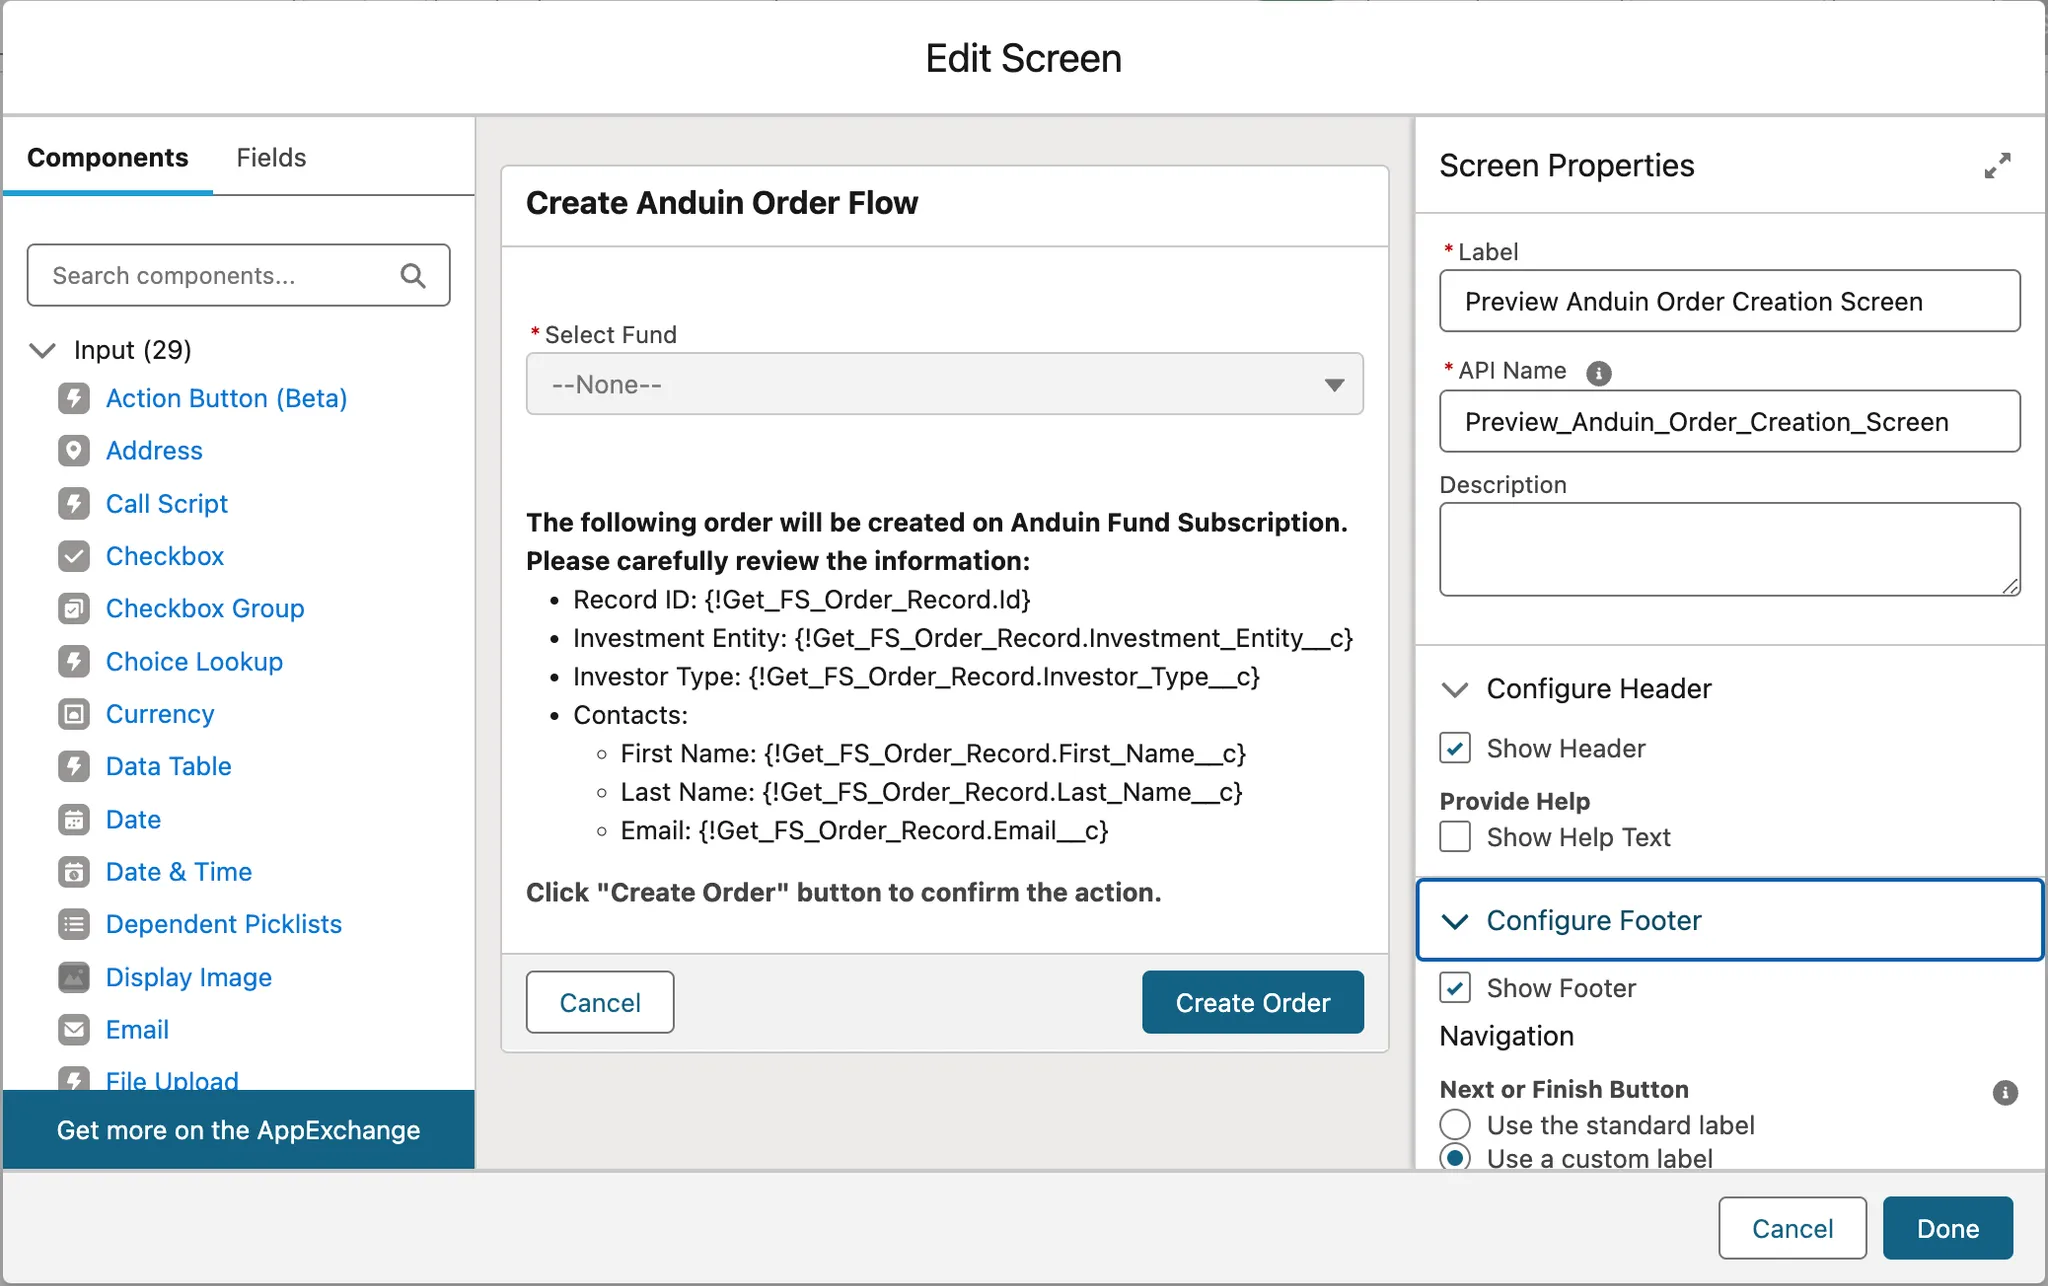
Preview Anduin Order Screen:
Create a screen element for users to select a target fund, preview order information, and confirm order creation on Anduin.
-
Element type: Screen
-
Components:
-
Picklist:
- Component type:
Picklist - Label:
Select Fund - Choice: Select
{!NamedCredentialChoiceSet}, the Collection Choice Set created earlier.
- Component type:
-
Display Text:
- Component type:
Display Text - Content: Design the content to show order information for user review.
- Component type:
-
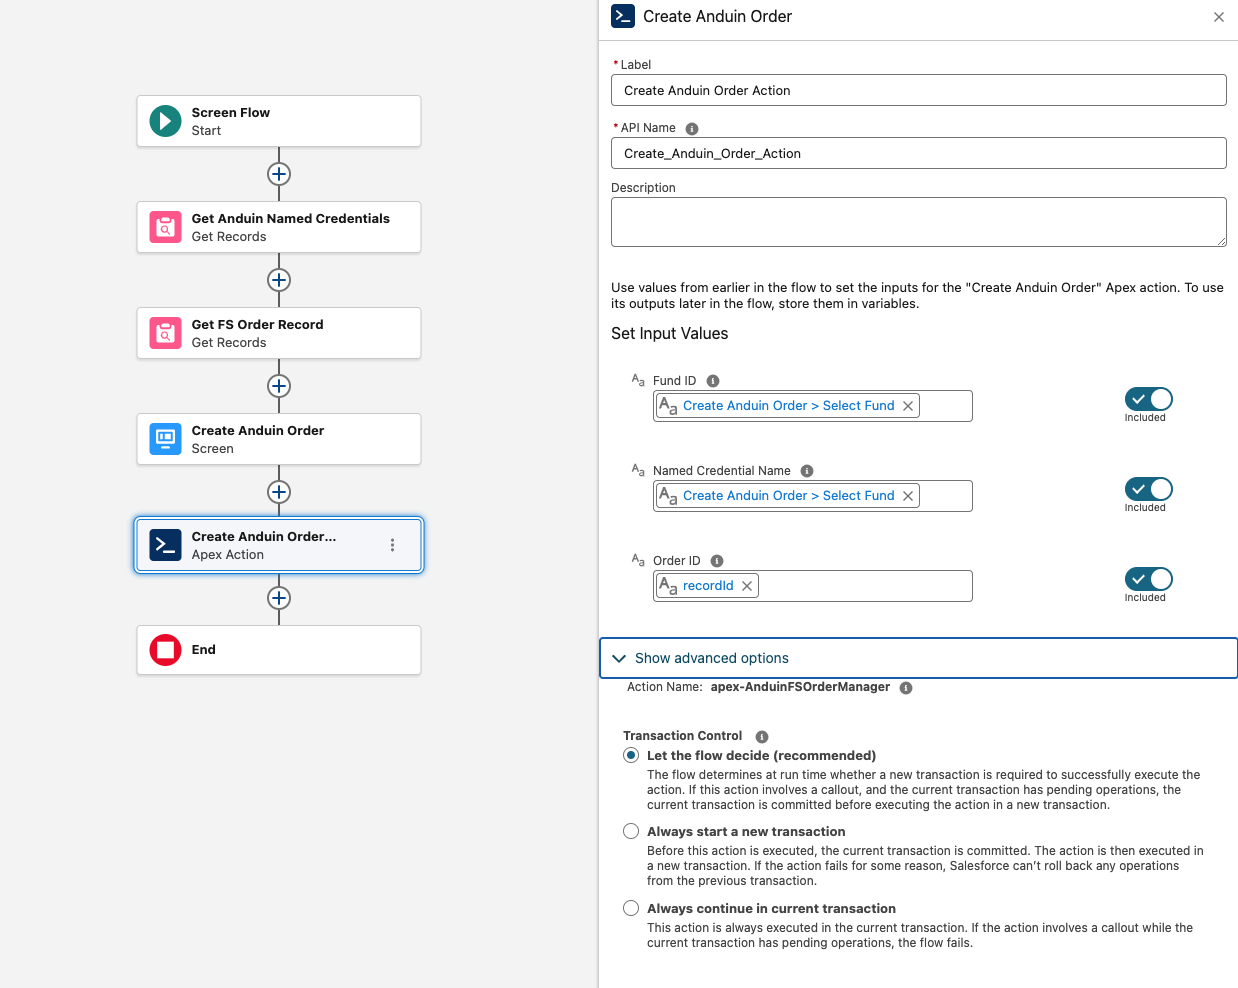
- Create Anduin Order Action:
Create an action element to invoke the pre-populated ApexClass for the configured integration.
-
Element type:
Action -
Search Action:
apex-AnduinFSOrderManager -
Label:
Create Anduin Order Action -
Set Input Values for the Selected Action:
- Fund ID: Select Screen > Preview Anduin Order Creation Screen > Select_Fund
- Named Credential Name: Select Screen > Preview Anduin Order Creation Screen > Select_Fund
- Order Id: Select Single Variables > recordId
-
Save and Activate Flow:
- Save a new version of the Flow.
- Activate the Flow by clicking the Activate button in the top right of the Flow Builder screen.
4. Create the “Create Anduin Order” button
This section shows you how to create a button on a Lighting Record Page to open the Screen Flow created in the previous section.
- Navigate to Object Manager:
- In Salesforce, go to Object Manager.
- Select the object used to create and pre-fill orders on Anduin.
- Create New Action:
-
Go to the Buttons, Links, and Actions section.
-
Select New Action.
- Action Type:
Flow - Flow: Select the Screen Flow created in the previous section.
- Standard Label Type:
–None– - Label:
Create Anduin Order - Click Save.
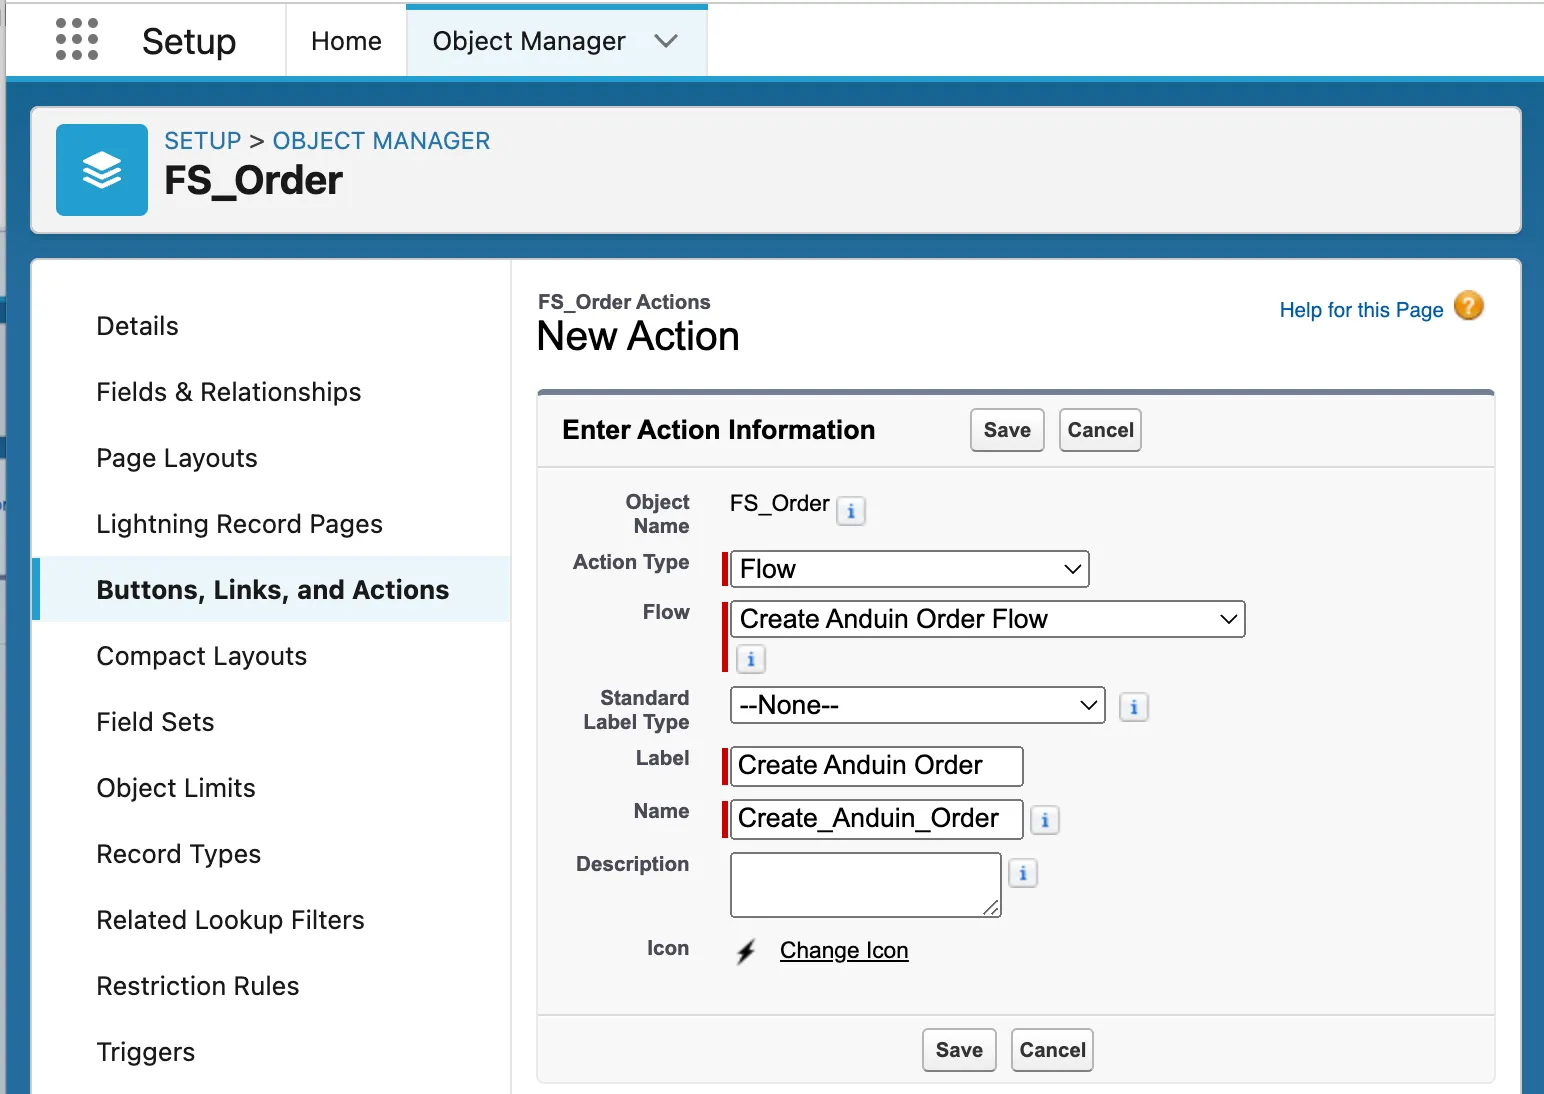
- Action Type:
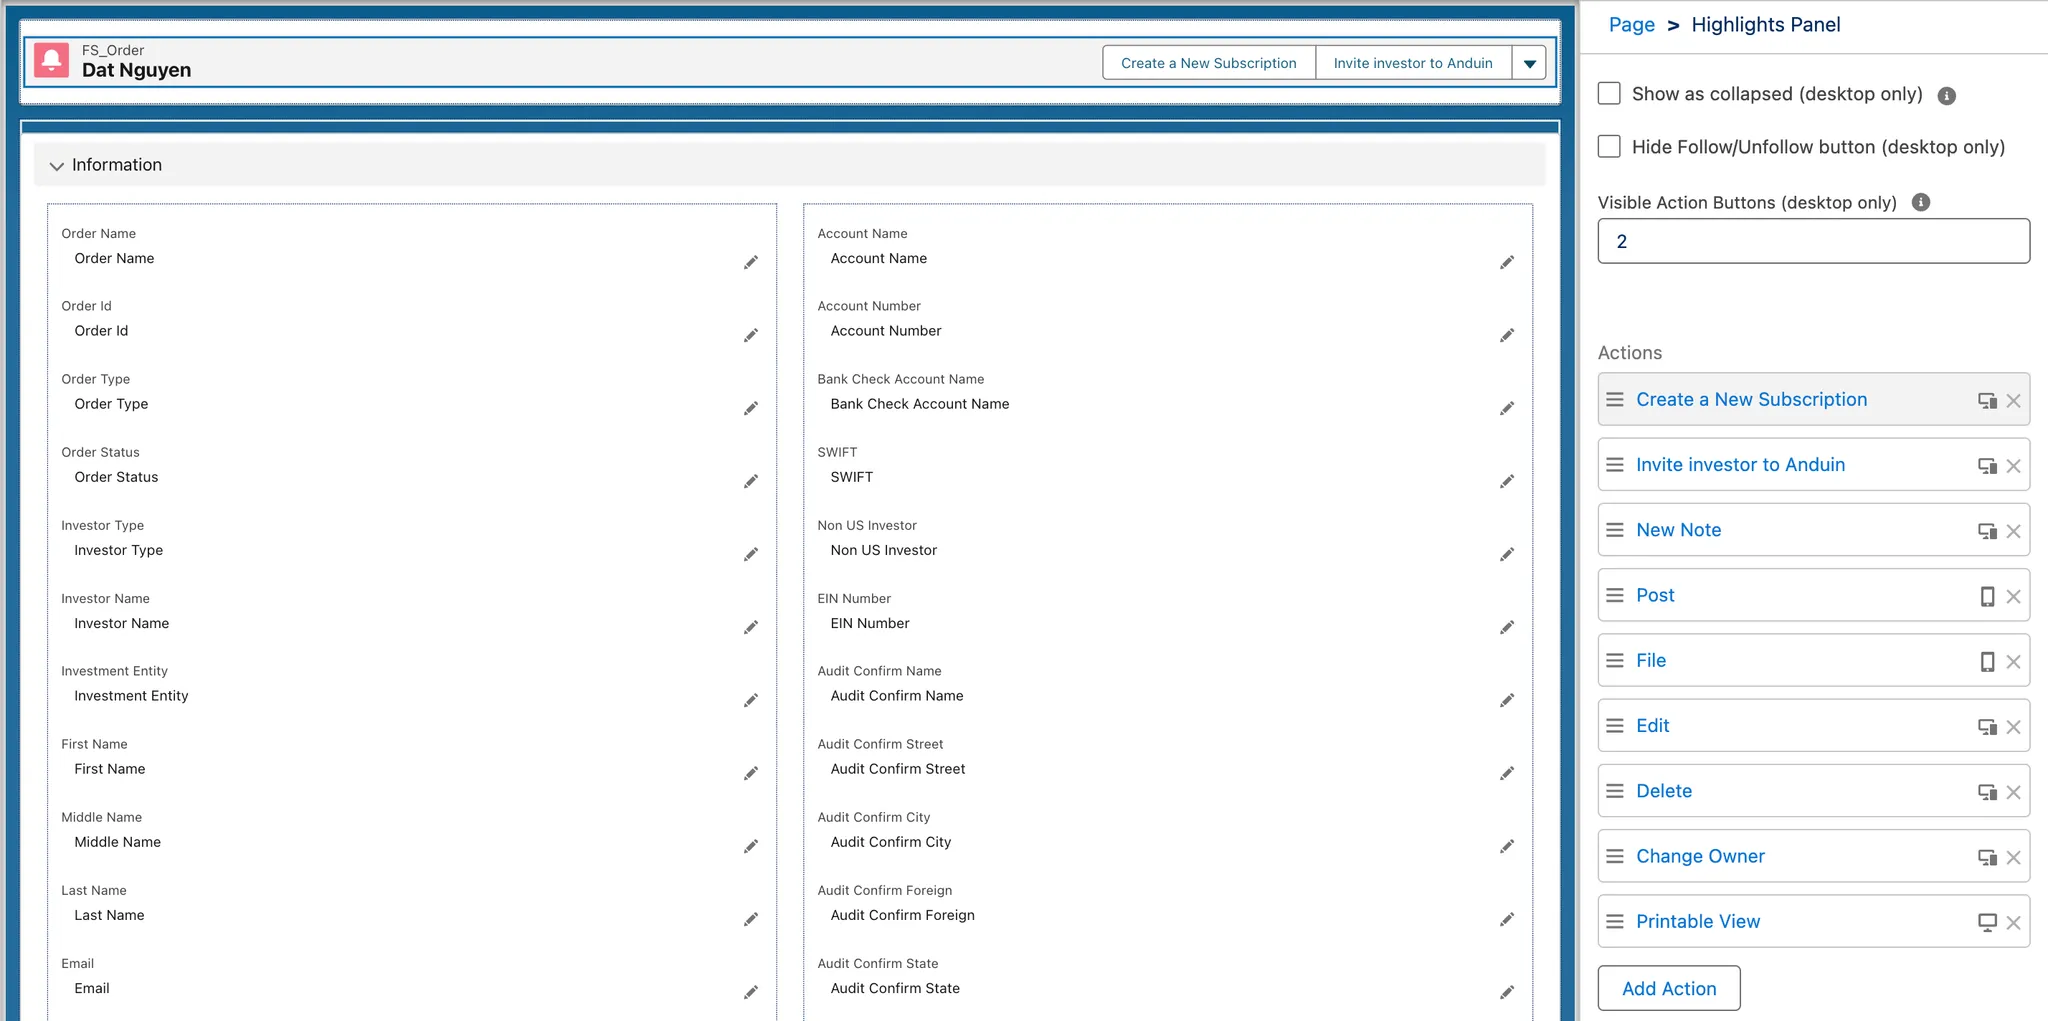
- Add Button to Lightning Record Page:
- Go to the Lightning Record Pages section.
- Select the Page you want to add the button to and click Edit to open the Lightning App Builder.
- Add the button to the desired area of the page. For example, you can “Add Action” to the “Highlights Panel” of the record page, as shown in the screenshot below. Once saved, you can navigate to the target object and trigger the flow with that button
Production setup
1. Object creation
Navigate to our configuration wizard (Use case 1) and replace your Salesforce credentials with production info. Once done, the following objects will be automatically created in your Salesforce production:
- Named Credential:
- Label:
[FundName](FundNameis the name of the fund subscription instance selected in step 3 - URL: The URL of the “Create Orders in Anduin” flow, which can be found in the “Trigger details” of step 1
- Authentication:
- External Credential:
Credential: [FundName](as described below)
- External Credential:
- Label:
- External Credential:
- Label:
Credential: [FundName] - Name:
AnduinSFDCCredential_[InstanceId]InstanceIdis the unique ID of the instance of the configured integration.
- Authentication Protocol:
Custom - Related Named Credentials:
- Include the Named Credential created by the integration as described above
- Custom Header:
- Name:
Api-Key - Value: The API key of the “Create Orders in Anduin” flow, found in the Trigger details of step 1
- Name:
- Label:
2. Deploy Apex Class from Sandbox to Production
To deploy an Apex class from a Sandbox to a Production environment in Salesforce, you can follow these steps using the Change Sets method, Salesforce CLI (SFDX), or Ant Migration Tool. Here’s a detailed guide for Change Sets approach
2.1 Ensure Apex and Apex Class are available in Sandbox
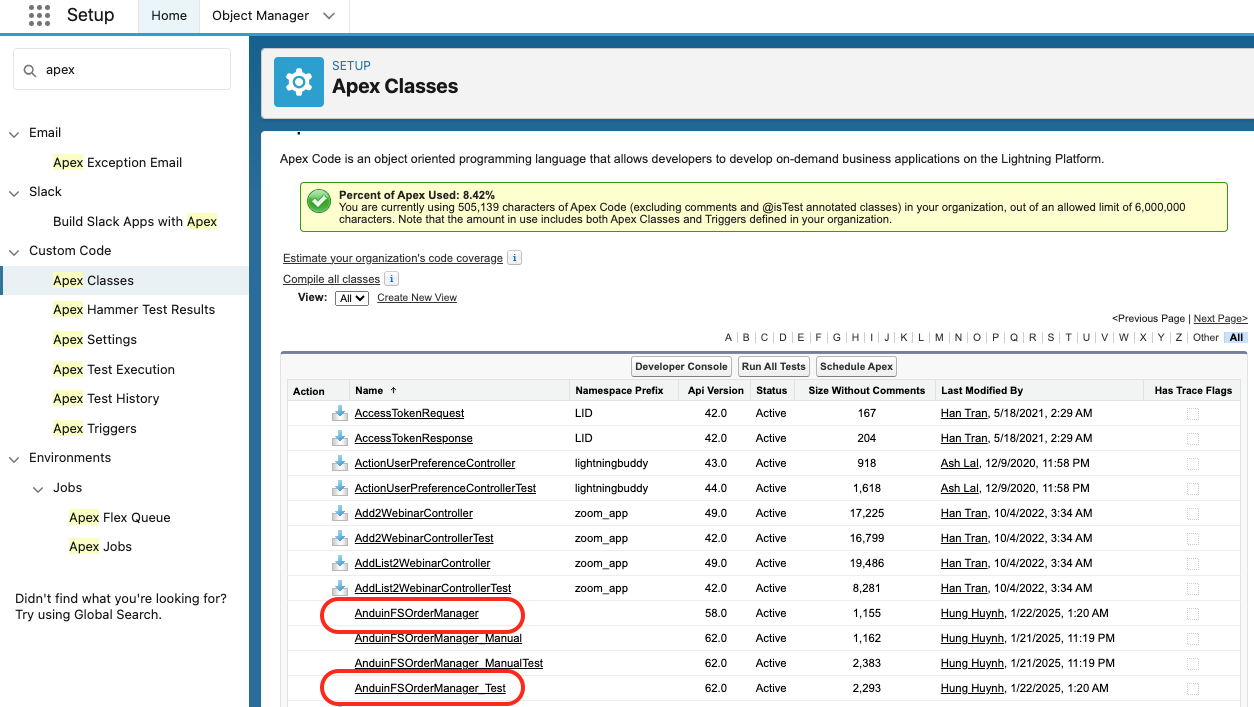
- In your Sandbox environment, go to Setup > Apex Class and confirm that both
AnduinFSOrderManagerandAnduinFSOrderManagerTestare available. These classes might be missing if you skipped the Sandbox stage and proceeded directly to the Production setup.
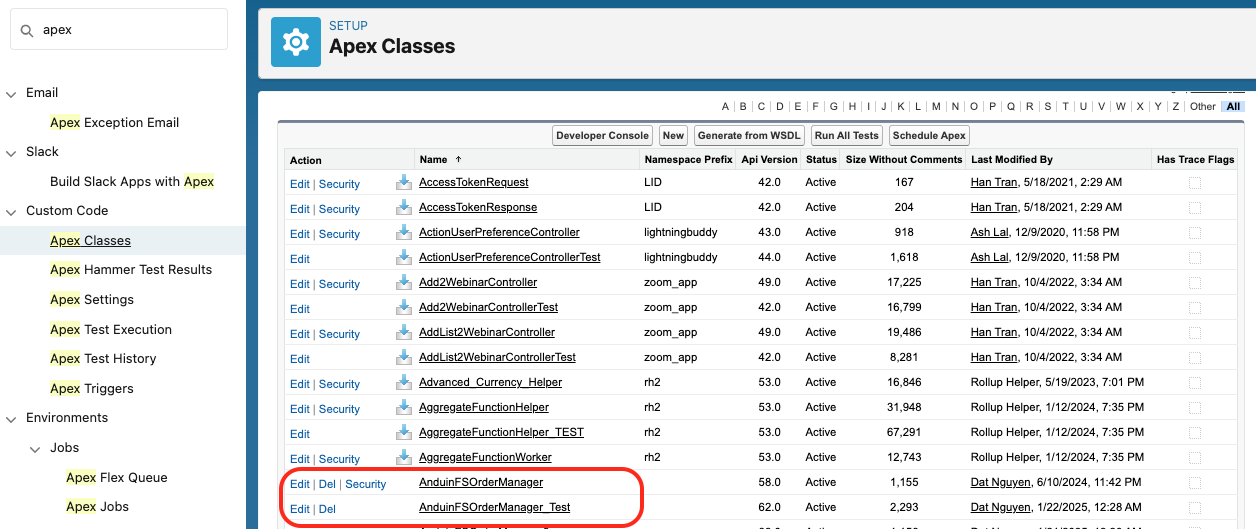
- If not, please manually create them by navigating to Setup > Apex Class > New, and paste the code snippet provided below. This will allow you to create a new Apex Class named '
AnduinFSOrderManagerand Apex Test Class namedAnduinFSOrderManagerTest, which will be used in a later step.
public with sharing class AnduinFSOrderManager {
        public class OrderRequest {
            @InvocableVariable(label='Order ID')
            public String orderId;

            @InvocableVariable(label='Named Credential Name')
            public String namedCredentialName;

            @InvocableVariable(label='Fund ID')
            public String fundId;
        }

        @InvocableMethod(label='Create Anduin Order' description='Creates a subscription order in Anduin Fund Subscription')
        public static void invite(List<OrderRequest> requests) {
            for (OrderRequest request : requests) {
                sendInvitationAsync(request.orderId, request.namedCredentialName, request.fundId);
            }
        }

        @future(callout=true)
        private static void sendInvitationAsync(String orderId, String namedCredentialName, String fundId) {
          // Retrieving Named Credential for secure API call
          String endpoint = 'callout:' + namedCredentialName;

          // Setup HTTP request
          HttpRequest req = new HttpRequest();
          req.setEndpoint(endpoint);
          req.setMethod('POST');
          req.setHeader('Content-Type', 'application/json');
          req.setBody('{"order_id":"' + orderId + '", "fund_id":"' + fundId + '"}');

          // Send HTTP request
          Http http = new Http();
          HttpResponse res = http.send(req);
          // Handle the response as needed
        }
      }
@isTest
public class AnduinFSOrderManagerTest {
@isTest
static void testInviteMethod() {
List<AnduinFSOrderManager.OrderRequest> requests = new List<AnduinFSOrderManager.OrderRequest>();
AnduinFSOrderManager.OrderRequest req1 = new AnduinFSOrderManager.OrderRequest();
req1.orderId = '12345';
req1.namedCredentialName = 'Test_Named_Credential';
requests.add(req1);
AnduinFSOrderManager.OrderRequest req2 = new AnduinFSOrderManager.OrderRequest();
req2.orderId = '67890';
req2.namedCredentialName = 'Test_Named_Credential';
requests.add(req2);
Test.setMock(HttpCalloutMock.class, new MockHttpResponseGenerator());
Test.startTest();
AnduinFSOrderManager.invite(requests);
Test.stopTest();
}
@isTest
static void testSendInvitationAsync_WithInvalidNamedCredential() {
List<AnduinFSOrderManager.OrderRequest> requests = new List<AnduinFSOrderManager.OrderRequest>();
AnduinFSOrderManager.OrderRequest req = new AnduinFSOrderManager.OrderRequest();
req.orderId = '12345';
req.namedCredentialName = 'Invalid_Named_Credential'; // Simulating an invalid credential
requests.add(req);
Test.setMock(HttpCalloutMock.class, new MockHttpResponseGenerator(500, 'Error'));
Test.startTest();
try {
AnduinFSOrderManager.invite(requests);
} catch (Exception ex) {
System.assert(ex.getMessage().contains('Error'), 'Exception should be thrown for invalid named credential');
}
Test.stopTest();
}
private class MockHttpResponseGenerator implements HttpCalloutMock {
private Integer statusCode;
private String responseBody;
public MockHttpResponseGenerator() {
this.statusCode = 200; // Default to success
this.responseBody = '{"success": true}';
}
public MockHttpResponseGenerator(Integer statusCode, String responseBody) {
this.statusCode = statusCode;
this.responseBody = responseBody;
}
public HttpResponse respond(HttpRequest req) {
HttpResponse res = new HttpResponse();
res.setStatusCode(this.statusCode);
res.setBody(this.responseBody);
return res;
}
}
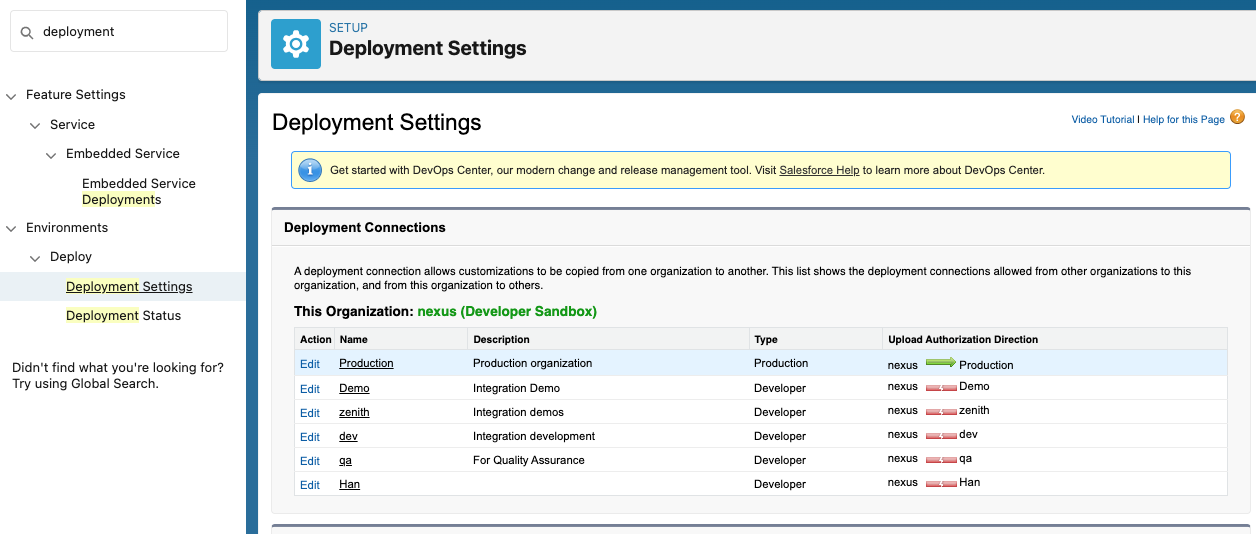
}2.2 Ensure your Sandbox and Production are connected
- Go to Setup > Deployment Settings and verify that the Sandbox can push changes to Production. For example, my Sandbox is named "Nexus," a green arrow indicates the connection is active. If you see a broken red arrow, please establish the connection to proceed.
2.3 Setup and push Apex from your Sandbox
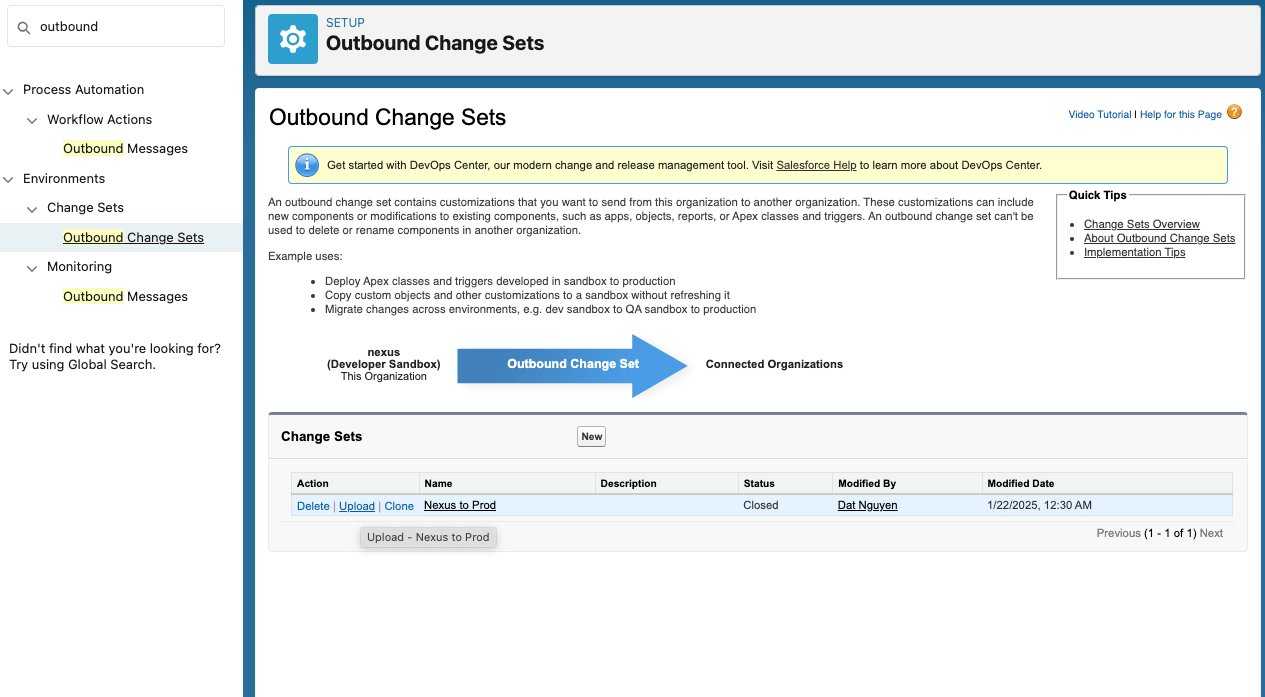
- Navigate to Setup > Outbound change sets > New
- Create and name your outbound change set
- Under Change Set Components section, add the previously mentioned Apex Class components:
AnduinFSOrderManagerandAnduinFSOrderManagerTest.
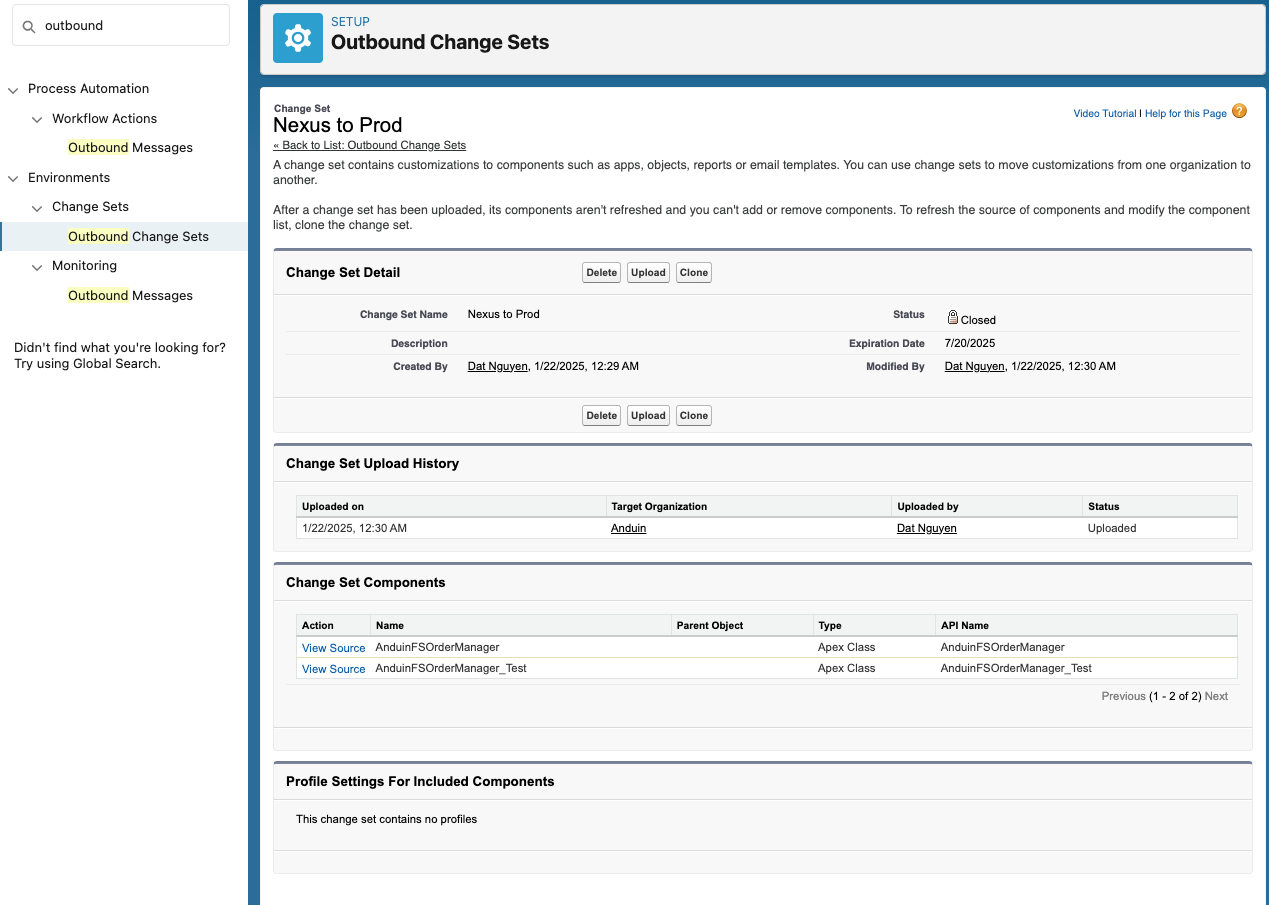
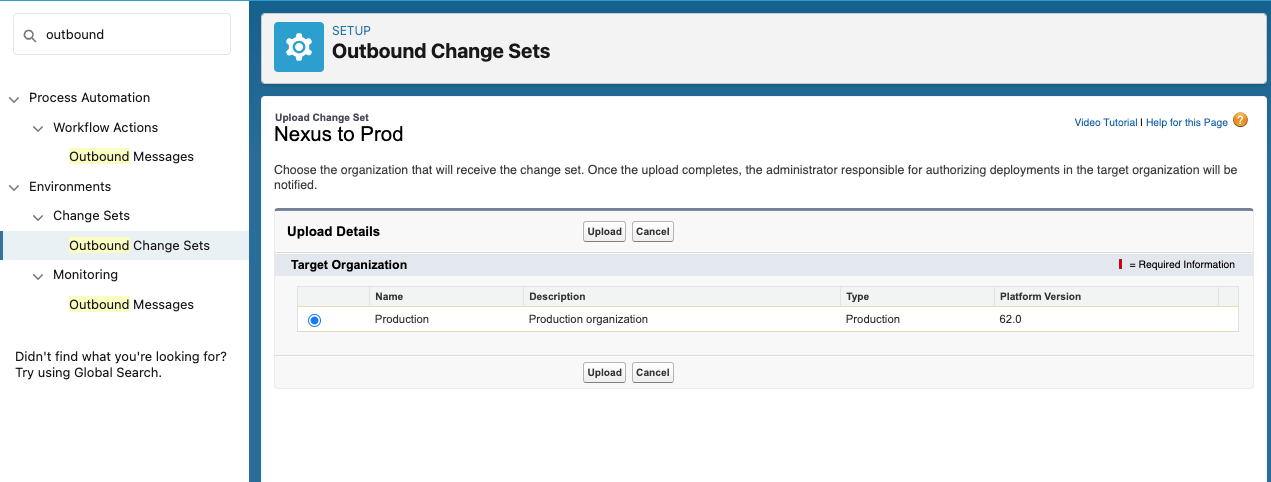
- Go back and select Upload
- Select the target Production environment for deployment, click Upload, and wait a few seconds until the system confirms a successful upload.
2.4 Approve the Apex in your Production
- Go to Setup > Inbound Change Sets in your Production environment.
- Click Validate, then select Deploy to successfully retrieve and deploy the Apex Class from your Sandbox.
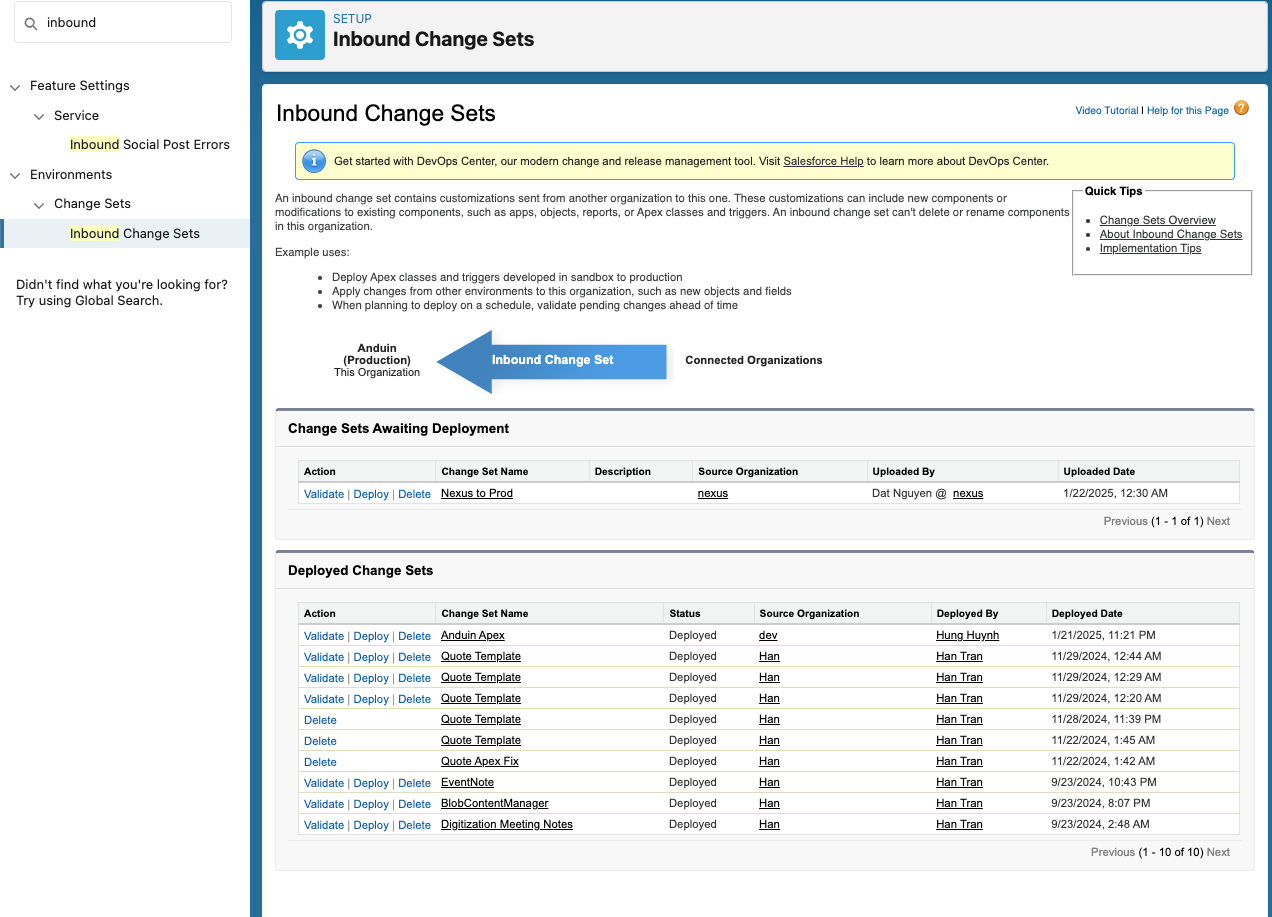
- Go to Setup > Apex Class in your Production environment, and verify that the Apex Class has been successfully created and is visible.
3. Remaining steps
- After the Apex Class is successfully created, repeat all the remaining steps from the Sandbox setup, and you’re good to go!
Updated 10 months ago